FPV Camera Control is a new feature in Betaflight flight controllers that allows you to access your camera setting menu using your radio transmitter sticks.

To change your FPV camera settings such as brightness, contrast, sharpness etc, you normally have to plug in a joystick (a.k.a OSD controller), like this:

FPV Cameras are supplied with a menu control joystick
Now, with the “Camera Control” feature in Betaflight, you can access the FPV camera settings using your radio transmitter! This is achieved by emulating OSD joystick inputs in the FC software.

Camera control allows you to access the FPV camera setting menu using your TX sticks via the FC
With Camera Control you would be able to adjust your camera settings according to the different lighting condition and environment. This allows your FPV camera to always perform well wherever you fly.
Update (March 2018): There is now another option for camera control using UART rather than the OSD pin on the camera.
Further Reading: How to choose an FPV Camera for Drones
Hardware Setup
Some flight controllers offers a dedicated pin for camera control, such as the CL Racing F7. All the hardware is there and set up for you to use straight out of the box. If yours doesn’t have this then you’d have to go through the rest of this guide to set it up.
Table of Contents
Finding the pin on the FC
First of all, choose a spare pin on the FC to connect to the camera’s OSD control. It doesn’t have to be a UART, any pin with a dedicated timer would do. Timer?! What is it?
If you don’t know what a timer is, don’t worry about it :) Just use the LED_Strip pin or any spare motor output. These pins almost always have their own dedicated timer, and they are perfect for camera control.
Resistor and Connection
You will need to add a resistor in the connection between the FC and camera. The resistor should be 150ohm – 600ohm, the lower the better.
In this example, I am using a 220ohm resistor, connected to the LED_Strip pin on the FC (Kakute F4 AIO V2).

Camera Control OSD Pin Connection to FC
The required resistor can be a hassle to many pilots. Therefore some FC manufacturers are beginning to build that resistor into their flight controllers. This might save you from doing it manually and everything would be plug and play. If they do have this feature in the FC, it should be advertised clearly and there should be a pin labelled as “camera control”.
Betaflight will soon use the pin “DAC” as a dedicated camera control pin, as long as your FC has the DAC output, there will be no more resistor or capacitor required for it to work in the future. This is not ready yet, but when it does we will update our guide.
Measure Reference Voltage
Power on your camera, and measure the voltage between the OSD pin and ground with a multimeter. Write it down somewhere, you will need to enter it in Betaflight CLI later (camera_control_ref_voltage).
For example, I have 3.19V on my Runcam Eagle 2 Pro.
Adding Capacitor (only needed on some cameras)
Larger cameras (i.e. standard size including the Swift and HS1177) should have enough capacitance in the OSD pin to make camera control work, so a capacitor is not needed. On some micro and mini cameras, your might need to add an extra capacitor between 0.1uF and 10uF, the larger the better.
Unless your camera is known to require a capacitor, I wouldn’t worry about it, only try to add the cap when nothing works. Anyway it doesn’t hurt to put one in if you insist :)
The cap should be installed on the camera’s side.

Connection of Resistor and Capacitor required for Camera Control
I have tested the following cameras and they all work without a capacitor: Swift, Eagle 2, Eagle 2 Pro, Owl, Owl 2, Swift Mini, and Micro Swift 2.
Betaflight Setting
Make sure you have the latest Betaflight firmware installed on the FC (at least BF3.2).
You will need to use Resource Remapping, if you are unfamiliar with the feature make sure to check out my tutorial.
Assigning Pin for Camera Control
Type “Resource” in CLI, and search for the pin you have connected to the camera OSD pin. In our example it’s LED_Strip, and C08 is the pin number we are after.
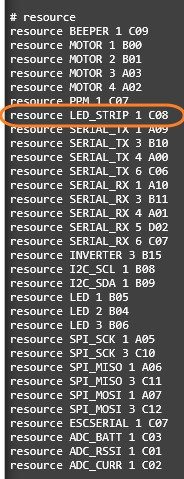
Note: You must run the resource command to find out which pin is used for LED_STRIP, because every FC can be different.
Copy and paste that line in the text box, and change C08 to none, and hit enter – this will free up the pin first
resource LED_STRIP 1 none
Paste that same line again in the text box, this time change LED_STRIP to camera_control, and hit enter
resource camera_control 1 C08
Camera Control Settings
There are 4 settings related to camera control, here are the default settings:
camera_control_mode = HARDWARE_PWM Allowed values: HARDWARE_PWM, SOFTWARE_PWM, DAC camera_control_ref_voltage = 330 Allowed range: 200 - 400 camera_control_key_delay = 180 Allowed range: 100 - 500 camera_control_internal_resistance = 470 Allowed range: 10 - 1000
camera_control_ref_voltage – Change this value to what we measured earlier using the multimeter, for example we have 3.19V with the Eagle 2 Pro, so we can change it to 319.
Camera_Control_Key_Delay – You might need to adjust this parameter depends on the electrical condition of the camera and your flight controller. If double-click happens when you only move the stick once, or if scrolling is jittering, then increase the delay.
Camera_control_internal_resistance – It can be complicated to calculate this value, if default value doesn’t work then check out the link in the Troubleshoot section.
Camera Control Using Transmitter Sticks
- Enter/Confirm – mid throttle, and yaw right
- Up/Down – Pitch stick
- Left/Right – Roll stick
Troubleshoot & Resources
If it’s not working, here is the official documentation including some tips on how to troubleshoot.
There is a thread on RCGroups with many different cameras, FC and settings reported to work by users.
20 comments
I tried also this for my analog drone but no success, set the resistor to 330 ohm, tested the voltage and every other hardware components, to problem is that the pin PMW doesnt put any output nomater what I have tried to set in soft. EG : Camera_control in modes, set CAMERA_CONTROL = C09 and TIMER C09 NONE none of witch yelded a pmw output on the pin
I tried hundreds of settings in Betaflight but could not get it to work. Soldered a 330 ohm resistor to the osd able but still no joy. After trolling dozens of forms there was someone talking about yaw settings in an unrelated matter when it occured to me that maybe yaw right was the problem just like yaw left to arm the drone can also be an issue. I got my transmitter and went to the page where you set up the 1000-2000 end points and my yaw endpoint was set to 2000 at 97.5% changed that to 100% which gave me 2011 as the max endpoint. Armed the drone and put the stick full right and bingo up came the camera control menue. Seems that not having enough travel on the yaw stick is an issue that might help fix things for some people.
I used the stock Betaflight camera control settings with a 330 ohm resistor spliced into the osd cable on a JB f4 fc and a Foxeer HS1177 camera. Hope this helps anyone who was stuck like me.
Hi Oscar i have Foxeer T-rex camera with Kakute F7 FC with the latest BF 4.2.8.
Kakute F7 has dedicated NC pin for that
Everything works but why to access OSD menu I need to push roll left at mid throttle instead of yaw right ??
im using the Mode 2 and in Receiver BF menu everything is assigned properly.
Im missed something ?
Because that’s the camera’s own OSD.
Betafligth OSD uses a different stick combo to activate, so they don’t conflict.
I am curious how I disable camera control? I had this setup, but it wasn’t completely working. When I would try to go into the Betaflight OSD menu, the camera’s OSD menu would trigger, so I removed camera control since it wasn’t completely working and interfering with my use of the BF’s OSD menu. I see there are “Camera Control” modes in the BF modes tab, but I am not sure what those even do and I’ve not turned up much info on them.
Hi Oscar. Always enjoy your work, thank you.
I have camera control assigned to pin B08 in betaflight but no pad marked as camera control. Is there a way to find the corresponding pad if it has a different label. Thanks.
Paul
Hi Oscar,
Why is it better to use low value resistor, such as 150Ohm, for the RC filter?
Hello Oscar I have a speedybee f4 and it has a dac camera controll.
I also have the Foxeer mix 2
How do i make the dac camera control work with the Foxeer mix 2?
Thank you
David
Betaflight hasn’t made DAC working yet AFAIK
As always, the information you provide i useful and detailed.
thank you
so it plugs in to the camera’s GND/OSD port, but is this the same as the GND/MENU port, on something like the JB Micro Eagle? thanks
i’m trying to turn off my cam osd useing my taranis i can change cam settings but can’t get in to turn off the osd.. I was in it once but don’t know how i got there and was out before i could turn osd off.. any help please..
HI Oscar,
Is there another set of pins I can use on the Kakute F4 AIO v2, as I still need the LED ?
In your case, maybe easier to use camera control adapter that connects to the UART.
How do I get in the osd menu so I can change my screen name and voltage readout… I can’t get into that menu. I’m using rr swift 2 cam. Does anyone know the stick command to get into that menu.
Right stick up throttle down you will enter setup for the sub menu
Hi Oscar, I’ve followed your tutorial and everything works until yesterday with my configuration shown below.
FC: Kakute F4 AIO V1
Mode: Hardware_pwm
Resource assignment: A01
Pad or through hole label: LED (pad)
Reference voltage: camera_control_reference_voltage. 330
Internal resistance: camera_control_internal_resistance. 470
Control key delay: camera_control_key_delay. 137 (was 125 but was too slow to respond properly to stick input)
Inline register value for PWM and capacitor if software PWM: N/A
Additional comments: No resistor or cap needed. Just connected the wire from the osd (no ground connected either) pin on the cam, wired it to the LED pad.
Yesterday evening I’ve moved my VTX from T6 pad to M5 and following another your tutorial for soft serial I’ve remapped M5 pad for SmartAudio with SOFTSERIAL 1 because I’ve used T6 and R6 for a gps BN-180. Well, the GPS and SmartAudio works but the camera control doesn’t work but if close SOFTSERIAL 1 camera control works… but obviously I can’t use smart audio..
Can you give me a solution?
Thanks
Just finished a build this weekend with camera control and it works great. Luckily my FC had a specific pad for this (CL Racing F4S) so it was basically solder and play, no resistor needed. One thing I did find was that you cannot turn off the Runcam OSD display (battery and name) using the CC feature. I had to plug in the joystick to turn it off since it’s a separate menu and entered differently. Once that was off I could control all other features through my TX and goggles. Along with the BF and smart audio features accessible from the TX, this gives you full control.
I tried a Runcam Swift 2 wired to the CAM_C pin of an CL Racing F4S today, running Betaflight 3.5. I was able to access and navigate the Runcam menu, but I could not Exit (mid-throttle, yaw right worked everywhere but Exit?). Some actions would double click or begin scrolling, so the default `camera_control_key_delay` must be too low.
One thing I notice is the left stick (mode 2) have to be mid throttle and yaw centered for the right stick to register. Just a tip for those having some issue with right stick not working all the time.