
Tuning your FPV drone is easier than it sounds, all you need are your eyes and ears, no Blackbox is required. In this tutorial I will explain the 10 simple steps how I tune my Betaflight 5″ quad for freestyle flying and racing.

Disclaimer: This guide is meant for informational purposes only. The author holds no responsibility for damages resulting from actions taken by the readers.
Table of Contents
What’s Tuning?
Tuning an FPV drone means adjusting settings in the flight controller software to make it fly the way we want. Not just PID gains, there are many settings in Betaflight that affect flight characteristics, including Feedforward, filters, rates and expo etc.
The amount of settings can be overwhelming even for experienced pilots, but I believe by tuning a few key settings described in this tutorial should be enough to surprise you how much better your drone flies.
To properly tune filters and PID, it’s still best to use Blackbox.
Tuning Goals
This tuning guide aims to make your quad:
- smooth cruising, no oscillation, wobbles or drifting
- no bounceback when doing flips and rolls
- as little propwash and wobble as possible when doing extreme manoeuvre
- the drone feels locked in and responsive to sticks
Tuning Rules
When tuning, keep these rules in mind:
- Always use new propellers, if possible get these props I recommended. It’s amazing how much more performance you can get out of the drone with balanced and vibration free props
- Try not to hit anything during tuning, it could mess up the props and tune. Bent props? Replace them.
- If you normally fly with GoPro, put it on during tuning
- Never make big change to settings, always take small steps. Only change one settings at a time to avoid confusion
- Pay attention to motor temperature after landing
Step 1 – Basic Configurations
0. Hardware Checklist
- Choose an FC stack that comes with rubber grommets (aka gummies), soft mounting is great for both durability and noise performance (vibration dampening).
- Use metal screws for the FC stack, avoid nylon/plastic screws/standoffs/spacers as they are easy to break and more likely to create vibrations. If you need spacers, use the soft silicone ones. Using lighter titanium screws can save a few grams (see post).
- Locking the stack screws firmly in place with a metal nut before mounting the 4in1 ESC. If your frame have pressed insert nuts then there’s no need to add another nut. This will prevent the stack screws from wiggling and creating vibrations. Tighten them by hand first, then give a final squeeze with the wrench/screwdriver.
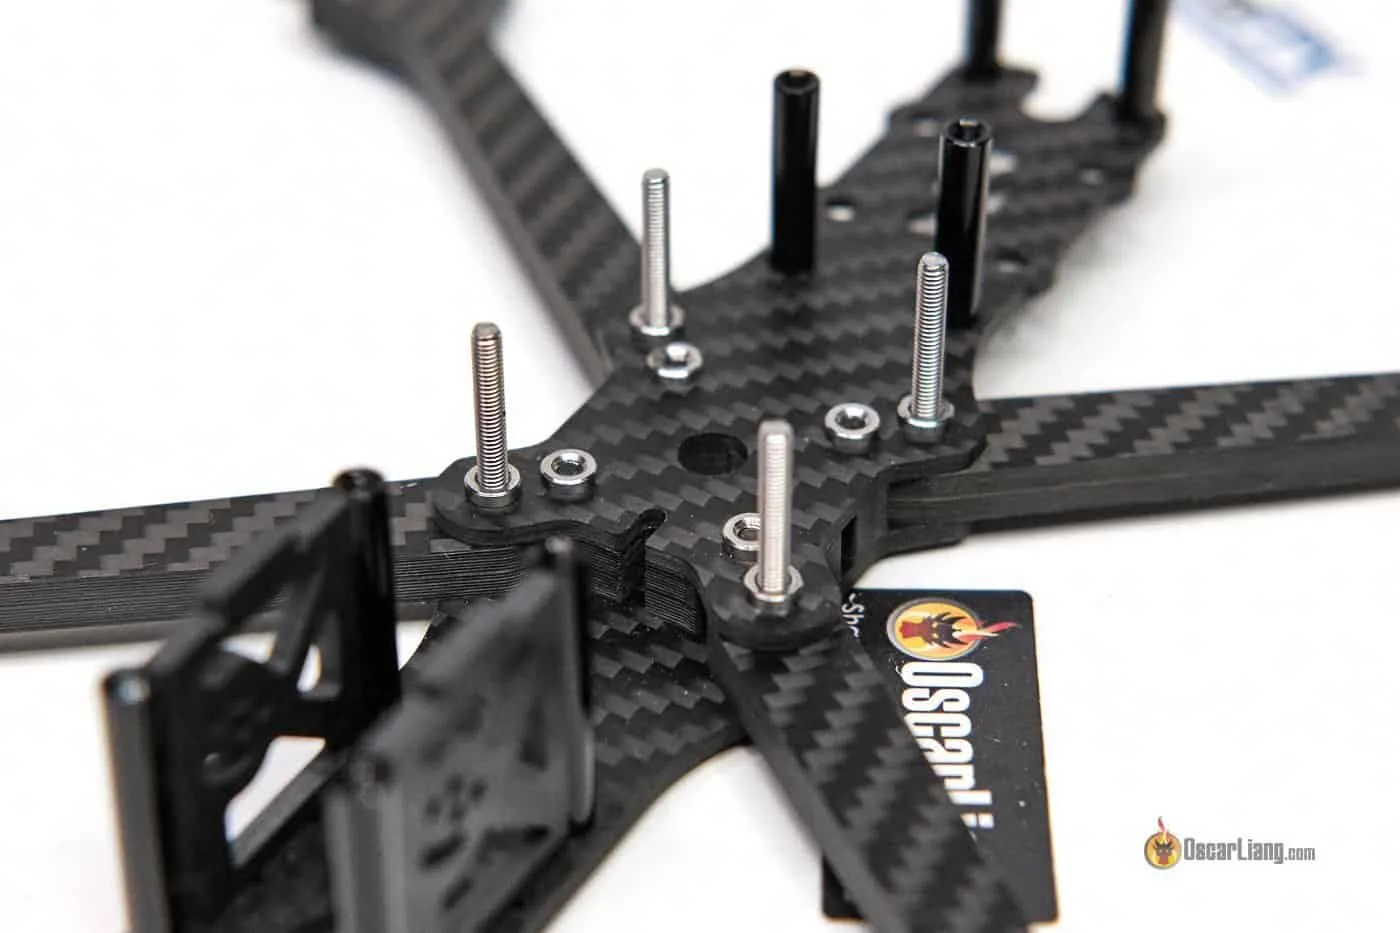
To secure the whole FC stack, you can use 4 plastic nuts. Tighten the nuts by hand, so that the gummies are not excessively crushed, this allows the soft-mount to work effectively.

Before we start, apply he following configurations.
1. Disable ADC filter in your OpenTX/EdgeTX radio (System->Hardware). This will reduce latency.

2. Enable RPM filter, this is probably the best filter in Betaflight.
Almost all modern ESC support it. I have a tutorial on how to enable RPM filter. BLHeli_32 ESC works out of the box, but if you have BLHeli_S ESC, you need to flash Bluejay firmware (tutorial) first.

3. ESC settings:
Optimize your ESC settings:
- For BLHeli32, follow this guide: https://oscarliang.com/best-blheli-32-settings/
- For BLHeli_S ESC, flash Bluejay so you can use RPM filter and Dynamic Idle: https://oscarliang.com/bluejay-blheli-s/
When it comes to PWM frequency, 24KHz has better braking which is better for prop wash handling and responsiveness, while 48KHz is smoother and less likely to have vibration issues. If you are on the fence, go with 48KHz as it’s the safer option.
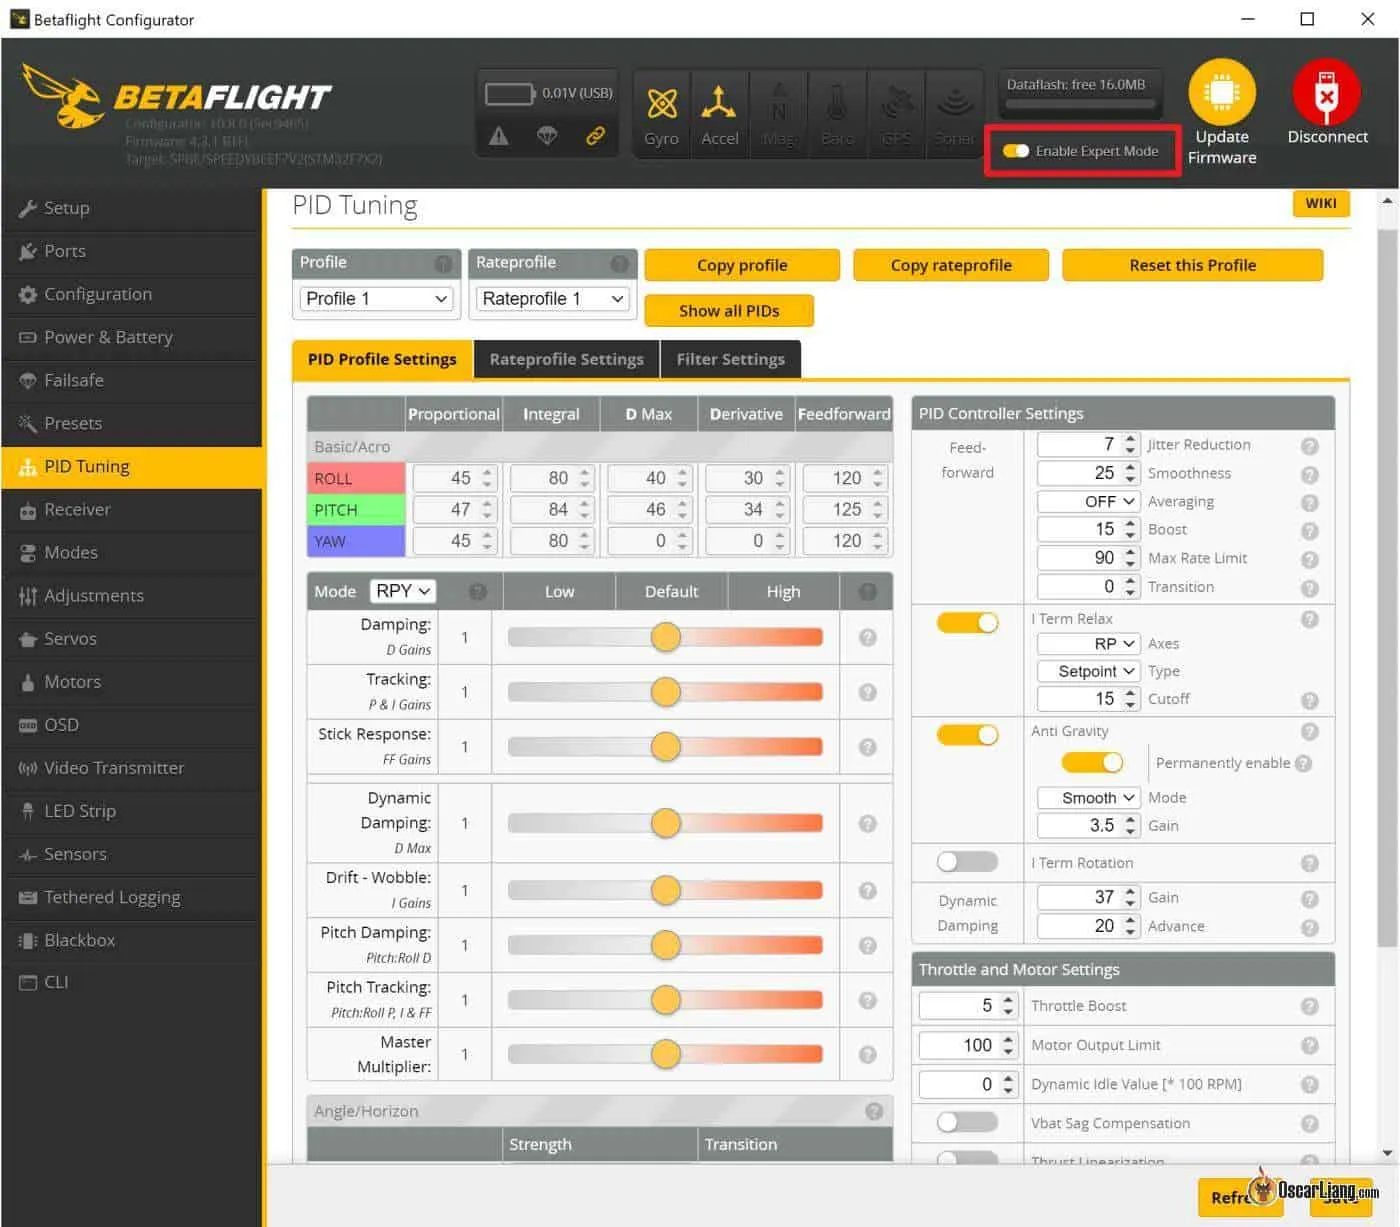
4. Flash the latest version of Betaflight firmware (currently 4.3.1) to your flight controller and leave PID/filter settings at default. Enable Expert Mode in Betaflight Configurator, this will give you all the available sliders and options on the PID Tuning page.
Use 4KHz PID Loop frequency (Configuration page), and DShot300 ESC Protocol (Motor page). Disable anything that you might not need such as Barometer, LED_Strip, Soft Serial etc in Configuration.
5. Load the appropriate RC_Link preset.

There are many high speed radio control links on the market. They offer different packet rates and require specific RC smoothing settings in order to avoid problems with Feedforward. My favourite RC link at the moment is ExpressLRS, check out my radio gear here.
By loading the suitable RC_Link preset, Betaflight will apply all the necessary config for you automatically. Don’t forget there are more options to pick before loading the preset, especially flying style, for most people it would be Freestyle.
If you are using Crossfire, lock the packet rate to either 50Hz (longer range) or 150Hz (lower latency) in the module.
Step 2 – Filters
To tune filters properly it’s best to look at Blackbox logs. Since we won’t be using Blackbox in this tutorial, we won’t be making too many changes here. If you want to learn more about Betaflight filters we have a tutorial here.
Before making changes to filters, test fly the drone by cruising around and look for any mechanical faults.
Betaflight default settings tend to be pretty conservative and your quad should already fly quite smoothly when cruising. Look for any vibration and listen for roughness in the motor sound, which could be caused by mechanical faults, maybe the motors, frame, how the flight controller is mounted, or bad propellers.
If all good, proceed.
The goal here is to reduce as much filtering as possible to minimize latency without burning the motors or making the quad go crazy. But if you want to play safe, it’s totally acceptable to just leave the filters settings untouched and move on to the next step.
First of all, try disabling Gyro Lowpass 1. Generally speaking, you only need it if your quad has mechanical issues like bad motor bearing or the quad is in beat-up condition.

Test fly for roughly 30 seconds, do some acro moves and punch out, and see if motors get hot.
Pro Tip: Hot motors – how hot is too hot?
As a general rule of thumb, if you pinch the motor and can’t keep your fingers on it more than a few seconds, that means it’s too hot and you are probably pushing your setting too aggressively.
If motors are cool, proceed to move the Gyro Filtering slider up one step at a time (less filtering).

Test fly again for another 20-30 seconds with some full throttle punch-outs and acro moves, make sure the motors are not hot.
Listen closely to the motor sound, when you don’t have enough filtering you will start to hear grinding noise when hovering, or even as soon as you arm the quad. Also see if flight performance is getting better or worse as you move up the filter slider, sometimes too little filtering actually makes the drone fly worse.
It’s possible to end up moving Gyro Filtering slider all the way up at 2.0 on a clean build, so don’t be surprised. But it’s also possible that you can’t move it up at all, it all depends on how clean your build is. Check out my FPV drone build guide for build tips.
DO NOT disable Gyro Lowpass 2 if you run 4K PID looptime, as it’s an effective anti-aliasing filter. For 2K PID looptime, a 500Hz PT1 lowpass 2 gyro filter is absolutely essential. Most clean 4K quads will run great with gyro lowpass 1 turned off, and just a single gyro lowpass 2 filter at 500Hz-1000Hz. 8K PID loops have no aliasing issues, so gyro lowpass 2 is allowed to be disabled without aliasing concerns.
After tuning Gyro filter, you could do the same for D-term filter slider, but I recommend not touching it really, and just leave the values at default unless Blackbox is used for proper noise analysis.
Step 3 – Finding P/D Balance
The PID slider system in the new Betaflight Configurator has made tuning a lot easier.
Before tuning PID, you should isolate P and D gains by getting Feedforward, Dynamic Damping and I term out of the way. To do this,
- set Stick Response to 0 (Feedforward no longer active)
- set Dynamic Damping to 0 (D gain becomes constant)
- set Drift Wobble to 0 (sets I gain to 0)
- turn off I Term Relax
- turn off Anti Gravity

To learn more about what PID does in an FPV drone, check out this tutorial.
Basically, P gain helps to keep your quad follow the stick, decent level of P gain will make the quad feel responsive, while D gain is the damper to the drone’s movement.
Move the Damping slider down (only adjusts D gain), until you see/hear overshoot when doing flips and rolls, then move it back up a notch or two.

This determines the optimal P/D ratio, and you don’t want to change this balance again. That means if you want to change one number, the other number must change proportionally.
Pro Tip: What’s overshoot?
Overshoot is bounceback when you do a fast flip or roll. Sometimes it’s hard to see it in your FPV goggles because it happens very rapidly, so try to listen to the motor sound as well.
When you do a flip without bounceback, you should only hear a single sound “whoof”, but when there is a bounceback, you should be able to hear a double sound “whoof whoof”. It’s much easier to see in Blackbox log.
If you see overshoot on Pitch but not Roll, then go ahead and move Pitch Damping slider up.
Step 4 – Maximizing PID Gains
Generally, an FPV drone tracks setpoint best and has the most direct feel with the highest possible PID gains.
To maximize PID gains, simply move up the Master Multiplier slider one click at a time.

It increases all gains while keeping the ratio between them. Between adjustments, test fly your quad with some acro moves for roughly 30 seconds, and check motor temperature. This adjustment should make your quad react faster to your control and it should feel more locked in and handle prop wash better.
However, there is a limit on how much you can push D gain before getting into trouble. D term dampens quad movements, but also amplifies vibration, it’s a double edge sword. This post explains why D gains can cause hot motors and oscillations.
If one of the following happens you should back off:
- motors getting hot
- motors making weird grinding sound / high pitched thrilling oscillations as soon as you arm or during flight
If you push D gains too aggressively, the quad could become crazy and shoot up as soon as you arm, it’s no joke. Step far away from the quad when pushing D gain.
If you don’t always fly with new propellers, it’s a good idea to keep D lower to have some headroom.
Step 5 – Finding I Gain
When I term is introduced back in the PID, you might find the quad to overshoot again when doing flips and roll. Don’t freak out, that’s completely normal. We can fix it with I Term Relax later. The reason we tune I gain after we max out P and D gain is because the optimal I gain is slightly different at low and high P gains.
Put Drift Wobble slider back to 1.

I term has a REALLY wide tuning window especially for powerful 5″ quads, sometimes it can be confusing for beginners where the optimal value should be. Usually the default I gain in Betaflight falls within that tuning window and does not need changing.
With that said, play around with I gain if you wish. As long as you don’t feel any drift and not getting any wobbles when you perform horizontal descents, your I gain is good.
When I term is too low, your quad would feel drifty and loose, it gets pushed around by wind, doesn’t hold its attitude well at all and constantly requires pilot correction. This is what you just experienced when the I term slider was all the way to the left.
When I gain is too high however, it will introduce overshoot and oscillation the same way excessive P gain does, but the overshoot or oscillation is noticeably slower. When you do punch out then get off throttle and decent horizontally, you will get wobbles that are caused by overshooting of the I term. When P gain is too low, it can also cause it to overshoot when doing flips, and wobble a bit when you descent. Don’t worry if you can’t get those wobble and overshoot to completely disappear, just try to reduce it as much as you can with good I term without feeling drifty, we can fix it with I term relax later.
Racers might prefer higher I gain for the tighter control while freestylers might prefer the looser feel of lower I gain.
Step 6 – Anti Gravity and I Term Relax
Enable Anti Gravity and I Term Relax.

If the nose of the drone dips when moving the throttle stick rapidly, higher P gain should be able to fix it. However you can’t always push P and D any higher, in this case, enabling Anti Gravity (AG) will help. It momentarily boosts P and I gains during rapid throttle changes to improve stability.
Default AG gain is 3.5, you could increase it slightly to minimize nose dip. Usually 4 to 6 works for most of my setups, remember to increase the gain value very carefully with sufficient testing!
If you are still getting slow bounceback when doing flips and rolls after bringing back I gain, enabling I Term Relax should fix it for the most part. if bounceback is getting better but not completely gone, try lowering cut off value (e.g. from 15 to 10), lower value means stronger suppression of I term during acro moves. 30-40 is good for racing, 15 for freestyle, 10 or even lower for big heavier quads.
Step 7 – Tuning Feedforward
Move up Stick Response Slider.

Feedforward can make your quad react faster and feel more responsive, but too much it might feel jittery. You can really crank this up without getting into any trouble except some overshoot when doing flips and rolls, but nothing bad, bad.
Just keep increasing it until you like it and not getting any bounceback. Don’t be surprised if you find yourself all the way up at max, sometimes you just don’t get any bounceback. I usually find myself end up at around 1.0-1.5, I could go higher without bounceback too, but sometimes it just feels too jittery for me.
Step 8 – Enabling Dynamic Damping
Move Dynamic Damping slider back to 1.

Do some aggressive flying for 30 seconds and check motor temp. If motors sound bad, or get hotter than before, move slider down.
Dynamic Damping boosts D gain when doing sharp stick moves for better prop wash handling (to Max_D value) , but it stays low (at Derivative value) when the quad is just cruising in order to keep the motors cool. However, when the drone detects a sharp move and trying to bump up D gain, it’s sometimes too late, so it doesn’t always work as expected. I tend to just turn it off (leave the slider at zero). But if you have hot motors when doing freestyle, Dynamic Damping can help.
This is how I normally use Dynamic Damping:
- Note down your current D Max value. This value should be the same as Derivative because the Dynamic Damping slider is set to 0 at the moment.
- Begin by increasing the Dynamic Damping slider to 1.
- Then reduce the Damping slider until the D Max value remains the same as before, this will lower the baseline D gain used during normal flights to keep your motors cool. Don’t worry if you can’t get D Max back to exactly what it was before, 1 or 2 points difference shouldn’t be noticeable.
Dynamic Damping is also useful for making your drone smoother if you have vibration even with simple forward flights. That’s because vibration can be amplified by D gain, and using Dynamic Damping can suppress D gain when you are just cruising. However this is just a bandaid, you should address the mechanical issue first.
Step 9 – Tuning Rates and Expo
Rate and Expo control how sensitive your drone reacts to the stick inputs, and how fast it rotates at full stick deflection.
Check out my tutorial to find out what Rates and Expos are in a bit more detail.
Start with default values in Betaflight Rates.

The first thing is to set your desired maximum angular velocity at full stick deflection, by changing RC Rate. For me 600-700 is a good range for freestyle, 600 or lower for racing.
As you increase RC rate, you might find it becoming more twitchy as the sensitivity around center stick also increases linearly. If this is the case, simply increase expo to decrease the slope around centre stick to your liking. If you fly cinematic style, and want to fly smoothly, using a bit more expo can really help make your flying smoother.
However if you find it not responsive enough around center stick, then you can decrease Super Rate which will bump up the sensitivity around center stick. But it also reduces the maximum angular velocity at full stick, hence you will have to bump up RC Rate to compensate. Racers might prefer more predictable and linear stick response across a wider range of stick travel, so try lower Super Rate and higher RC Rate.
It’s really an act of balancing between the three terms because they all affect each other, and it’s just purely personal preference. Some people like to apply the same values to all 3 axis to keep things simple, or you could set them differently. It’s all up to you.

Example Rates on one of my quads
Step 10 – Other Settings
Your drone at this point should fly pretty well, so you might or might not need these settings, but they might boost performance a bit more.
I didn’t explore all the settings in Betaflight as I try to keep this guide short and simple, you can learn about them by clicking on the question mark next to each setting. However I don’t think you need them unless you have a specific issue you need to solve.
Dynamic Idle
Dynamic Idle Value 30-35
Dynamic Idle helps to improve stability. By increasing motor speed when throttle is at zero, it improves control authority of the PID controller and low throttle input responsiveness. There are also other benefits such as sharper flip and roll stops, more responsive in low throttle and more effective braking etc.
When Dynamic Idle is set, Static Motor Idle (in %) in the Motors tab is disengaged.
To setup Dynamic Idle, you need to
- enable bi-directional DShot in the Motor Tab (if you already have RPM filter enabled, you are all set)
- set a suitable Idle RPM value in the PID Tuning page (3000-3500 RPM for 5″)
The recommended Idle RPM value depends a lot on propeller size and pitch, smaller and lower pitch propellers generally require higher value. For 5″ drones, you can generally set this to 20-40, and for 3″, it’s higher at 33-66. When it’s windy you can also set this higher to counter.
Value too high, you lose hang time when you let the drone fall upside down (the motors push harder towards the ground). A high value will also tend to make the quad “hover” a little more even at zero throttle, making throttle management a little harder. When value is too low, you risk low throttle instability.
To set the value, depends on what ESC idle you had previously (default is 5.5%), test your motor in the motor tab, you can use a smoke stopper or bench power supply to limit current in case it goes out of control. Spin the motor at the ESC idle value, e.g. for 5.5%, move slider to around 1055, and see what the reported RPM value is (it will only show this if you enable bi-directional DShot). Then this RPM value would be the ideal value for your dynamic Idle value (divide it by 100).
Throttle Boost
Default value is 5, works for most freestyle builds. It boosts your throttle value when you are moving throttle stick up suddenly to give you extra power, it gives you a power boost but also makes throttle more unpredictable. It doesn’t have any effect when you move throttle stick slowly though. If you find throttle is hard to manage you can reduce it. I know some racers even disable throttle boost entirely by setting it to 0. You can experiment with smaller values and see what works for you.
Voltage Sag Compensation
It boosts your PID as voltage drops to make your quad performance more consistent throughout the whole flight.
Thrust Linearization
Enable Thrust Linearization and set it to 20%.
This will boost PID to improve responsiveness and control authority at low throttle, while lowering PID at top throttle to reduce oscillations . It can help with nose dip This is especially recommended for whoops and if you use 48KHz PWM frequency on ESC. It’s also useful when TPA alone isn’t enough to address high throttle oscillation.
Since it boosts PID at low throttle, you might want to drop the master multiplier slider down a notch or two if motors get hot.

Example: settings on a 4S 5″ Freestyle FPV Drone after tuning – don’t copy without testing
How Good Is This Tuning Method?
To see how good this tuning method is, I tuned one of my 5″ quads using this method (no blackbox), I will call it the “old tune”. Then I tuned it again using Blackbox (following this tutorial), I will call this the “new tune”.
The two tunes turned out to be surprisingly different!
First of all, I couldn’t tune filter without blackbox, so the only change was to reduce Gyro Lowpass a bit. With Blackbox, I can optimize filters as much as possible and get the filter delay down significantly. I think this might or might not have been the reason for the more responsive feeling I was having with the new tune. Also I was able to use a higher D gain confidently in the new tune. Propwash handling was noticeably better. Looking at the spectral analyser, the new tune has less noise in the sub-100Hz frequency spectrum (thanks to the lower filtering delay), but there’s more noise in the high frequency region in Dterm because Dterm lowpass filtering was reduced, but it’s in an acceptable level. The motors in the new tune do get noticeably warmer than the old tune after a flight, but it’s not hot.
The other major difference between the two tunes is P/D balance. In the old tune, the damping slider is at 0.8, while in the new tune it’s at 1.0. I think the main reason I am using a higher P/D balance in the old tune is because I couldn’t see or hear the overshoot when doing flips and rolls, but the step response tool in PIDToolBox is much more sensitive about it. I do like how the quad flies more with the higher P gain in the old tune. It’s slightly more locked in and when doing snap rolls it feels more precise and tighter. That makes me wonder if we should change our standard in the step response tuning method. Maybe having a little overshoot in the step response is acceptable or even favourable? Or simply bump up P/D balance by 5% to 10% after finding the ideal Damping slider value?
Without looking at Blackbox, tuning feedforward is tough. Without looking at the traces you can’t accurately set feedforward gain, you will most likely undershoot or overshoot. In my old tune it was too high and overshoots setpoint.
To conclude, tuning without Blackbox will definitely still give you a better flying quad than using just the defaults. But if you are serious about tuning and want to get the most out of it, definitely use Blackbox.
Troubleshooting
Shakes and Jello
Shakes and jello aren’t always PID or filter related, sometimes it could be caused by mechanical or electrical issues.
- Check if the camera is mounted properly and doesn’t wiggle
- Always make sure you add extra low ESR capacitor to the power/ESC
- Try different props! They are the cheapest thing to try and sometimes make a day and night difference. See my props recommendations
- Loosely mounted FC? Best practice is to use long steel bolts that go through the frame, fixed in place by steel nuts, then put on top your 4in1 ESC and FC, finally secured by nylon nuts. Make sure the FC is using rubber grommets for soft mounting
- Bad motor bearing? Check in motor tab in Betaflight, spin them up one by one and check the gyro graph, set graph refresh to 10ms, scale 0.05. If bad bearing you should be able to hear it even. If it’s not that bad, you should also be able to see it causes more vibration than other motors. Try to pull motor bell up and down to see if there’s any play, if so, tighten shaft screw slightly
Oscillation at High Throttle
If you are getting oscillation only above certain throttle level, TPA might be the solution. It also helps to push PID higher without giving you problem in the high throttle range.
In the latest Betaflight it only attenuates D gain above certain throttle level (which is usually the cause of the oscillations). In the older Betaflight it attenuates both P and D, if you want you can bring this back by typing in CLI: set tpa_mode = PD.
Usually I like to use a higher throttle value whenever possible, so I have a more constant D gain across a wider throttle range. Make sure to set the throttle value a little lower than the position where the D term related oscillations starts. For example, if oscillation happens above around 1800 throttle, I would do something like this: TPA = 0.75, 1750.
Reducing Prop wash
Things that help eliminate propwash:
- Reducing filtering as much as possible – less delay and allows higher D gain
- Increasing PID gains as high as possible for better setpoint tracking
- Use 24KHz PWM frequency in BLHeli
- Using lighter propellers
- Using more powerful motors
- Making your quad lighter
21 comments
Is there a sort of “pre-tune” I can slap on without having to make my own?
Sure, there are PID and filter presets in Betaflight: How to use Betaflight Presets
Do you guys provide service,for tuning other peoples quads?I have a quad i need setting up.Warthox mini cp,I have a Naze 32 flight controller.Last time I flown was 8 years ago…No more clean flight or Base flight.I have 3 naze FC.Can I send my quad and transmitter ect to you for a tuning fee?
If not.Can you refer me to someone that can please.
Very Nice
“Always use new propellers, if possible get these props I recommended. It’s amazing how much more performance you can get out of the drone with balanced and vibration free props”
I disagree with this unless someone is flying only with brand new props and replaces them after slightest damage, and does not try to fly back home after a crash. For tuning always use used props that are in the state where they have a few dings but you would not normally replace them yet. With this tune you might not get the latest drop of performance that would be available with brand new props but you can safely keep flying after dinging a prop a bit.
I used to think the same way, but used props are always inconsistent and unpredictable. You cannot bend or damage them the same way every time, it’s going to create noise in different frquencies and it’s going to throw off you tuning. Using old props is going to give you a suboptimal tune, and that might not even work well with a different set of old props.
Help me oscar, i tried this method because my fc doesnt have a blackbox, the issues is when my quad hit something and quad goes crazy, what should i do ?
May i asking sir !!!
what differently packet rate in CSRF / ELRS for value 50ghz, 150ghz, 250ghz ???
What best i set in my Jumper TLite ???
The higher the lower latency but less range. Choose whatever suits your needs, if you are not flying long range, higher packet rate is preferred.
Thanks sir for ur reply (answer).. come to bali again sir hehehe
Thank you sir! :) I will definitely be back!
Tengo una duda, al desactivar el filtro ADC, no hay ningun problema con otros modelos que no esten actualizados a 4.3?
Hey Oscar, thanks for all the work you put into these articles they have been immensely helpful. I am having trouble getting the Dynamic_Filter toggle to show up under Other Features. I have the motor protocol set to DShot300, BiDirectional DShot enabled and my ESCs are running BL_Heli32 32.9. I am using the SpeedyBee F7 V3 FC and ESC stack. I have betaflight 4.3.1 flashed and the latest version of the configurator 10.8.0. Under other features my toggles stop at OSD there is no Dynamic_Filter toggle which I have found referenced in many tutorials. Let me know if you have any ideas on what I might be doing wrong.
Thanks,
Nathan
Dynamic filter is no longer in the configuration tab and is enabled by default in the filters tab in PID tuning.
There’s an older 10.8.0 and a newer 10.8.0 configurator released in Jun, make sure you are updated to the latest version: https://github.com/betaflight/betaflight-configurator/releases
is there any benefit to use 8k pid loop with 600Dshot on F7 board?
Or better go less with 4k and Dshot300?
I really like this guideline and it helps a lot for getting a decent flying quad.
But can you make another, sort of in deph guideline of tuning the quad the best and most accurate with the blackbox?
Would appreciate it a lot :)
(Little hint for you, where it sais “Since it boosts PID at low throttle, you might want to drop the master multiplier slider down a notch or two if motors.” you might wanna add “get hot” at the end ;) )
That’s on my to-do list :)
I’m actually working on a beginner guide on Blackbox now, after that would be a tuning guide using Blackbox.
oh wow nice!! excited for that :)
Thank you a LOT for this!
Just needed that 👍
awesome
Oscar, thanks for this really nice walk through. It’s a straightforward approach without some of the gross detail that made me avoid formal tuning. I have relied on pushing the filters until bad things happen then pull back but never had a strategy for PID tuning. Thanks for this thoughtful approach!