The SpeedyBee Mario 5 FPV Drone is finally here, offering an affordable option for those who want a capable FPV drone without the hassle of building from scratch. Based on SpeedyBee’s recently released Mario 5 frame, this drone requires only a receiver to be flight-ready. Here’s my in-depth look at the Mario 5, from unboxing to flight performance, and my final verdict on whether it’s worth adding to your FPV fleet.

Table of Contents
Where to Buy
You can purchase the Mario 5 FPV Drone from:
- Speedybee: https://oscarliang.com/product-aa2l
- AliExpress: https://s.click.aliexpress.com/e/_DDXRdDT
- 6S LiPo recommendations: https://oscarliang.com/lipo-battery-guide/Recommendations
- Spare props: https://s.click.aliexpress.com/e/_DDsjDbB
Different Options
The SpeedyBee Mario 5 series includes two versions: one without an FPV system and another with the DJI O3 Air Unit. Both models share the same flight controller, ESC, and frame.
The Mario 5 is also available in two frame configurations:
- X Frame: Offers more precise handling, ideal for freestyle flying. However, when using the DJI O3, you might see the propellers in view, which could be distracting for cinematic shots.
- Deadcat Frame: Keeps the propellers out of view when using an action camera or the DJI O3, perfect for cinematic footage. If capturing smooth video is your priority, I’d recommend the deadcat frame.
I’m reviewing the deadcat version equipped with the DJI O3 and GPS.
Note: The SpeedyBee Mario 5 does not come with a receiver. You’ll need to add one, such as an ExpressLRS receiver: https://oscarliang.com/setup-expresslrs-2-4ghz/#Receivers
Unboxing

Here’s what comes in the box:
- HQ J40 Props: A set of four 5.1x4x3 propellers.
- Battery Straps: Two SpeedyBee rubberized straps.
- Hardware: Screws, prop mounts, spare side plates and a receiver cable.
Specifications
- Frame: Mario 5
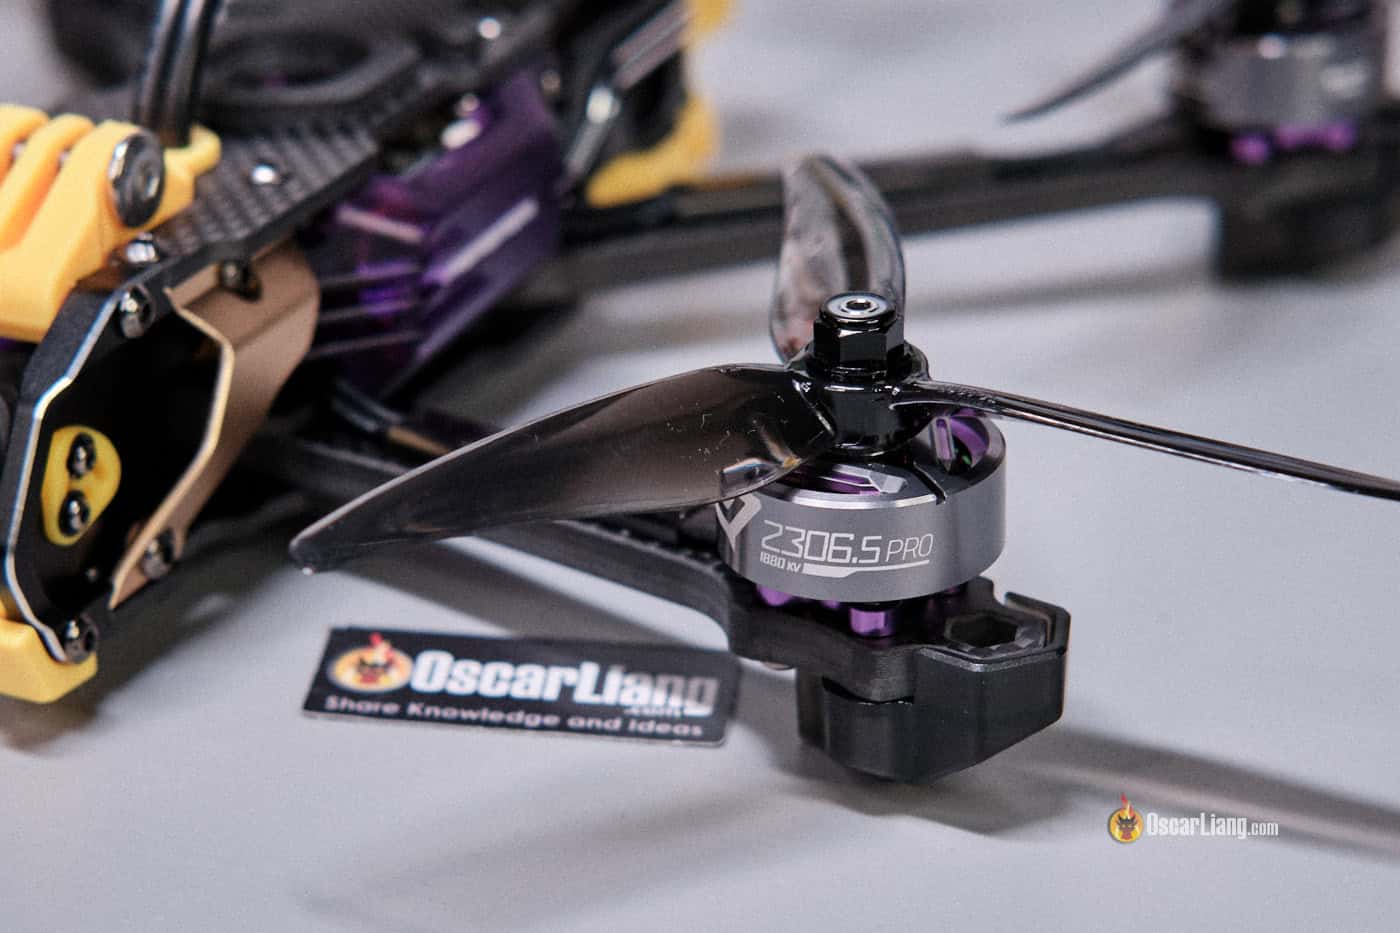
- Motors: SpeedyBee Storm 2306.5 1880KV
- Flight Controller: SpeedyBee F405 V4
- ESC: SpeedyBee 55A 4-in-1 BLS ESC (flashed with Bluejay)
- FPV System (Optional): DJI O3 Air Unit
- Propellers: HQ J40 5.1x4x3
- LEDs: Side panels with built-in LED Strip
- Recommended Battery: 6S 1000–1800mAh
- Top Speed: Advertised max speed 190 km/h
- Flight Time: 5 to 10 minutes, depending on flight style and battery size
- Weight (with DJI O3):
- Without battery: 497g
- With 6S 1100mAh: 697g
- With 6S 1100mAh and GoPro 11: 1051g
Design
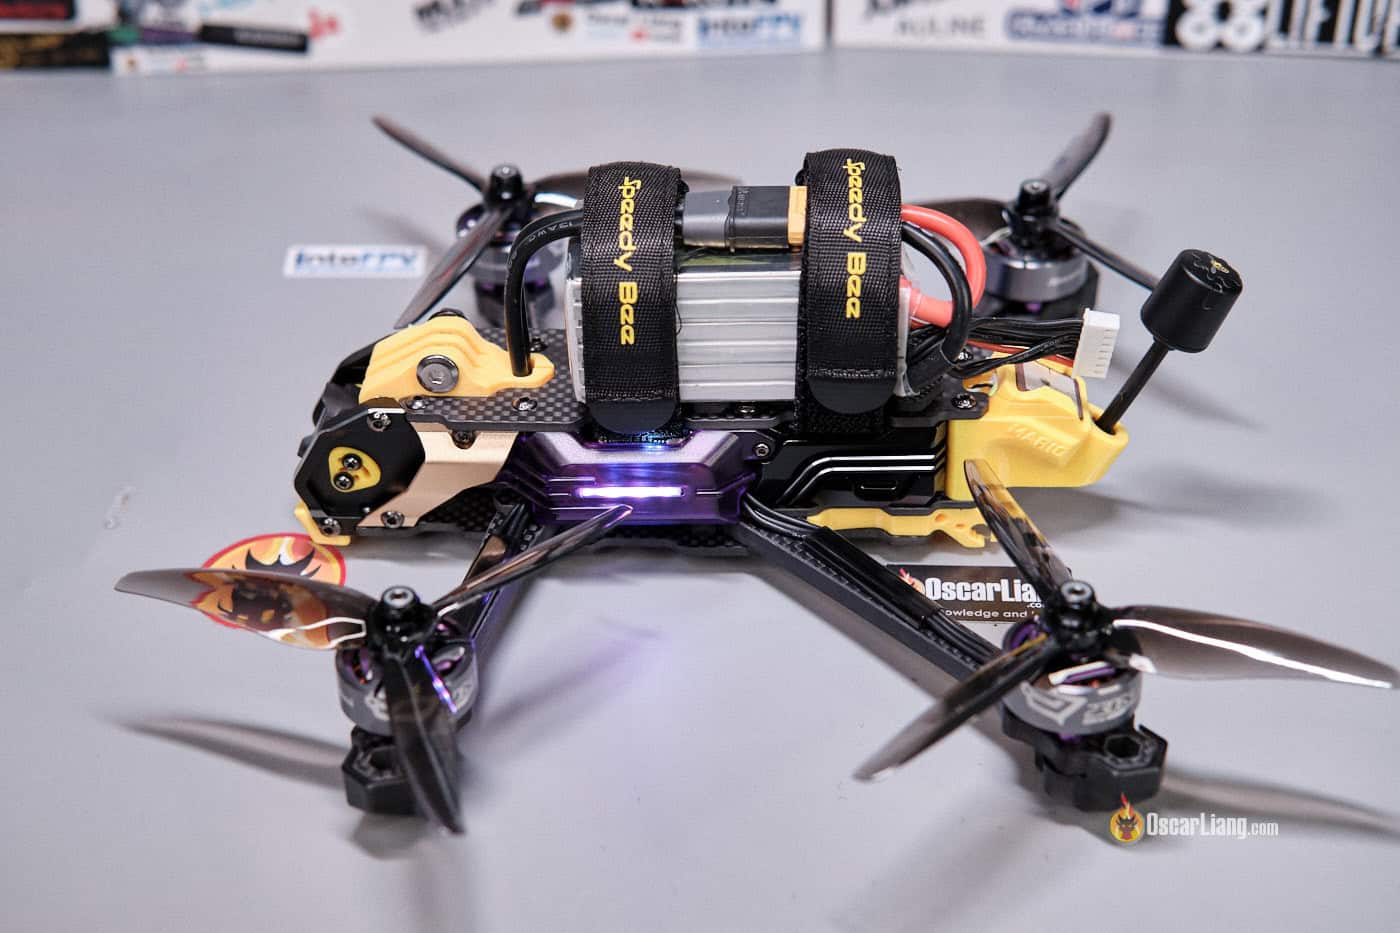
Taking the Mario 5 out of the box, my first thought was, “This thing is built like a piece of art!” It features transparent side panels with built-in LED strip, adding a flashy yet functional aesthetic. For those looking to optimize weight, these panels can be removed to slightly enhance flight performance, which I will do later in this review.

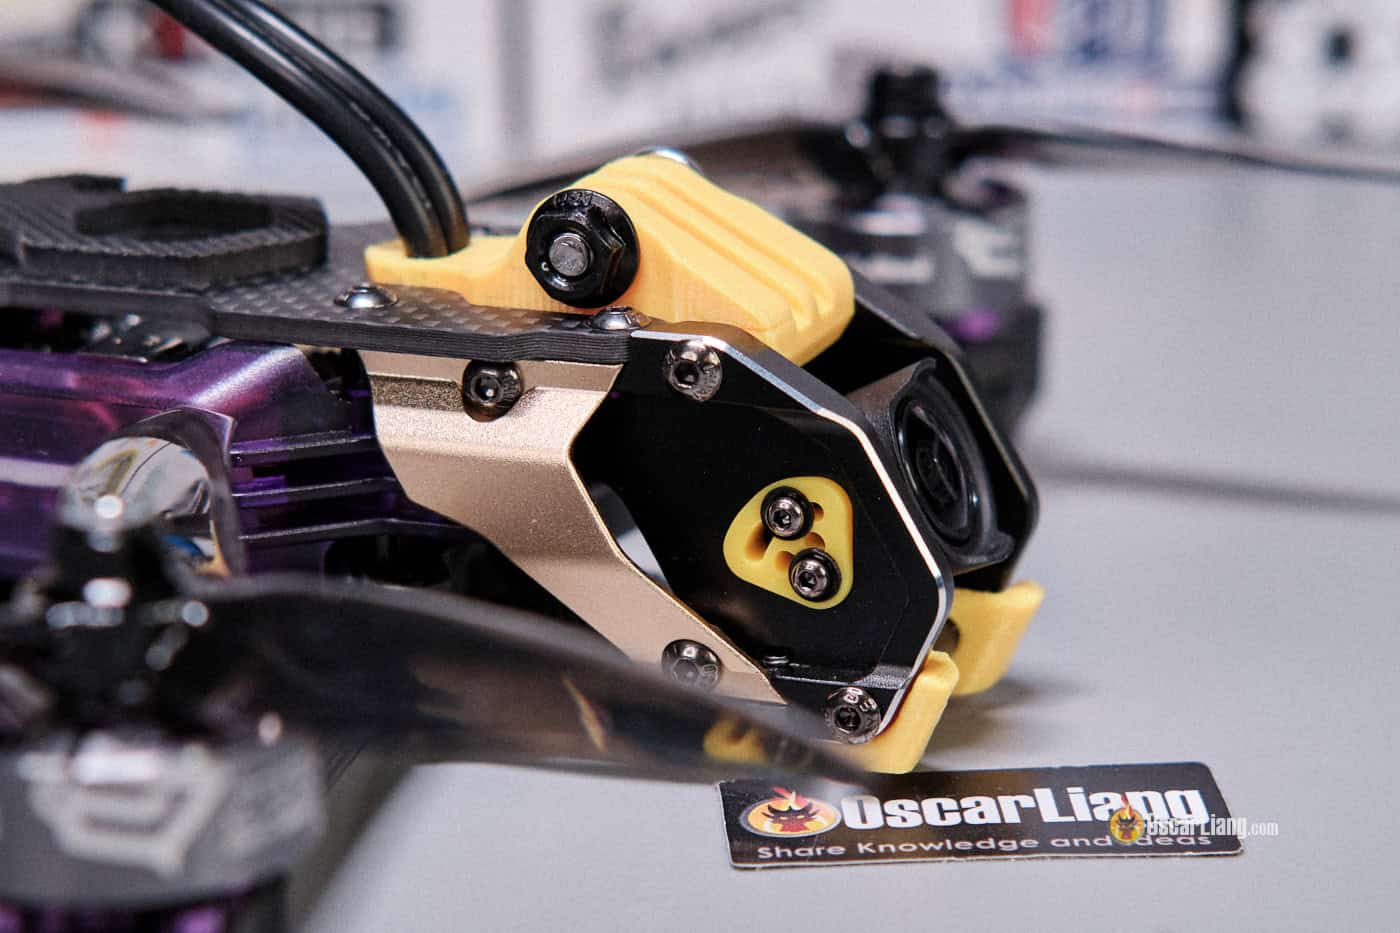
The frame is constructed with 6mm arms and 2.5mm carbon fiber top/bottom plates, reinforced with a CNC aluminum camera cage in the front for added durability. The build quality is impressive, with SpeedyBee’s attention to detail evident in neatly routed wiring, sturdy motor mounts, and secure fastening.
The frame is compatible with analog, Walksnail, and DJI O3 air units, giving pilots flexibility in FPV setup options.

Having reviewed the Mario 5 frame before, I can say it’s well-engineered but complex, with some heavy decorative elements that may not be essential for every pilot. It’s a robust 5-inch drone weighing 497g without the battery—definitely crash-resilient, though a bit on the heavy side for a 5-inch FPV drone. For comparison, the Orqa DreamX, which I reviewed recently, weighs just 340 grams. But that’s an analog quad, with the O3 Air Unit factored in, the Mario 5 is roughly 130g heavier. It’s A LOT.
One delightful feature is the Mario startup sound. Upon plugging in the battery, the Mario 5 plays the iconic Mario theme song, adding personality to each flight. It’s a small touch, but it adds to the fun factor.
The drone’s design includes mounting space for a GPS module, which I would definitely recommend for enabling GPS Rescue mode. This is a useful feature if you plan to fly long-range or in unfamiliar locations, as it will allow the drone to return home if it loses signal.

The XT60 pigtail comes out in the middle of the top plate, the location is functional and convenient, though it can get in the way and limit camera tilt if you’re using a GoPro. For more flexibility in camera angles, relocating the XT60 to the back might be preferable.

Lastly, the O3 Air Unit is surrounded by aluminium side panels that act as heatsink. Thankfully, you still have easy access to the USB-C port and SD card slot, downloading O3 footage is convenient. But where I live, it’s cold enough that overheating hasn’t been an issue, so I plan to remove the heatsink to save weight.

Build Quality
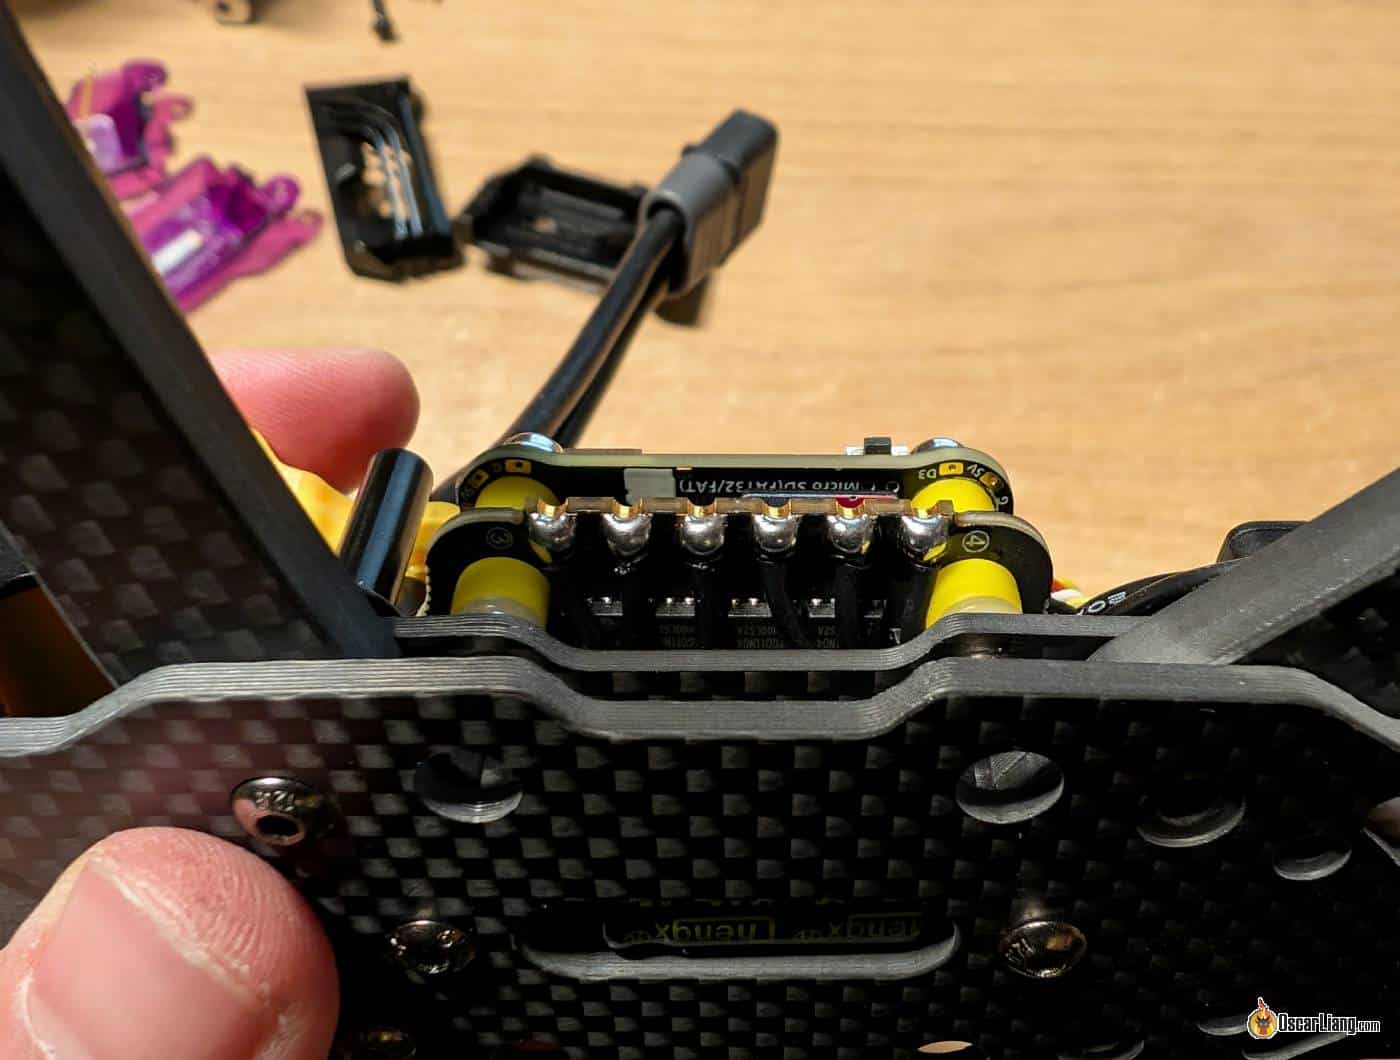
Taking the Mario 5 apart, I was immediately impressed by SpeedyBee’s attention to detail. The cables are trimmed to the perfect length, and the soldering is clean and professional. This meticulous assembly not only enhances durability but also minimizes potential issues over time—something SpeedyBee has clearly prioritized in this design.
I also appreciate that all hardware is SpeedyBee-branded—the frame, flight controller, ESC, and motors are all from the same brand, creating a cohesive build where each component is fully compatible with the others.

Finally, one major inconvenience, is that the side panel blocks the USB port on the flight controller. You have to unscrew one screw first to open the side panel.


Then you will realize it doesn’t open quite wide enough to insert the USB cable, which is embarrassing.

I had to remove the aluminium “fin” next to the camera in order to open the side panel more. Alternatively, you could also use the SpeedyBee app on your phone, and configure the drone wirelessly through Bluetooth.

The side plate also covers the SD card slot on the flight controller, which could be inconvenient if you plan to use Blackbox. You’ll need to remove the side plate to access it, and I’ll walk you through this process later in the review.
Adding Your Own Receiver
Interestingly, the Mario 5 doesn’t come with a receiver, so technically it’s not a true BNF (bind and fly) drone; instead, it’s a PNP (plug and play) model. While this might seem unusual and inconvenient, it does offer flexibility in selecting your preferred receiver type.
Thankfully, installing the receiver is pretty easy if you are using an ELRS receiver. The drone includes a receiver cable that you can solder to your receiver and then plug straight into the drone. It’s a straightforward process, and you won’t need to completely disassemble the drone to install it, which is a nice touch for anyone looking to get airborne quickly.


Flight performance
Right from takeoff, it was clear this drone packs serious power. Although the Mario 5 is on the heavy side, and the motors are the relatively smaller 2306.5 (most 5″ drones these days use 2207 motors), it still delivers an exhilarating amount of thrust. It’s fast, powerful, and responsive—everything you want in an FPV drone.
The Mario 5 easily hits speeds of up to 150 km/h and cruises comfortably around 100 km/h. This makes it more than capable for high-speed chases.
While the stock tune has room for improvement, it provides a smooth flight experience. The controls feel slightly “mushy” due to the conservative tune, but I think it suits well to beginners and pilots focused on relaxed, cinematic footage. For more aggressive flyers, some tuning can make the Mario 5 even more responsive.
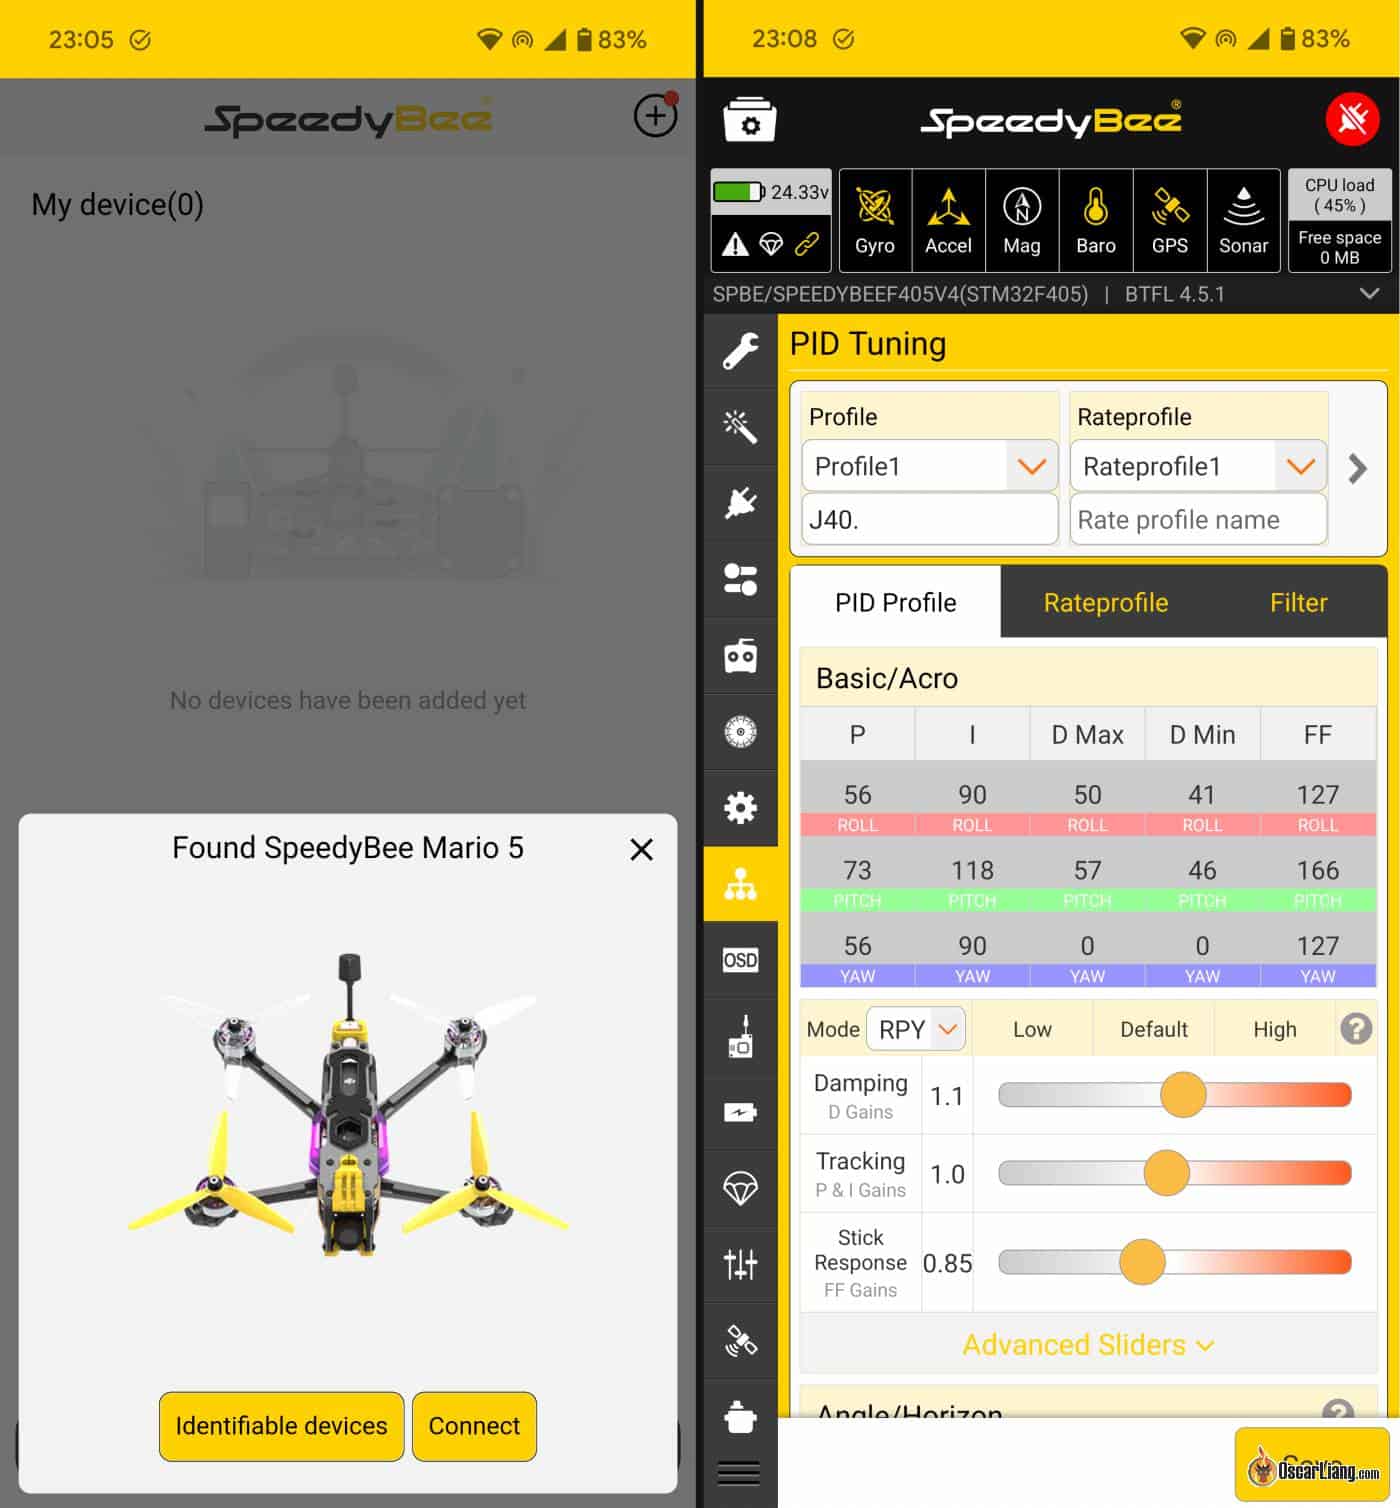
Here’s the gyro noise graph of the stock tune.

In terms of flight time, I got around 5:30 to 6:30 using a 6S 1100mAh LiPo battery, depending on flying style. It hovers at around 21% throttle with a fully charged battery—not as fast as some other BNF quads with lighter build and larger motors, but it still offers plenty of power and feels more manageable when navigating through tight spaces.
The GPS performs well, getting 17 satellites after a couple of minutes. However, rescue mode isn’t configured, so you’ll need to set it up yourself. I have a guide here for anyone who needs help with that: https://oscarliang.com/setup-gps-rescue-mode-betaflight/
The current sensor is pretty accurate out of the box, although I needed to slightly increase the scale by 3 points for optimal readings.
With further PID and filter tuning, this drone’s performance can be elevated significantly. I spent 2 hours on a custom tune for this quad, which I’ve shared on my Patreon. By optimizing the filters and PID settings, I managed to make the Mario 5 far more precise and responsive, giving it a more connected, snappy feel that’s perfect for freestyle flying.
Check out some of my flight footage to see the difference:
Stock Tune:
Custom PID/Filter Tune:
How to Setup
Default CLI dump (CLI diff) can be found here.
Setting up the SpeedyBee Mario 5 FPV Drone for its first flight is straightforward:
- Install and Bind Receiver: Solder your ELRS receiver (I’m using the BetaFPV Nano 2400 RX) and complete the binding process.
- Bind DJI O3: The DJI O3 unit comes pre-activated, so it’s ready to bind out of the box.
- Modes: Configure switches for arming and mode changes, such as angle mode.
- OSD: Apply my OSD template: https://oscarliang.com/betaflight-osd/#HD-with-GPS
- That’s it!
The ESCs come pre-flashed with Bluejay firmware (J-H-40 Bluejay 0.19 48kHz), so no additional configuration is required.
To change settings in Betaflight, you might want to remove the side plates first. Alternatively, the SpeedyBee app on your phone allows you to configure settings remotely via Bluetooth or WiFi—ideal for quick field adjustments.
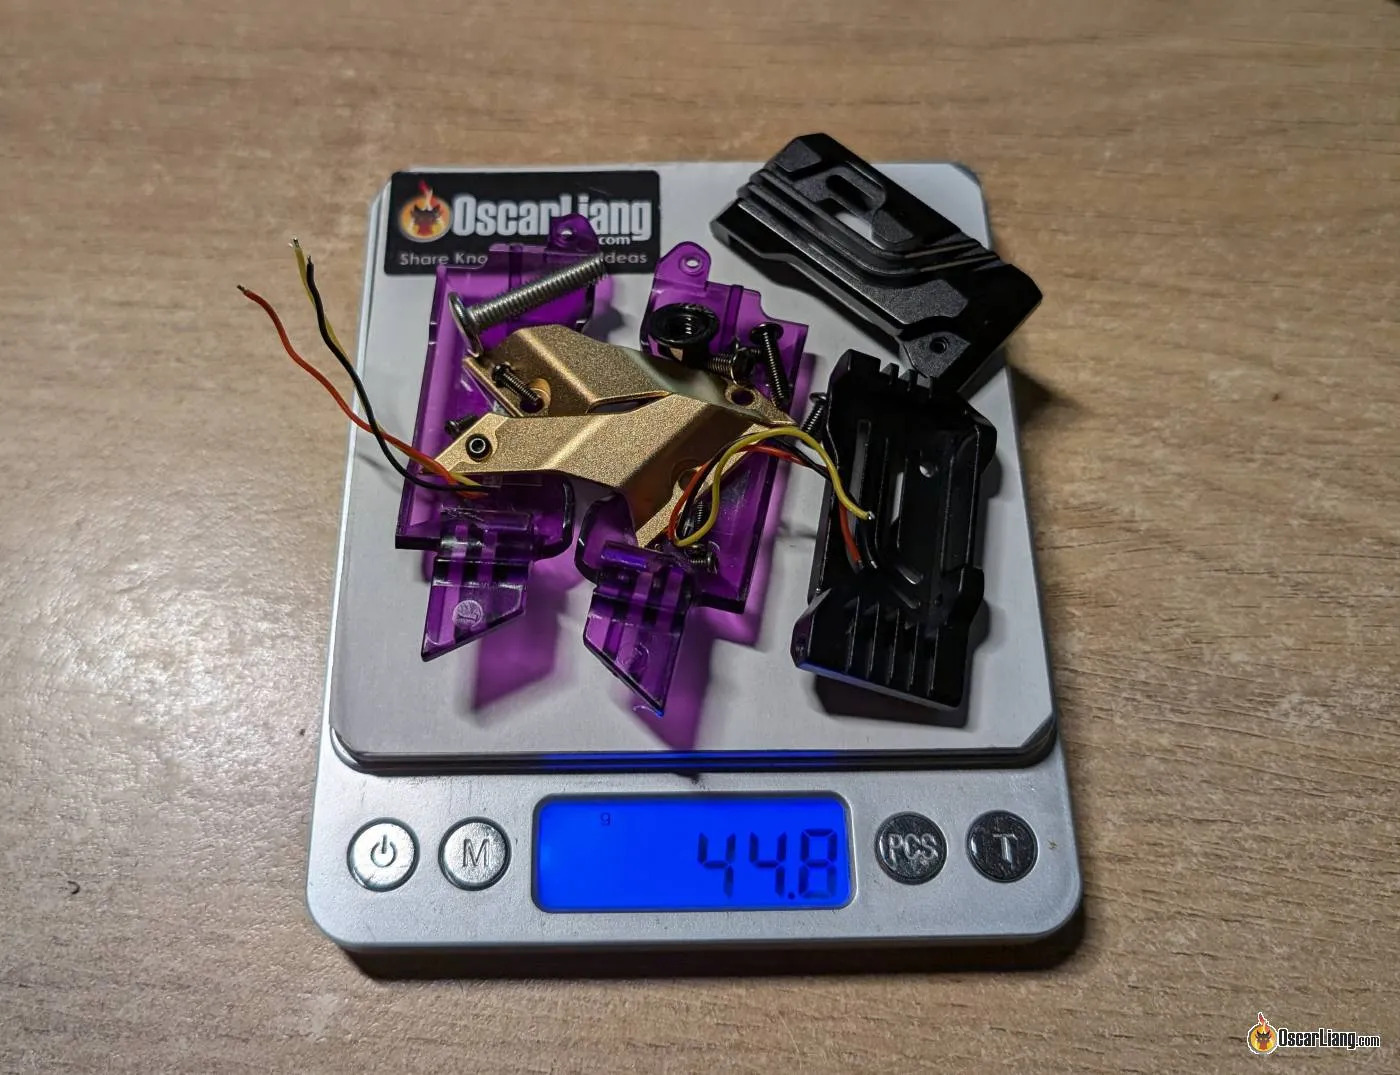
For weight reduction, I removed non-essential parts like the side panels and O3 heatsink. These are mostly for aesthetics and do not contribute to flight performance, in fact they make it worse as they are just dead weight. 45g of weight saving is massive on a 5″ quad!
When replacing the O3 heatsink with standoffs, I noticed the frame height is actually 23mm which requires 23mm standoffs, an uncommon length. I have both 22 and 24mm standoffs, just no 23mm. In the end I just used 22mm standoffs with a 1mm spacer instead.


A Few Drawbacks
While the Mario 5 has a lot going for it, there are a few areas it can improve on:
- Limited USB Access: Accessing the USB port on the flight controller requires partial disassembly. Although the SpeedyBee app covers most configuration needs, easier USB access would be handy.
- No Pre-installed Receiver: An included ExpressLRS receiver would make it a true BNF, sparing pilots from extra soldering and assembly.
- Weight: At 497g, it’s on the heavier side for a 5-inch quad. Removing the side plates and metal parts can reduce weight by up to 45g, making it more agile and efficient.
- PID and Filter Tuning: The stock tune leaves room for optimization. SpeedyBee has taken a conservative approach here, which provides a safe margin for error and minimizes potential issues like motor overheating, but advanced pilots may prefer a more aggressive setup.
- No Buzzer: It has flashy LEDs, but no buzzer?! Please can we get our priority straight? :)

Final Verdict: Is the SpeedyBee Mario 5 for You?
The SpeedyBee Mario 5 is an excellent choice for anyone looking to dive into FPV or upgrade to a powerful 5inch 6S platform without the hassle of building from scratch. The Mario 5 combines high-quality components, thoughtful design, and smooth flight performance in one package, making it a fantastic option for pilots who want a almost ready-to-fly experience.
You can purchase the Mario 5 FPV Drone from:
- Speedybee: https://oscarliang.com/product-slos
- AliExpress: https://s.click.aliexpress.com/e/_DDXRdDT
- 6S LiPo: https://oscarliang.com/lipo-battery-guide/#Recommendations
- Spare props: https://s.click.aliexpress.com/e/_DDsjDbB
While the setup process requires adding a receiver, and the frame design has some inconveniences, these aren’t deal breakers. With a bit of modifications, tuning and patience, these limitations can be overcome.
Overall, SpeedyBee has delivered a solid, well-built quad in the Mario 5 FPV drone, offering the performance FPV pilots need. If you’re after a powerful, reliable quad that saves you from building it yourself, the Mario 5 is a great pick.
For those who want to optimize freestyle performance, check out my custom tune available on my Patreon. Enjoy the flight!
15 comments
Hola Oscar, armé mi Mario con Stack y motores Mepsking, siento osilaciones raras cuando el acelerador está en 3/4, mucho jello en la imagen, que cuando está menos acelerado no sucede, que valores puedo cambiar del setup para mejorar?
Hi Oscar, i bought this quad aftermarket from a guy i know, but i currently face problems with resoldering the main battery-esc wires (as the previous solder fucked up even before the first test flight, don’t ask, i don’t know how). I have to use the variant in which wires go vertically trough the front camera mount (just like on your photos). I can’t really just solder them normally and bend them to fit in this hole in the TPU mount so i assume i’ve got to solder it vertically. Unfortunately your photos did not really show the main wires’ contact with the esc, so may i please ask you to tell wether you soldered it “touching” the contact pad from the side, or “standing” on the pad? It would be even better if you could send a photo on my email, which i’m submitting here.
Hello Oscar,
I recently purchased your patreon for this tune, but before I proceed to put your tune on my quad I would like to ask you few questions.
My drone is not a prebuilt one, but custom build, that I builded in june last year. Used components: frame mario 5 DC, speedybee F405 stack with 60A ESC, motors Xing2 2027 1855 KV using gemfan Vanover props and one thing that should not affect is that I use Walksnail moonlight kit on the drone.
Q1 – does the different size motor and slighty different KV affect the tune, or it should work on the tune?
Q2 – I guess the different props have affect aswell. Is your tune done specialy for the J40 props?
Q3 – When I flashed bluejay on my quad I used 24 khz PWM – should I change to 48 khz as it is the default for the your tested version?
Thank you for doing such a good work and that I can find a lot of ifnormations when cant answer them by myself :-)
Best regards,
Peter
Q1/Q2 – absolutely. Different motors, or even different props will perform and react differently to the same PID/filter tune. Yes my tune is for the stock motor/prop combination. But you can give it a shot, just do some 20/30 seconds test flight and make sure motors are not hot before going aggressive with it :)
Q3 – I think you should change it to 48KHz – it’s usually smoother.
Thanks for reply. I will give it a shot. Exactly that was I thinking to try for like half minute and check motor temperature. Also I already changed to 48khz yesterday ;-)
For summary. I just returned from flying. Fist change of the 24 to 48 khz on motors was a very good imoroovement.
Compared my first tune, even if it was not so far from your tune and your tune, I have to say WOW!!! Good job! Works perfect also on slightly bigger motors and different props. Already ordered the J40 for compare.
Hi, I have a spare camera, (the Foxeer Razer Mini) which is 22mm wide and I was looking at buying this frame. Could the 19mm wide TPU camera mount be stretched or sanded down to fit this camera?
On that datasheet they mention that the motor mounting hole distance as “16-19 mm”. What does that mean? Does it mean that the holes are not in a square arrangement and are in a rectangular one instead?
Motors have either 16mm or 19mm mounting patterns (the screw holes are 16mm or 19mm apart).
When a frame supports 16-19mm motor mounting, it just means it will support motors of both these mounting patterns.
Right now price on SpeedyBee website is €9,697.03 (from EU). Nice!
Hello, could you please share the command line (CLI)? I can’t find it on the official website. Thank you in advance for your reply.
Sure, it’s here: https://intofpv.com/t-cli-dump-for-speedybee-mario-5-fpv-drone-with-dji-o3
Unavailable/unlisted anywhere and also no news about price…
This drone is no where to be found!
Yea looks like they haven’t released the product page yet though they told me the release date is 11/11.