I’ve been flying the Flywoo Explorer LR4 for 5 years, and it remains one of my favorite drones to take when traveling. It’s lightweight and offers exceptional flight time—perfect for long-range exploration and capturing cinematic footage. So when I heard Flywoo had released a new version featuring the DJI O4 Pro, I knew I had to give it a try. In this review, I’ll share my thoughts on the updated Explorer LR4, its pros and cons, and how you can optimize its flight performance and reliability.

Learn more about long-range FPV flying in this guide: https://oscarliang.com/long-range-fpv-flying-mini-quad/
Table of Contents
Where to Buy
You can purchase the Explorer LR4 O4 Pro Edition from these vendors:
- Banggood: https://oscarliang.com/product-04g1 (Coupon code: BGc9f082)
- AliExpress: https://s.click.aliexpress.com/e/_ooatdK0
- Flywoo: https://oscarliang.com/product-b073
Note: You can buy the Explorer LR4 with or without the DJI O4 Pro Air Unit. However, the version that includes the O4 Pro is $270 more—while the O4 Pro alone costs only $220. That’s a $50 markup! If you’re comfortable installing the Air Unit yourself, it’s more cost-effective to buy the drone without it and install the O4 Pro separately. I’ll walk you through the installation process later in this review.
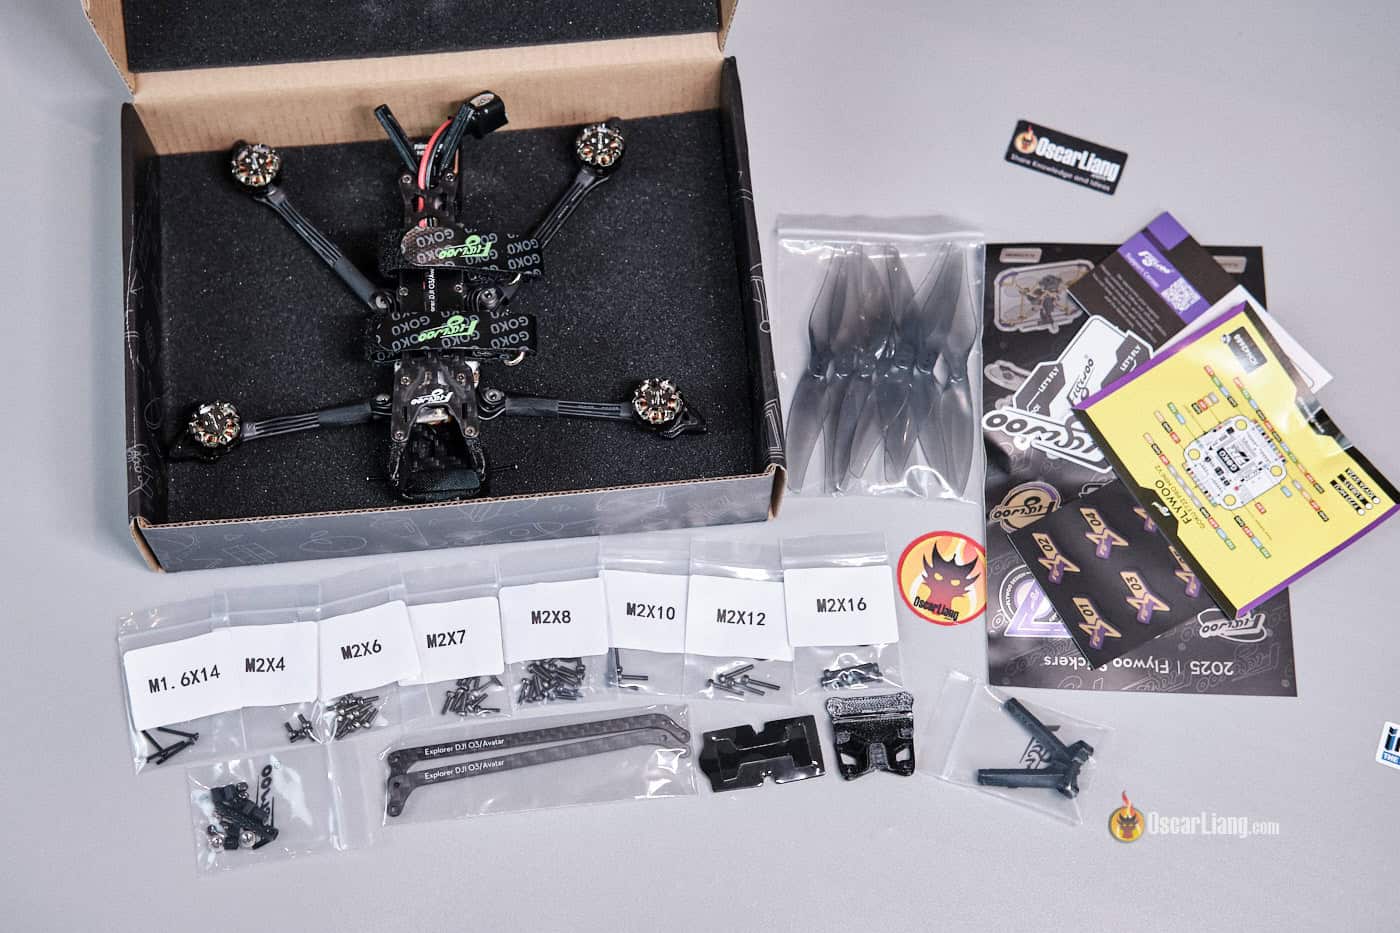
Accessories include:
- 8 × Gemfan 4024-2 Black Props
- 2 × Battery Straps (15x180mm)
- Screws
- Additional 3D printed mounts
Specifications
- Frame: Flywoo Explorer LR4 O4 PRO Frame Kit
- Flight Controller: Goku F722 Mini
- ESC: Flywoo 45A 32bit 4-in-1 ESC
- FPV System: DJI O4 Pro Air Unit
- Receiver: ExpressLRS
- Propellers: Gemfan 4024×2 Bi-blade
- Motors: Flywoo Nin V2 1404 2750KV
- GPS: GOKU GM10 Mini V3
- Battery Connector: XT30
- Weight:
- 171g (without battery)
- 239g with a 4S 720mAh LiHV (sub-250g)
- 266g with a BetaFPV Lava 4S 850mAh LiPo

Build Quality & Design
Almost the Same as the Original Design
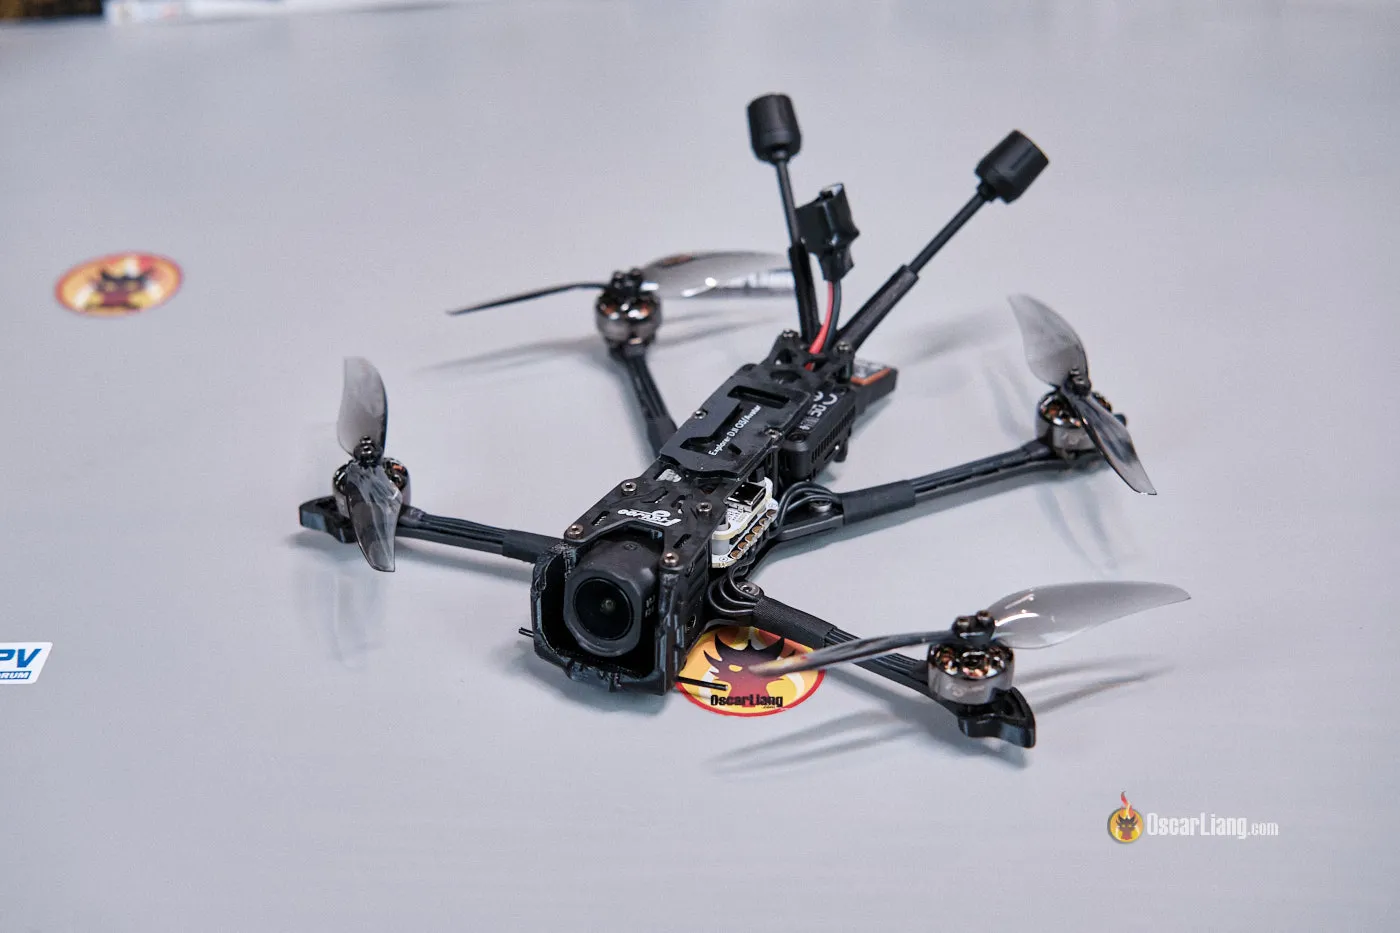
Flywoo hasn’t changed much about the Explorer’s design since the original version from five years ago. The main update is a modification to the frame to accommodate the DJI O4 Pro Air Unit.
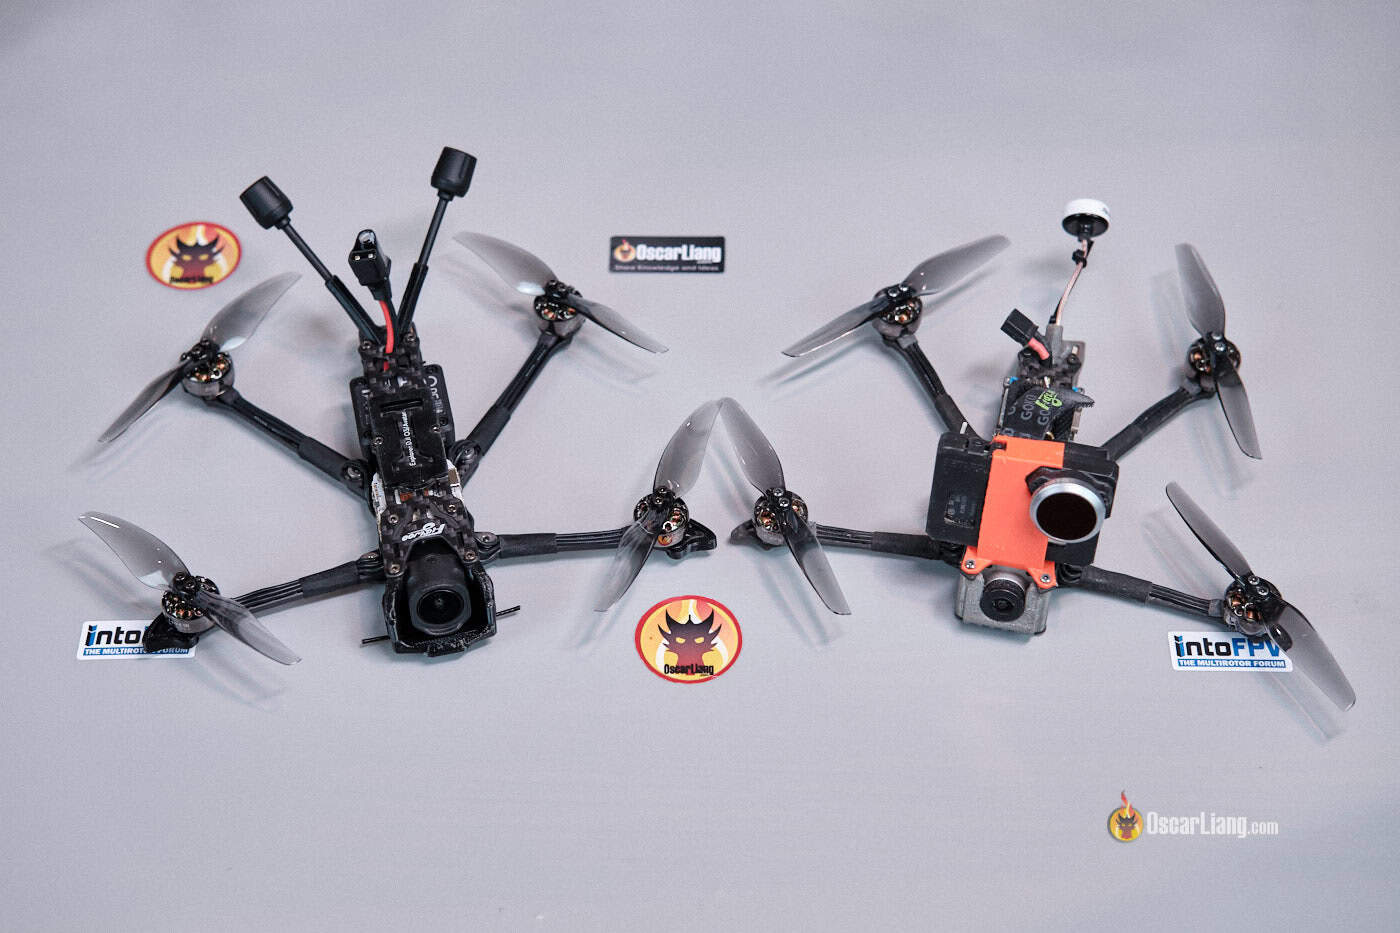
Left: Explorer O4 Pro; Right: Original Explorer with Caddx Vista
For those unfamiliar with the Explorer, it uses a deadcat layout, which helps keep the props out of the camera’s view. The arms are extremely skinny—this drone isn’t built for crashing, but rather for staying light to maximize efficiency and flight time.
The soldering quality looks great. The motor wires are soldered vertically, keeping the profile low and reducing the risk of wire damage. Antennas are mounted in a V-shape at 90°, which is optimal for signal reception—nice attention to detail from Flywoo.
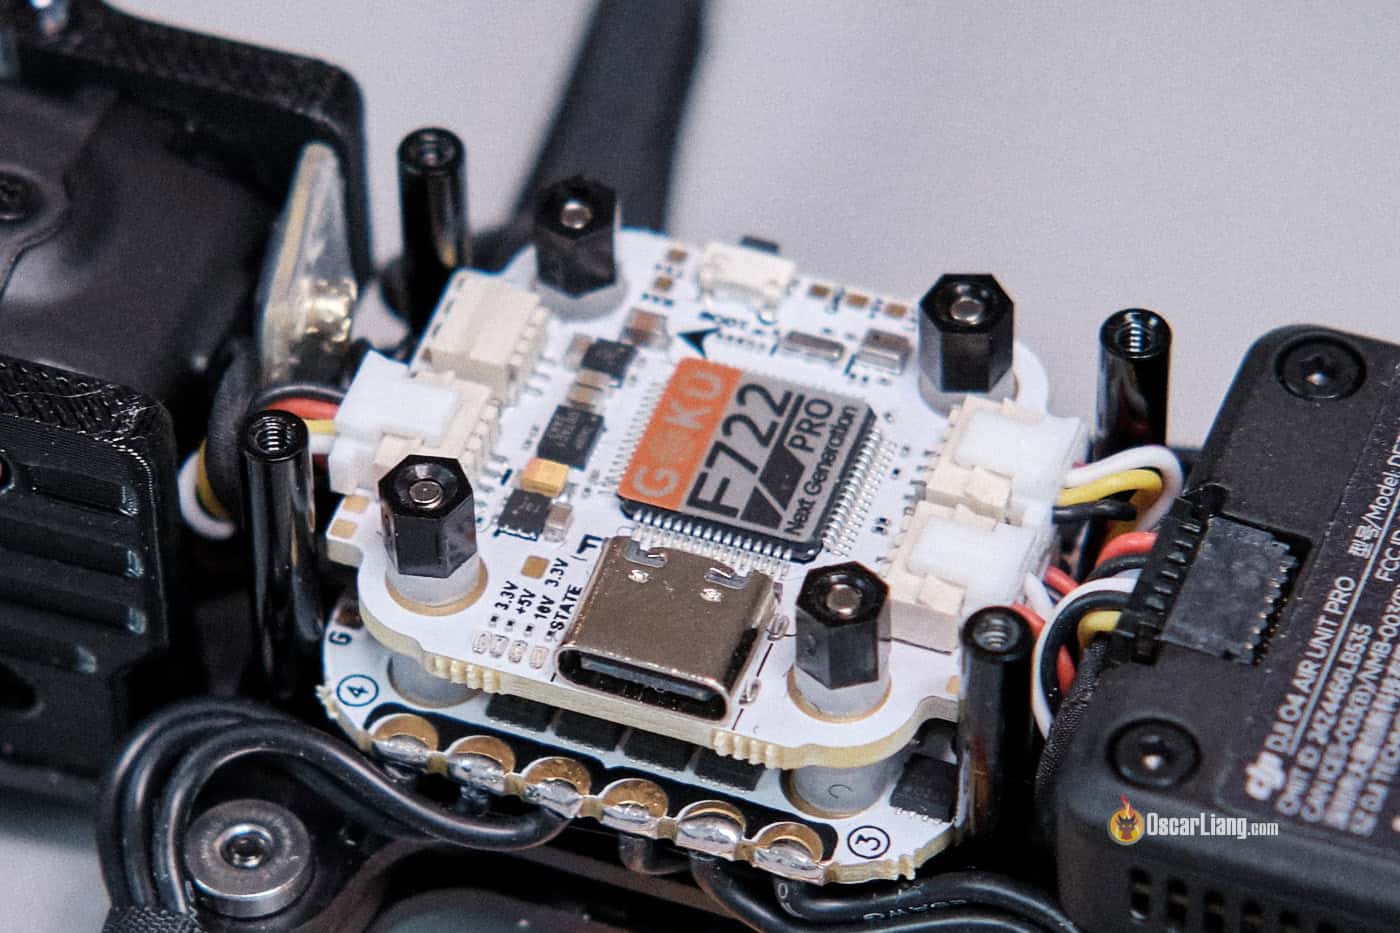
Electronics
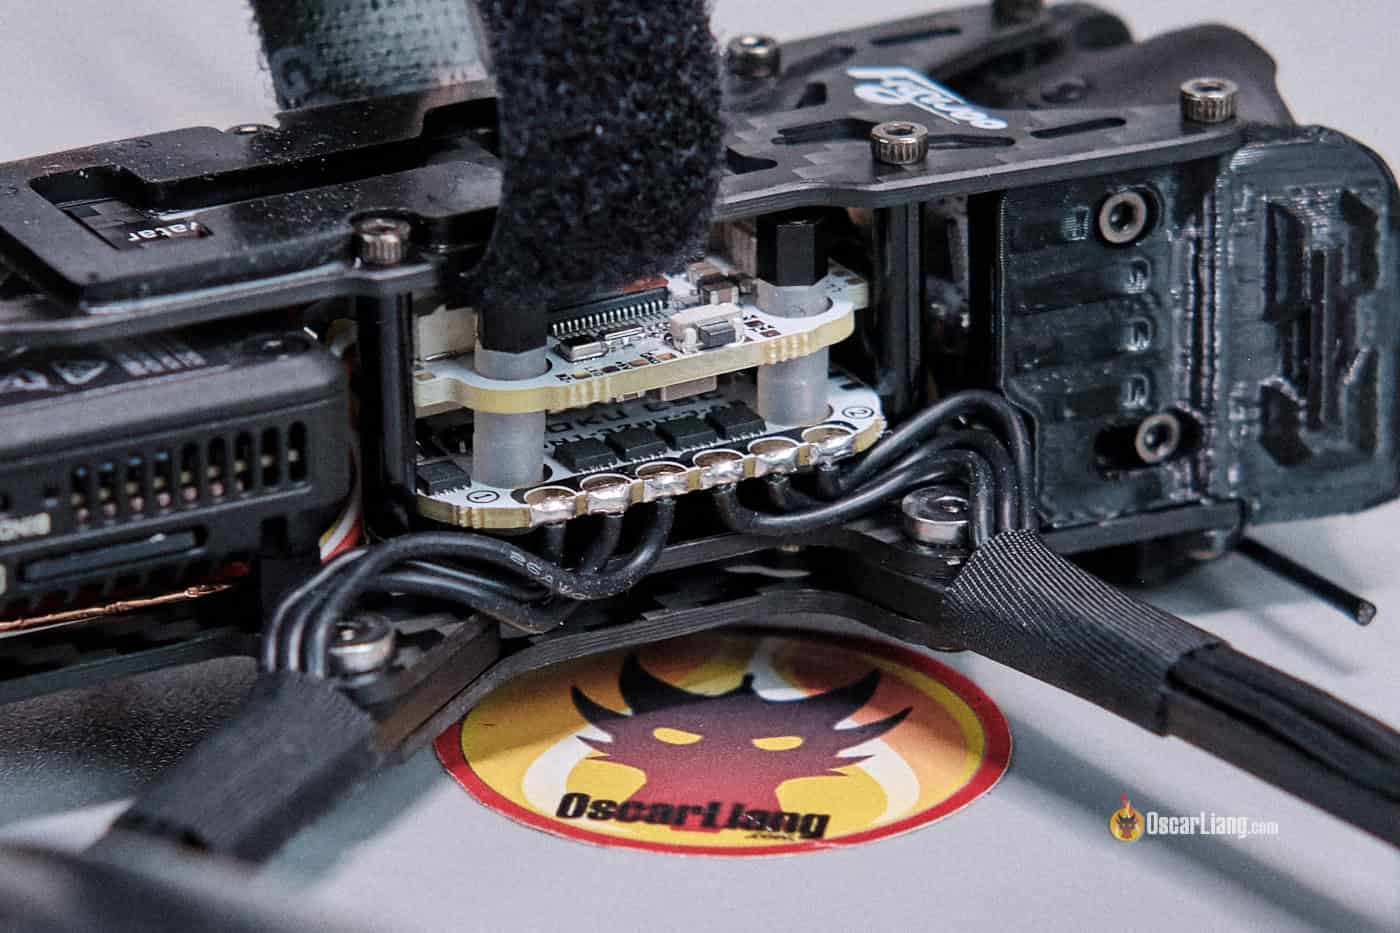
Flywoo upgraded the FC/ESC stack from 16x16mm to 20x20mm. The larger board size not only makes repairs easier potentially, but the new ESC now features 45A 32-bit support—a major step up from the previous 13A version. It’s a huge overkill for this build (you’ll hardly use 10% of its current rating), but hey, having extra headroom is never a bad thing.


All the components are connected to the FC via connectors – no soldering on the FC at all.

The receiver is not attached to anything, just left there hanging freely. With the O4 camera installed it’s sort of being pressed by all the wires between the stack and camera, so it’s not loose or anything and hasn’t been a concern so far during my testing.
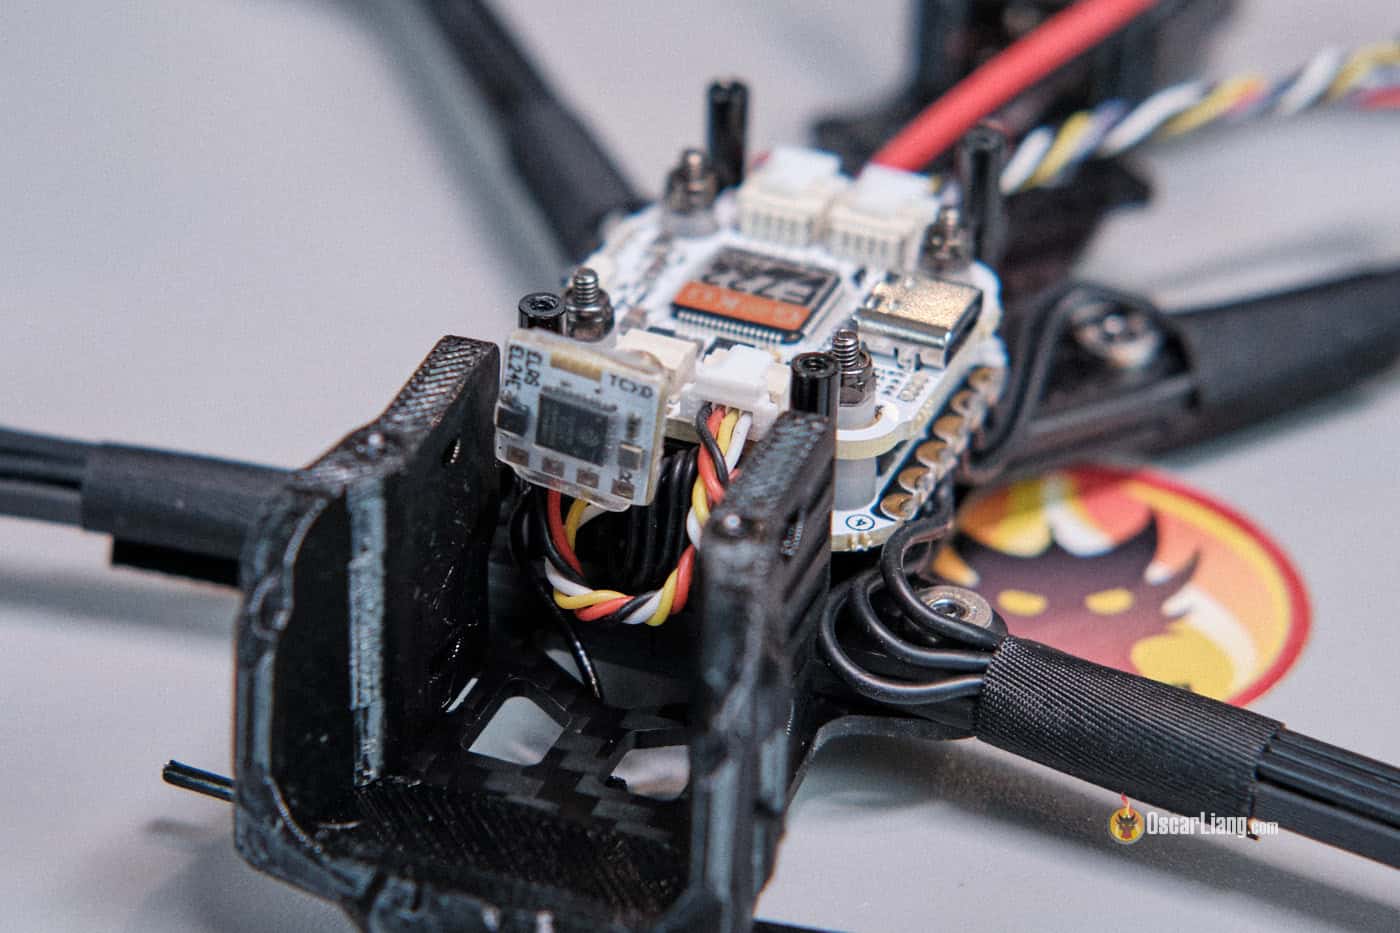
They’ve also finally added a current sensor, which is a big plus for long-range flying. Voltage alone can be unreliable—especially with low C-rated batteries that suffer from voltage sag. With a current sensor, you get a much better idea of battery usage and can better judge when to land.
Due to the tight space, Flywoo had to solder the capacitor directly to the XT30 connector, which is a bit far from the ESC. The capacitor is also quite small. While not the most effective setup for noise filtering, it’s better than nothing. Luckily, the small motors don’t produce too much electrical noise, so this should be fine in most cases. Learn about capacitor in this guide: https://oscarliang.com/capacitors-mini-quad/

GPS Improvements
Flywoo continues to mount the GPS module at the rear, just under the VTX antennas—a location that I’ve always found problematic. In the earlier model, the M8-based GPS would take a long time to get a 3D fix, and satellite counts were often low due to interference from the nearby VTX antennas. The routing of GPS wires beneath the VTX added even more EMI and made matter worse.

This time around, Flywoo attempted to address the issue by:
- Shielding the GPS wires with copper tape
- Upgrading to a newer, more powerful M10 GPS module
While I still wish they had moved the GPS away from the VTX entirely, these changes should improve GPS reliability.
Receiver Antenna Mounting
Another design choice I’m not a fan of is how the receiver antenna is mounted.

While this mounting method is simpler for manufacturers and works fine for short-range flights (within a couple of km), it’s not ideal for long-range. For best performance, antennas should be mounted vertically. Learn more about antenna mounting: https://oscarliang.com/antenna-positioning/
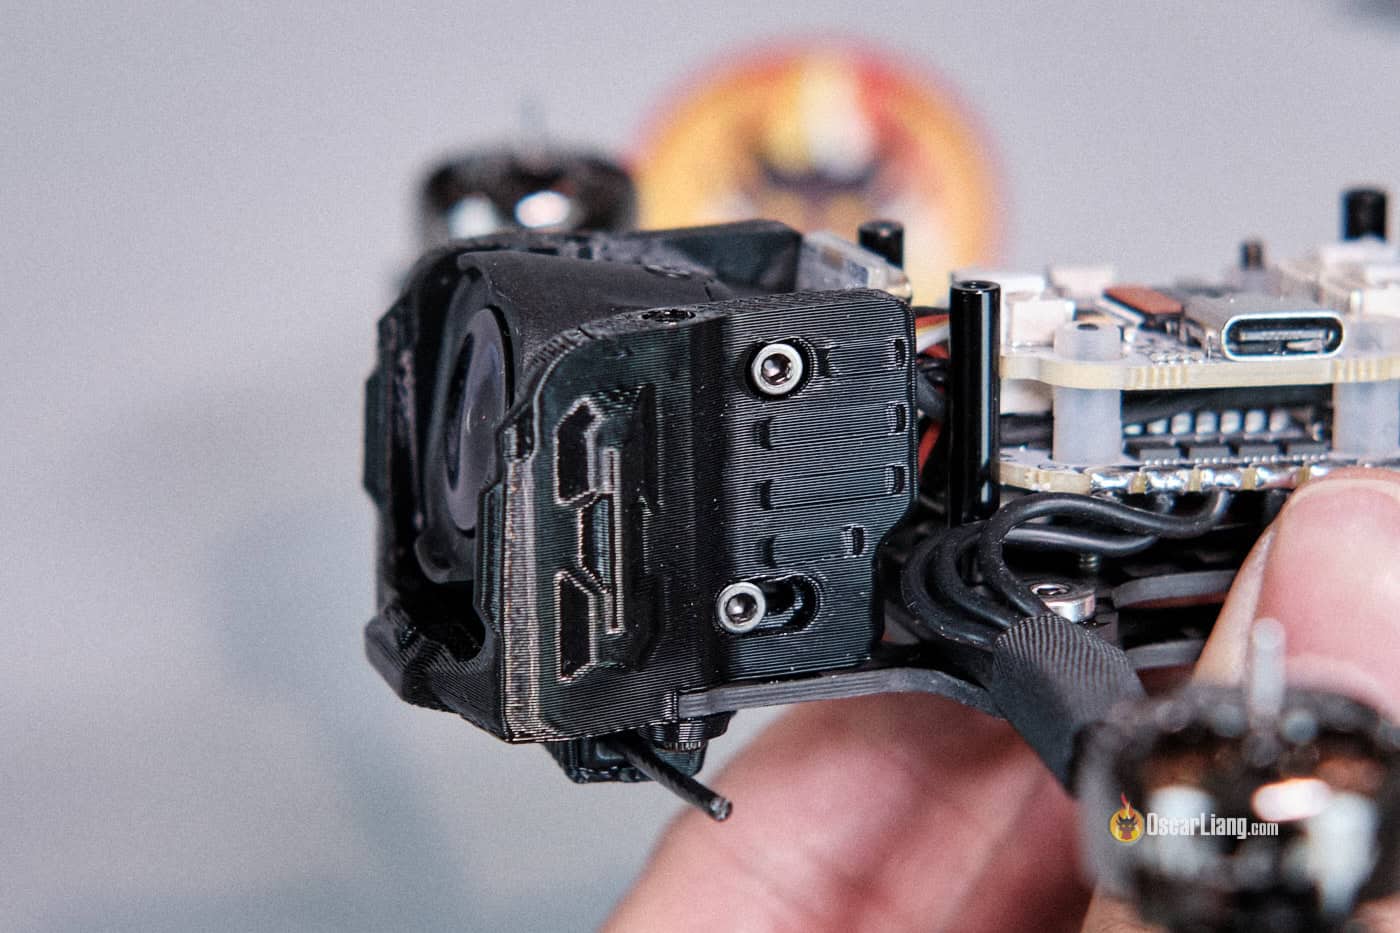
DJI O4 Pro
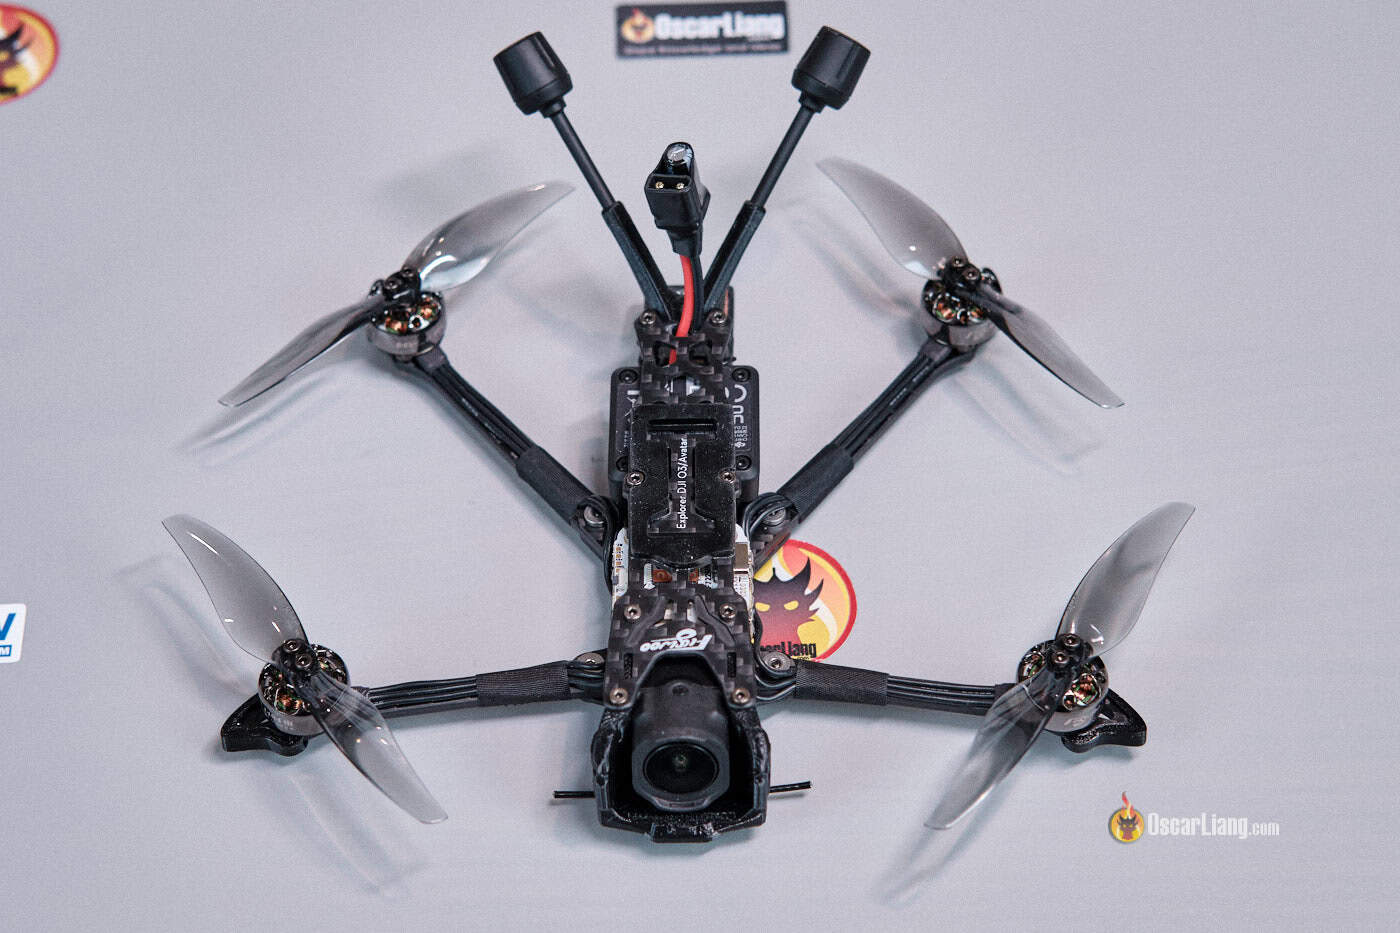
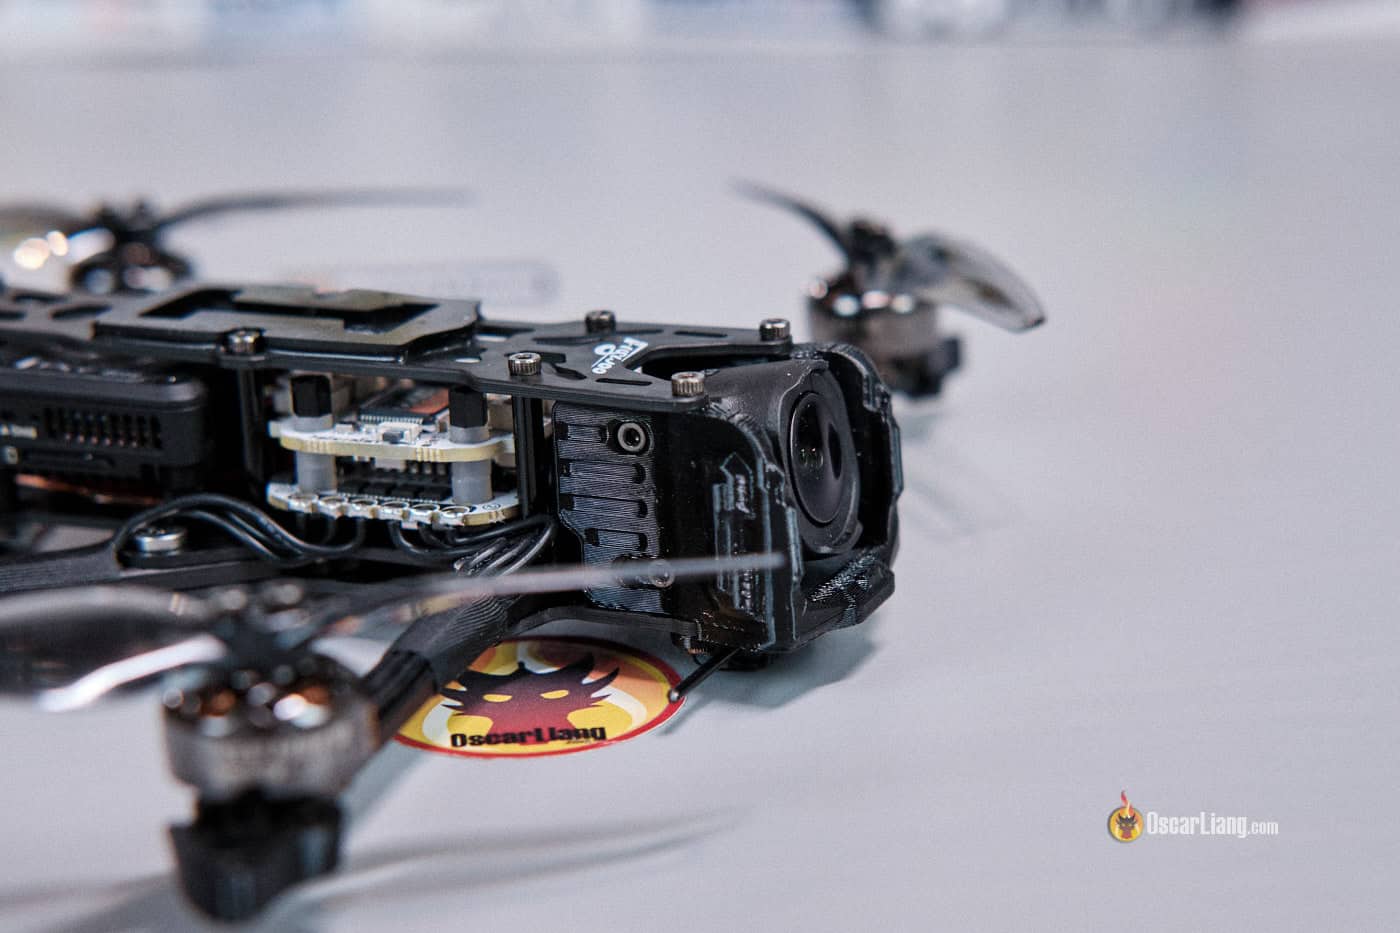
The DJI O4 Pro Air Unit is securely mounted on standoffs, leaving clearance for wires beneath. This setup allows for decent airflow, helping to keep the air unit cool during flight. Even though the O4 Pro camera is only mounted between simple TPU adapters, I didn’t notice any jello or vibration in the footage, Gyroflow also works flawlessly.
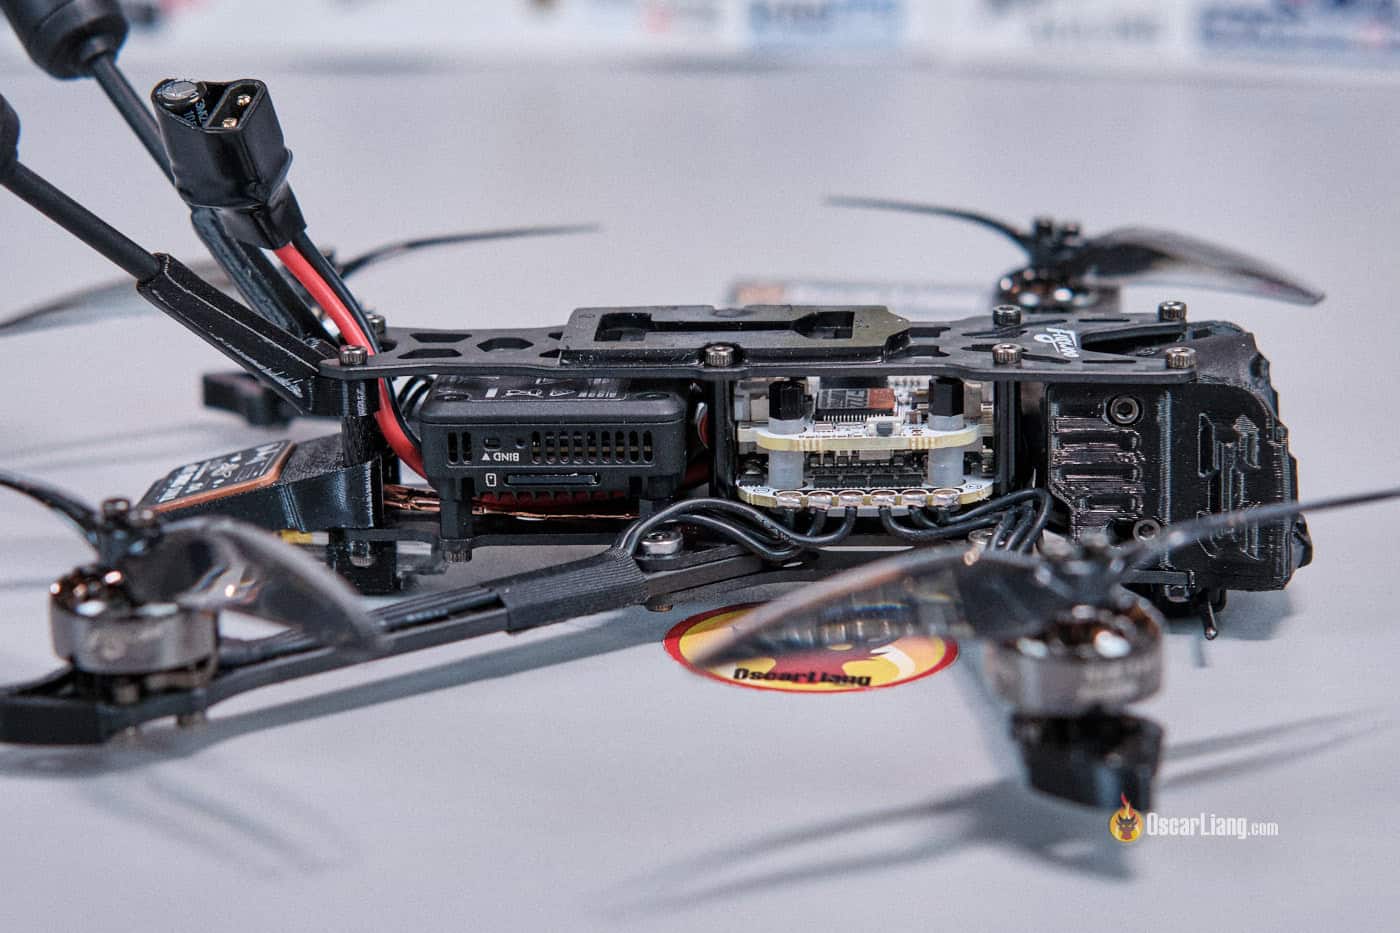

One downside: the camera tilt angle is highly limited, with a maximum of around 15 degrees. This restricts how fast you can fly, as higher speeds will have you staring at the ground more. The limited angle is due to the frame’s compact height—the O4 Pro camera is physically large, and increasing the tilt would require a taller frame, which in turn would increase weight, drag and reduce efficiency. That said, for a slow cruiser like the Explorer, this angle is adequate.
Onboard Buzzer
Flywoo includes a self-powered buzzer—a rare feature in BNF FPV drones. If your battery dies or gets disconnected in a crash, the buzzer will continue beeping for hours, greatly improving your chances of finding the drone.

If you’ve never used one of these buzzers before, don’t be surprised when it starts beeping after you unplug the battery—this is expected behavior. To stop the beeping, just press and hold the button on the buzzer for a few seconds to disarm it. If you’re simply swapping batteries, you don’t need to press the button, simply plugging in a new battery will automatically stop the beep.
Flight Performance
Here’s footage from one of my test flights:
Battery Choice and Efficiency
Depending on battery weight, the Explorer pulls around 6-7A at 50 km/h and 7–8A at 60 km/h—which is impressively efficient.
If you want to stay under the 250g weight limit, the largest battery you can use would be 4S 850mAh LiHV 60C from GNB, which comes in just under the threshold and offers around 10 minutes of cruising flight time and up to 7km of total flight distance. LiHV batteries are slightly more energy-dense than regular LiPo, giving you a bit more flight time, see my testing here: https://oscarliang.com/lihv-battery/
Get the GNB 4S 850mah LiHv from AliExpress: https://s.click.aliexpress.com/e/_olJ1Gke

For maximum flight time, the 4S 18650 Li-ion battery pack is the way to go. It can provide almost 30 minutes of flight time (based on my testing with the previous version of Explorer), though it increases the overall weight to around 365g. Ideally, you should build your own pack using high-quality cells. I recommend the Molicel P30B 18650 cells, which I’ve tested here: https://oscarliang.com/best-18650-li-ion-battery/#Results-and-Recommendations. You can also buy pre-built Li-ion packs, but they often use cheaper cells, here’s a list of recommended options: https://oscarliang.com/li-ion-battery-long-range/#Buying-Ready-Made-Li-ion-Battery-Packs
Personally, I love cruising at around 40–45% throttle (45–50 km/h) with 4S 850mAh, or 50% throttle (50–60 km/h) with the 4S Li-ion pack. This seems to be the optimal throttle range for maximizing flight time.
Cinematic Smoothness
This drone flies like it was on rail, very locked in and stable. In the flight footage, I was flying in 20 MPH gusts, and while the drone did drift quite a bit (due to its light weight), it didn’t wobble like many smaller micros do. That stability is very beneficial for capturing cinematic footage.
Freestyle Capability
With hover at 36% throttle and a top speed of 105 km/h using a 4S 850mAh LiPo, the Explorer is not a fast drone. During extreme maneuvers, it tends to wobble and experience instability due to the limited power of the motors.
Let’s be honest—the Explorer feels underpowered. The 1404 motors are considered very small for 4-inch props; they’re commonly used in 2.5-inch freestyle drones, and in my experience, they even struggle with 3-inch props! But remember, this drone is built for efficiency and endurance, not raw power, so it makes sense.

While it’s no freestyle beast, it can handle basic moves like split-S, power loops, and inverted yaw spins just fine. You just need to adjust your expectations—this isn’t a 5-inch ripper.
Noise
The Explorer is surprisingly quiet. It’s not silent, but it’s much less intimidating than a 5-inch freestyle FPV drone. This makes it well-suited for flying in parks or urban areas without drawing too much attention.
Durability
As mentioned earlier, Flywoo hasn’t changed much about the Explorer’s frame design since the original version—and based on my experience, it’s quite fragile. I’ve broken arms in light to medium crashes—not even hard hits—due to how skinny the arms are. As long as you’re aware of its fragility and stick to cruising instead of aggressive flying, it’s fine.

GPS and Rescue Mode
Slight disappointment here: the GPS takes quite a long time to get a fix from a cold start—about 6 minutes to acquire 8 satellites. The max satellite count was around 19. I suspect the low GPS performance is due to its mounting location—it’s under the VTX antennas.
That said, Betaflight GPS Rescue Mode works well. I’d still recommend a few changes to make it better—such as adapting “throttle fallback” (see my Rescue mode guide for detail) and reducing return speed, etc.
How to Setup
Installing DJI O4 Pro
I bought the Flywoo Explorer without the DJI O4 Pro Air Unit, so I had to install it myself.


Since this is quite a small quad, working on it is a bit more challenging compared to larger drones like a 5-inch, but it’s still doable with patience. It took me about 30 minutes. No soldering is required—just mount the camera, air unit, and antennas, plug in the cable, and you’re good to go. Here are the steps.
Remove the antennas from the DJI O4 Pro Air Unit.
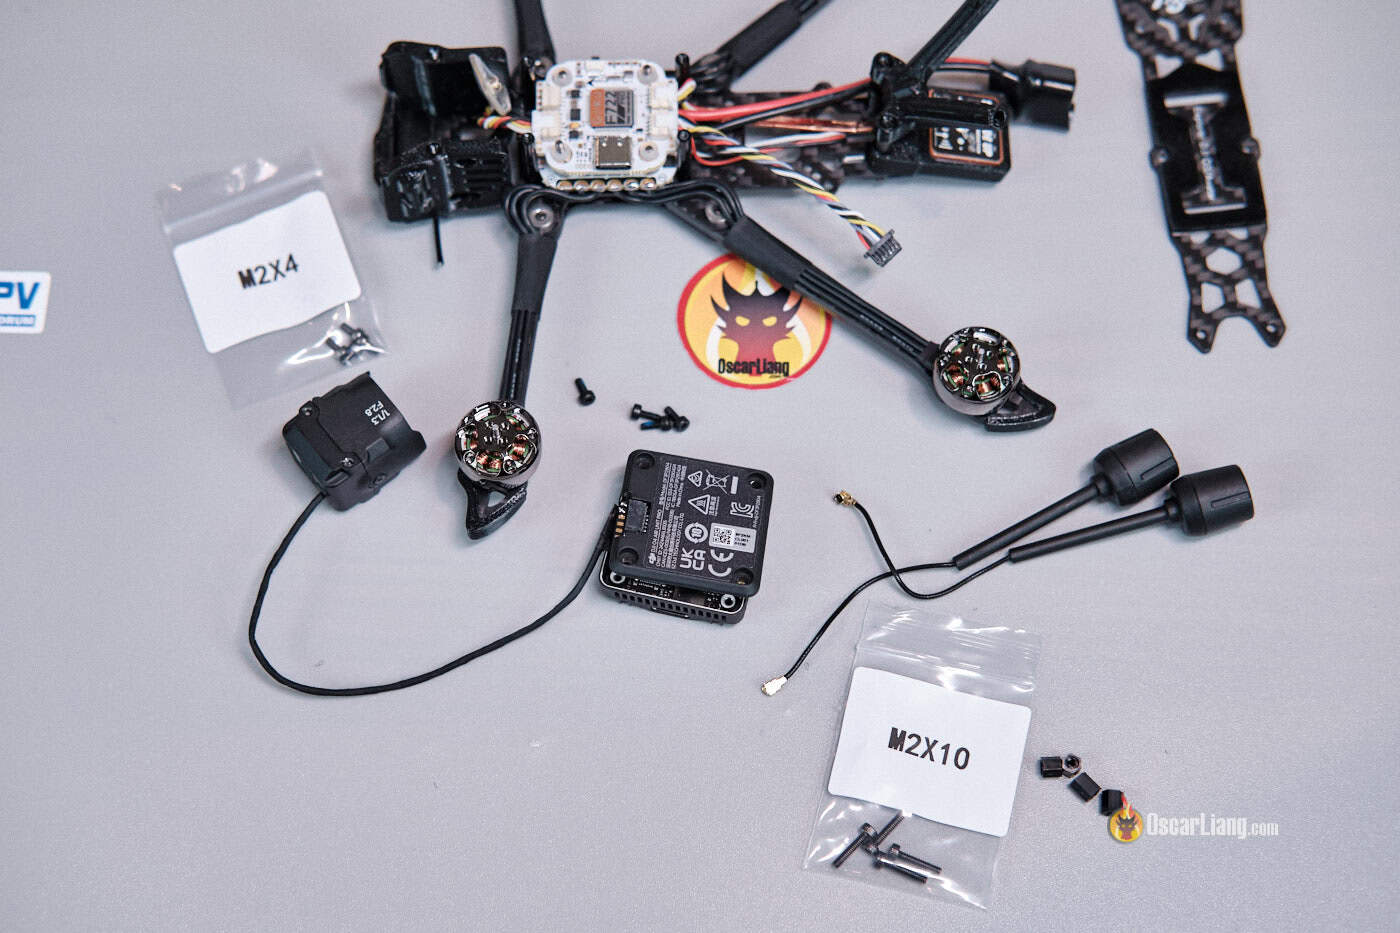
Install the antennas into the TPU holder.

Install the four standoffs at the back of the frame for mounting the air unit.

I preferred to run the camera cable under the FC, so I removed the FC from the stack temporarily.

Install the O4 Pro camera in the frame.
Reattaching the antennas onto the air unit, plug in the cable from the FC, and mount the air unit onto the standoffs. That’s it!

There’s no need to remove the SBUS wire in the O4 Pro cable, because it’s connected to UART1 (specifically RX1) on the flight controller. Since the ExpressLRS receiver is connected to UART2, there’s no conflict as long as you’re not using UART1 for anything else. If you plan to use UART1, you should remove the SBUS wire in the O4 cable.
Before powering the drone for the first time, plug in a smoke stopper such as the Vifly Shortsaver, and connect a battery and test the drone and see if it powers up correctly. You should hear the ESC/motor initiation beeps.
Activate the O4 Pro if you haven’t already: https://oscarliang.com/how-to-setup-dji-o4-pro/#Activation
Pair the DJI O4 Air Unit with your goggles – Guide: https://oscarliang.com/how-to-setup-dji-o4-pro/#Pairing-DJI-Goggles-3-with-O4-Air-Unit-Pro
Firmware
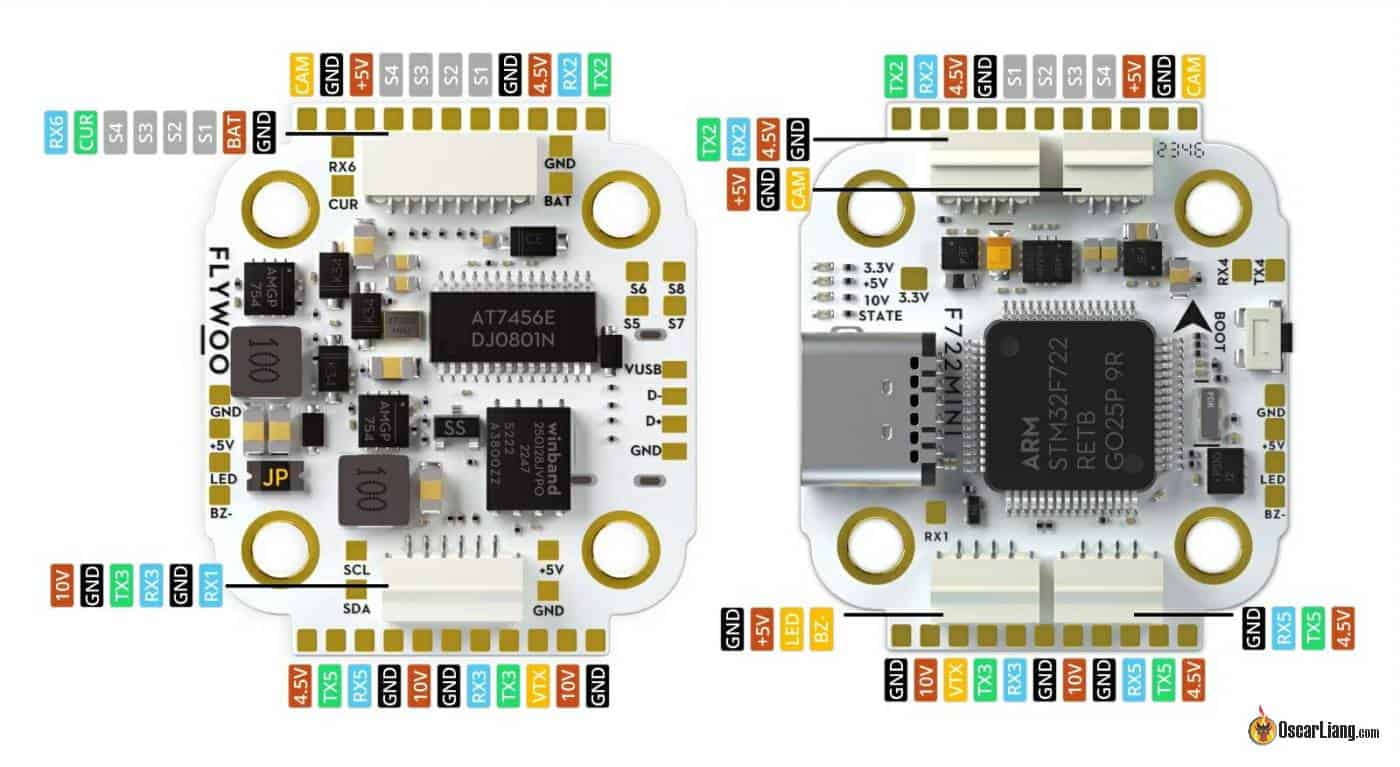
The flight controller (FC) board target is FLYWOOF722PROV2, and it comes preloaded with Betaflight firmware version 4.5.1. For stock CLI Diff, see here.
Here’s the FC pinout diagram.
ESC Firmware: F4A_4IN1 – AM32 2.16. Here are the default ESC settings.

ELRS Receiver Firmware Target: Flywoo EL24E 2.4GHz RX, firmware version says “merge 481945 CE_LBT”, not sure what version this is but it binds fine with my radio which is on ELRS V3.5.
Betaflight Setup
- Bind the ELRS receiver – Detail tutorial: https://oscarliang.com/bind-expresslrs-receivers/
- Load the ExpressLRS preset according to your packet rate – Instructions: https://oscarliang.com/betaflight-presets/#Loading-RC-Link-Configurations
- Set up custom rates – My Rates: https://oscarliang.com/rates/#My-Rates
- In Receiver tab, enable Telemetry
- Configure the Modes tab (arm switch, turtle mode, etc.): https://oscarliang.com/betaflight-modes/#How-to-Setup-Arm-Switch
- Set up OSD, you can copy my CLI lines: https://oscarliang.com/betaflight-osd/#My-OSD-Setup-CLI-Commands
- Disable LED strip in Configuration tab to save some CPU load if you want to increase PID Frequency to 8K/4K (LED strip is not being used anyway).
- Install propellers using M2x7 screws – out of the box, motor rotation is reversed by the way!
What Could Be Improved
Update: I wanted to make this quad more awesome, so I documented the modifications in this post – https://oscarliang.com/upgrade-flywoo-explorer-lr4/
The FC stack could benefit from using plastic nuts instead of metal lock nuts. Not only are metal nuts heavier, but they’re also tricky to remove when you want to work on the FC.
As mentioned earlier, mounting the receiver antenna vertically would be ideal. I’m not doing that just yet because I plan to upgrade to a diversity receiver, with antennas mounted on both sides of the frame—just like I did with the original Explorer. With that setup and just 100mW on my T-Lite V2 radio, I was able to fly out 3km and back.

It’s a bit of a missed opportunity that Flywoo didn’t use their GOKU Nano GPS with an onboard compass. With Betaflight 4.6 bringing position hold feature, this would have been a great addition. I’m also not a fan of the current GPS mounting location—underneath the VTX antennas. I think it would be better placed at the front, above the FPV camera, and away from all the antennas.
Also, there’s no manual included, and the screw bags aren’t labeled for their purpose—only by size. It would have saved some time if they were labeled (e.g., M2x7 for propellers, M2x4 for O4 Pro camera, etc.).
Some Betaflight settings could have been configured more thoughtfully for the Explorer. For example, GPS and OSD settings were left at default. While Flywoo did provide a custom PID tune, the filter settings were mostly left untouched. There’s definitely room for improvement in filters, PIDs, and Rescue Mode configuration. I’ll be posting my configuration on Patreon.

Stock PID Settings
Final Thoughts
I’ve been a big fan of the Explorer LR4 from Flywoo for years—it’s a fantastic platform with loads of potential. There’s still room for improvements, I wish Flywoo had done more than just upgrade the FPV system. But overall, the Explorer LR4 with the DJI O4 Pro is a fantastic long-range FPV drone, especially for those who travel a lot and have weight requirements. I’d absolutely recommend it.
You can purchase the Explorer LR4 O4 Pro Edition from these vendors:
- Banggood: https://oscarliang.com/product-04g1
- AliExpress: https://s.click.aliexpress.com/e/_ooatdK0
- Flywoo: https://oscarliang.com/product-b073
Pros
- Highly efficient – offers almost 30 minutes of flight time with Li-ion battery
- Under 250g with a smaller battery, yet still offers up to 8 minutes of flight time
- No need to carry a GoPro thanks to the DJI O4 Pro
- Very compact and great for traveling
- Flies smoothly out of the box
- Rescue mode works right away (only minor tweaks needed for optimization)
Cons
- Takes a long time to get a GPS fix from a cold start
- Lacks power and freestyle agility
- Fragile build – not ideal for beginners and bashing/crashing
- Over 250g when using larger batteries for extended flight time
- Drifts a lot when it’s windy compared to larger 7″ long range quads
14 comments
Beautiful footage but it’s all ruined by the freezes, the pauses in the video. This is a serious deal breaker. Saw exactly the same kind of freezes in your other review on the O4. Can you tell me if it is the O4 camera that is giving this error or what it is?
Hi Oscar, I’m new in FPV Drones, I buy the Explorer LR4 O4 pro and I buy this batteries “Explorer Lionpack 18650 3000mAh SONY VTC6 4S 14.8V 4S1P XT30”, but the drone doesn’t fly, I’m not sure if a buy the wrong battery (so heavies) or if I’m doing wrong in my setup. I updated the RX, TX and FC to the latest version and I follow you beta flight suggestions. What I’m doing wrong? Thanks for you help and excellent page and content.
I’d love to help, but blog comment is not the best place to troubleshoot problems because it takes a long time to communicate.
Have you try reaching out to customer service? Or consider posting your issue on our forum intofpv.com. Incluing videos what’s wrong with the drone, what you have done so far to resolve the problem, etc…
Was my bad, I align wrong the propells, I fix it and is flying. Now I’m working with the gimbals sensitive. Thanks
Hey Oscar, your thoughts on the 3S 3000mah Li-ion vs the 4S 3000mah Li-ion? Would there be any noticeable impact with the ~50g weight savings?
With the same capacity, 4S will provide 25% more flight time than 3S.
That’s because the total energy in a battery depends on both voltage, and capacity.
To have the same flight time as the 4S 3000mah, the 3S battery will have to be 4500mAh.
Ah makes sense, thanks!
I have used iflight true diversity 2.4 receiver (short antennas) and I love it.
I bought this one last week and I thing about upgrade. I want use diversity receiver with two antennas. I”m not sure it’s better to put them both vertically or one of them in original location and the other one somewhere else. I think about putting GPS on top plate next to o4 pro camera against close to vtx antennas. i will add water resistant silicone and that’s probably all. maybe some thread glue.
Hi Oscar,
thank you for the review.
I’m in love with this quad, but i’d like to have position hold / altitude hold. (to set the shots or whatever).
I’m waiting for betaflight 4.6 to come out.
Meanwhile i was thinking about flashing INAV but i don’t know how to PID tune it decently.
Can you please give INAV a go and perhaps share a tunefile?
Thank you
I bought the explorer L4 with 04 pro a month ago and have been flying frequently for cloud surfing. Yesterday, I experienced a RX loss at 50 meters from the takeoff point, but the GPS rescue worked well, landing close to where I took off. Strangely, the OSD showed no signal from the receiver, although the RC still received telemetry. I checked the cables and soldering, and everything was fine. This morning, I tested it again and didn’t lose RC connection, flying up to 1 km away.
Now, I can’t arm the quad because a “flag calib” appears in the OSD, which seems related to the barometer. I can only arm it when I disable the barometer in Betaflight. Do you think was a problem of the FC?
Update: I was able to make GPS work. The OSD is still a problem
Hi Oscar, thank you so very much for your work. I am a newbe. I’ve also got LR4 with 04 PRO, PNP, and only thanks to your post was able to configure ports correctly to make it work with N3 goggles an RC3. But I still have two problems:
1. I don’t have OSD in the goggles. I can only see image from camera, but that’s it.
I tried running CLI commands, that you recommended: ‘set osd_displayport_device = MSP’ and ‘set vcd_video_system = HD’ and the one, setting OSD port on UART 4, but with no success.
Also, on Receiver tab the ‘Telemetry’ box is blank.
2. GPS: when I select it on ‘Configuration’ tab and enable it, after saving, it is disabled again. I re-flashed firmware making sure the ‘GPS’ is included, but it still cannot be enabled.
Any help will be appreciated.
Emh… you shouldn’t need to change any config and OSD should work out of the box – you only need to change Video Format to HD in the OSD tab.
Maybe try loading the original CLI diff to reset everything back to stock settings, and try again?
If you need help with configuring DJI O4 OSD, please follow this guide: https://oscarliang.com/how-to-setup-dji-o4-pro/#Setup-OSD-in-Betaflight