Just a while ago I wrote a brief build log for the FPV250 mini quad. I recently received the new Diatone Frames (FPV250LH – Low Hung or FPV250 V3) from Hobbyking, with some improvements I have in mind from the previous version, I decided to sell my old one, and rebuild the mini quadcopter with all brand new parts.

In this build, I will try to keep it minimal, no gold connectors, shortest wire possible and so on. I have requests for more step by step pictures of my build log last time, and that’s what I am going to do as well.
Check out the complete part list for 250 size mini quad for more options on motor, frame, ESCs, FC, and all other components.
Update: I have started a new build with a different frame.
A quick video.
As to the components and parts, it would be similar to my previous build. But if you have any question do check it out before asking.
- Diatone FPV250LH V3 Frame
- Cobra 2204 1960KV Brushless Motors
- 12A Blue Series ESCs with SimonK Firmware
- Gemfan 5030 Propellers
- Naze32 with Multiwii
- Frsky DJT Transmitter and Frsky D4R-II Receiver
- Turnigy 9X with er9X Firmware
- SONY SUPER HAD 600TVL CCD Camera – PZ0420 with 2.8mm Lense
- Mobius / GoPro
- Super Simple OSD
- ImmersionRC 5.8Ghz VTX
- Turnigy Nano Tech 4S Battery 1300mAh/1800mAh
- Weight ~ 630g
- Flight time ~ 9 minutes with 1300mah, 12 mins with 1800mah.
FPV250 V3 Frame
Diatone released their FPV250LH V3 (clean and dirty) frame not long ago, which separates the cage from the main frame by some vibration-dampening rubber balls. This is not much different from the last version apart from this, all measurements, size of screws etc remain the same.

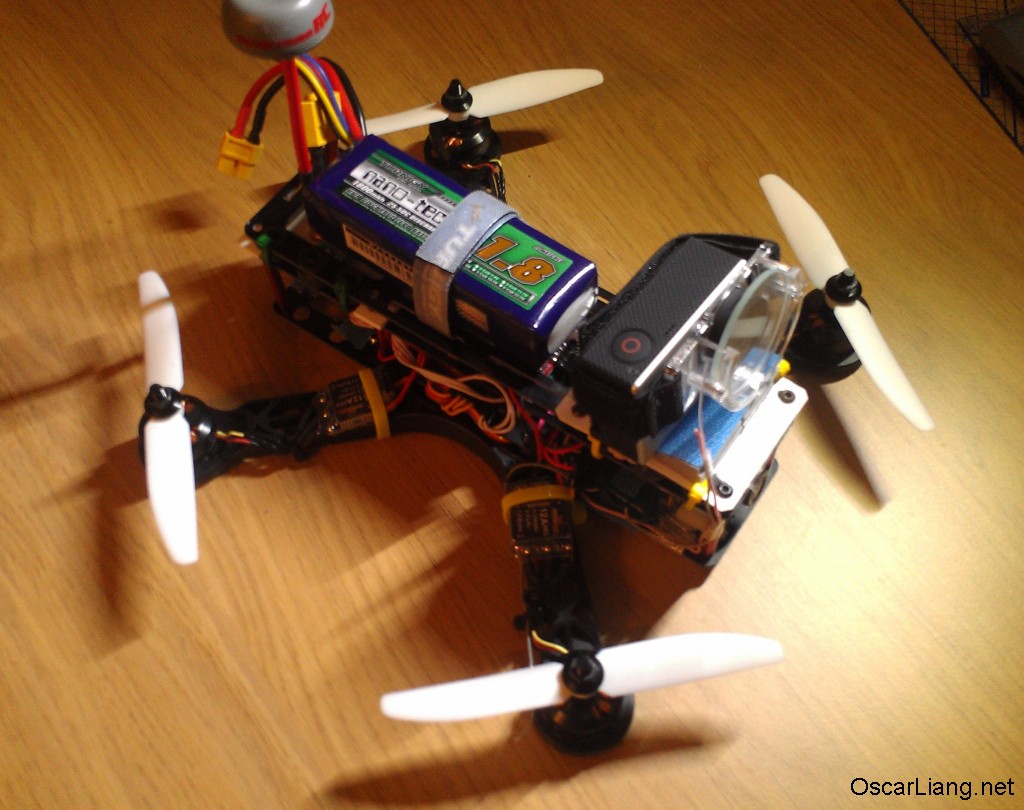
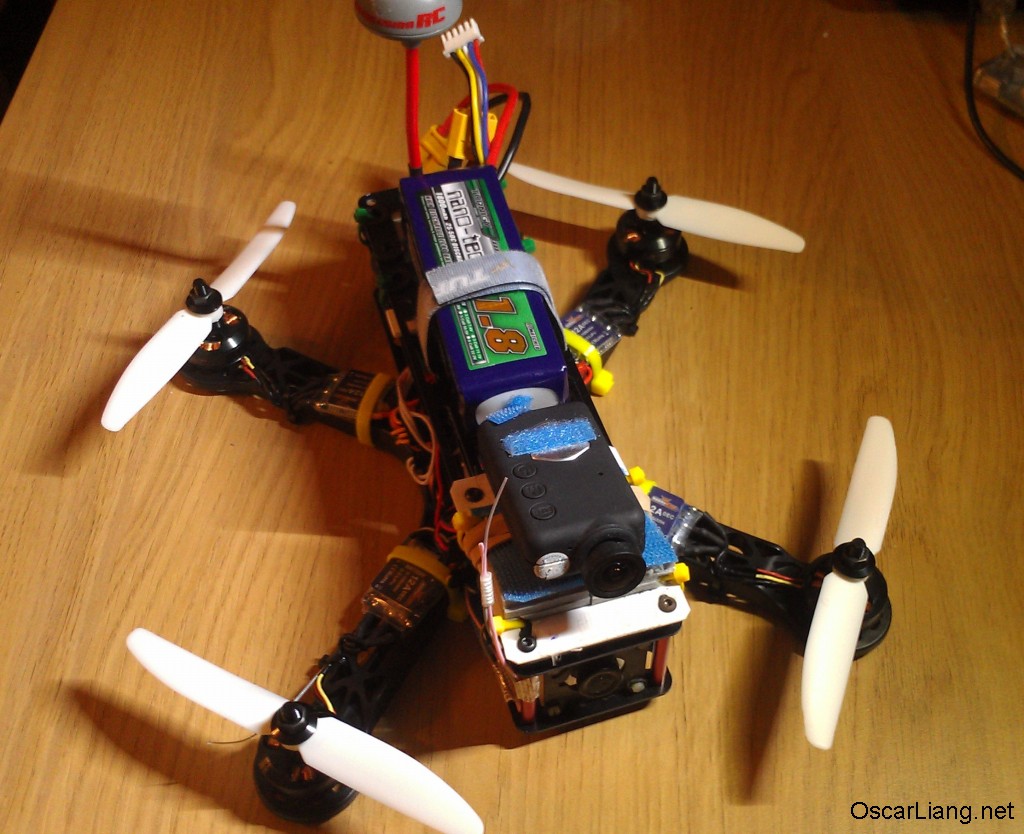
The only problem is when the cage is hung below the main frame, it’s awkward to mount the recording camera. So I was getting creative and rearranged the positions. I didn’t like the idea of “low hung” anyway, I think it causes the “pendulum” effect when the quad is making rolls, making movement more slowly.


It’s now effectively the previous FP250 version, but with a anti-vibration top plate for the Mobius / GoPro camera.
One of the downsides of this frame is weight.

Quadcopter Assembling
Right, let’s get to business.
Table of Contents
Motors
Same as the last build, I will continue to use the Cobra 2204 motors. They are great for mini quadcopter, medium price but excellent quality. The 1960KV version is great for 4S battery setup, and the 2300KV version is perfect for 3S Lipo setup.


Remember to use washers at the bottom of the mount, otherwise the the screw might be pull through the holes, and the motor might come loose.


Now installing the prop adapters, I use some loctile glue to make sure the screws doesn’t fall out due to vibrations.


ESCs
I am using Hobbyking Blue Series 12A ESCs, all N-FET, cheap and programmable.

First of all, flash all 12A ESCs with SimonK Firmware. It’s very easy to do with these ESCs, I described how to flash these 12A ESC using Arduino in detail.


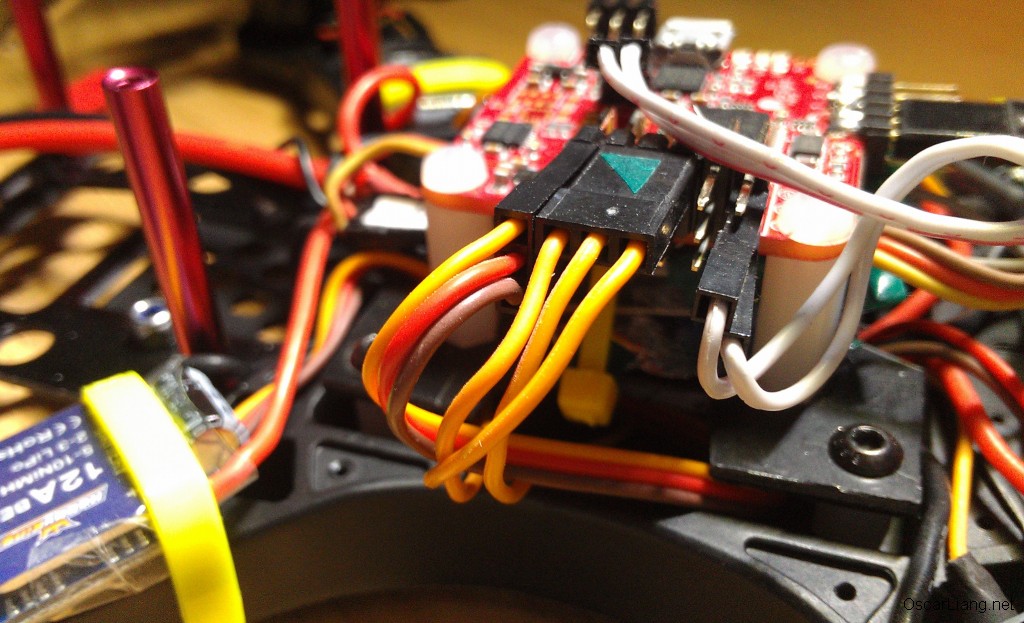
I also like to strip the 5V and GND cables for three of four ESCs, so the flight controller and radio receiver is only powered by 1 ESC. The reason I do this is because in Naze32, all BEC’s are connected together, and current is drawn when there is a voltage different (even very little). I found the ESC’s run cooler when the 5Vs are not connected together. Also, it’s a few grams lighter too! Every gram you save, is a few more seconds in the air.
But of course, this is unnecessary.


Now put everything on the frame, and measure the length of the wires, make sure they are long enough.

Power Distribution (PDB)
I am using 14 AWG wire to distributes power directly to the ESCs from the battery. I am not using PDB because I don’t like having the conductive surface exposed, any wet leaves get in there could potentially short your system. I also added a branch for voltage OSD, and another branch for the video transmitter / Camera.


To find out what wire you should be using, given the max current you might run in your system, check out this post.

Cutting the wires of the motors and ESCs to a reasonable length, and solder them together, finished with head-shrink tubes.


Electronics – Naze32, Radio Receiver, Video Transmitter and OSD, Power filter
The FPV250 Frame isn’t really designed for small flight controller like the Naze32, so you need to make your own FC adapter to mount it. Some people prefer to drill holes at the bottom, or simply use double sided foam, it’s all up to you. Here I made an adapter for this frame.

I am fitting the ImmersionRC 600mW video transmitter below the Naze32 to save some precious space. Voltage regulator and power filter sit at the back.
Although the ImmersionRC 600mW vTX accepts 4S Lipo voltage, the CCD camera only works on 12V, so I will be using the voltage regulator for both of them. To avoid any noise from the motors/ESC’s, I built a power filter for it.

And the radio receiver goes to the front. I am using CPPM, so there is only one cable connect for 8 channels.

And the OSD for Lipo voltage and timer is cable tied to the two spacers.

And finally mounting the Naze32, and connecting the ESCs. The white cable is for the bluetooth module, which allows me to do PID tuning on the field using my smart phone, without the need of a computer.

CCD Camera
You might ask why CCD Camera? Here is a guide explaining what makes a good FPV camera, and what CCD means.
To use the Sony HAD 600tvl CCD Camera on this frame, you will need to remove the edges of the board first.

To fix the camera on the camera mount plate, you will need some long M2 screws, nuts and spacers (or rubber balls).

This is recycled from my last build, look how dirty it is! :)

I put more washers on the top screws, so the camera is tilted upward, which allows me to see more when the quadcopter is flying forward. This is especially useful if you are a quad racer who loves speed.

And this is what I am getting.

Dirty and Clean Plate
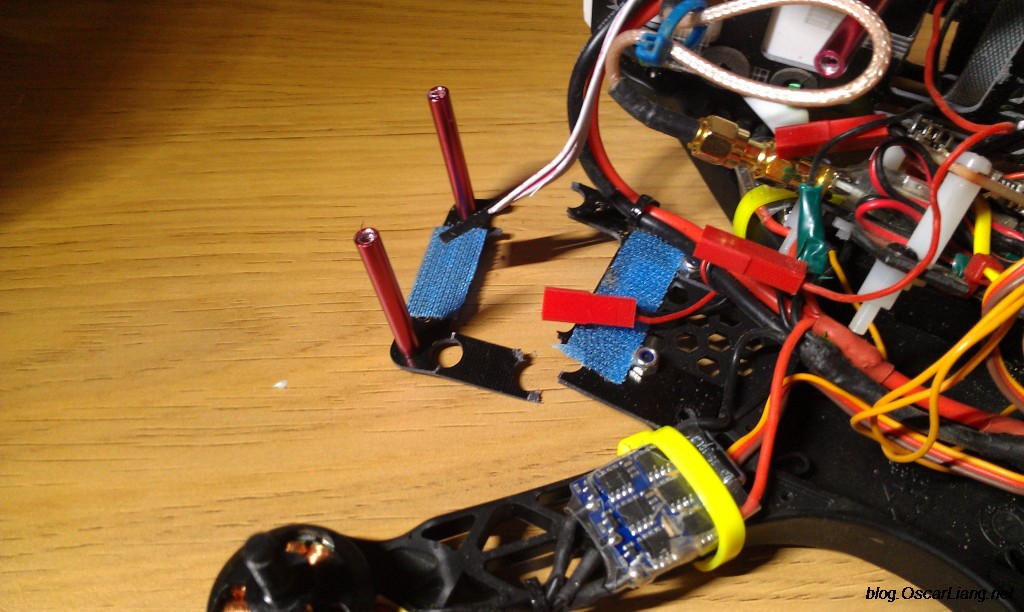
Don’t mount the antenna on the video transmitter directly, it could easily rip the antenna mount off the PCB of the vTX. I learned the lesson a while back, although I managed to fix it by soldering it back, but the range decreased a lot.

I prefer to use a coaxial extension cable, have the antenna mount end fixed on a piece of plastic sheet (or just use one of the rubber ball holes on the frame).
The camera mount is made from these anit-vibration stickers.


And I also run zip ties through the rubber balls.


Final Touch


Flight Controller Settings
Naze32 settings on this mini quad is discussed on this post. Here is the first flight:
Rolls of Death!
Not sure what caused this, I still need to bench test it a bit more. Here is some background of the crash.
It rained earlier, the grass is a bit wet, I flew happily for 20 mins, and had a few minor crashes, so some components might have got wet grass on/in them.
After another take off, all of a sudden, it just started to spin like crazy, and eventually crashed into the ground. I rushed to the crash site. I lost radio control, because of the radio receiver antenna came loose. But the motors are still spinning.
I took it home, plugged everything back together, and it seems working fine. But I noticed the bottom right ESC heatsink went missing, and there are grass stuck in between the FET chips.
Was it the ESC/motor? Was it the flight controller? Or was it the radio receiver?
After consulted with my friends, we all think it was water that got into the flight controller, and caused it to malfunction. Lesson learned! Never flight during rain, or right after rain!
In today’s flights, I managed to break the frame in a few places, all at where the holes are (where the rubber balls sits). It reveals the weak points in this new frame. These holes are cut so big, it does not leave much glass fibre to hold it together.


Damage Report
The last crash in this video broke the arm of the frame.
https://www.youtube.com/watch?v=Z1VJ7IsmL0E

Another Damage Report
I am not sure if it’s me flying more and more aggressively, or the FPV250 frames are getting crappier, or just simply pure bad luck, this new frame only lasted one week. It snapped almost on the same spot as the last one.
The crash at the end of this video did it. I was so frustrated, as I just arrived the park, and it was my first lipo pack!

I just placed an order for a blackout 250 chinese clone frame. They are about 1/5 of the price of the blackout mini quad, and the spec looks very much the same. I have heard good feedback from others, apart from the carbon fibre cuttings, and hole drilling look bad.
I now have only one FPV250 frame left. If that breaks as well, I will be trying the new QAV250 (C250) Frame, .watch out guys for my review on that. It’s really time consuming to assemble a quad.
Customized DIY Camera Mount (update 23/08/2014)
So one day after many crashes, I came home with two broken top plates. What am I going to do with them, I wondered. I know! I am going to turn them into a small camera mount. Since I have good luck with the V2 frame, I can combine them to create a “Semi V3” frame, and have the best of both worlds.


Use all six holes to get the best dampening effect.

Do not put screws on the top plate yet.


Motor mount Arm snapped again in Crash! (Update: 09 Sep 2014)
My last FPV250 frame finally died after many days of service. I don’t think it can take any more of my abuse, and finally given up! LOL
But no need to shed tear, I will be building another one with the Carbon Fibre 250 Mini Quad frame which I reviewed a few weeks ago. It’s really not a safe spot to break on the arm, where the motor mount is. The motor wires was tore and a little bit of copper wire is now exposed.

This is the last minute video of this frame… RIP
https://www.youtube.com/watch?v=wR_eFPCxwKk
37 comments
Hi Oscar,
How do you know which wires to solder from the EXC to the motors? Since all 6 are black, do you have a way of knowing which way the motor will spin before you energize the system?
Hi Brian, just hook them up randomly first. when you test them for spin direction, if it’s wrong, just swap 2 of the wires and the motor will spin the other way.
Hi Oscar
I’m pretty new to all this and I was wondering if you have some sort of wiring diagram of what goes where and maybe a recommended part list (different cables and connectors needed, electronics and such) of how to build a 4s lipo quad. Was planning on using a 36x36mm PDB, a Naze32 on top of that and a Super Simple OSD, but figuring out where the rest is supposed to go and what I need is beyond my tiny brain :P (FYI I’m going to go 3s lipo first. That I can build, but need some help with the upgrade)
Thanks in advance man.
Hi Gert, Google “250 parts list”, you should find my mini quad parts list. as you can see there are lots of options there, it’s hard to recommend parts because it depends on your budget and needs.
about OSD wiring, Search for “OSD setup” on my blog, you should find some guides on it.
Damn it I always forget something :
In what range should the weight of the battery stay in? I’ve selected two, 1800mah for 134g and 2200mah for 163g because they’ve got the highest capacity for their weight. But maybe 163g is too much?
depends on your setup really, if you can carry the extra weight, without losing too much Agility then go for it. The heavier they get, the slower they get too. Mini Quad should be fast, quick and low profile, so I would recommend go as light as you can.
Oh it will be my first quad, and after having fun with the naze32 I’ll try to put my arduino and an IMU to have some real fun with it.
I’ll buy some batteries of different capacity and weight, seems like the best solution!
Depends if your carrying fpv gear or going pure speed the lighter the faster as duration and speed will be effected by the weight of it, if that makes sense ?
Hey, is it possible to put the cage above like you did, but with the vibration-dampening rubber balls between the cage and the main part? (The inverse of what you did)
And would it be a good idea? Or should I just get the v2..
Yes, of course you can try that, I am sure it’s going to fly.
But personally I don’t like to have the the FC sitting on vibration dampening plate.
Oh, why?
Maybe it could affect responsiveness when turning a lot. But I was looking at this to reduce the noise on the sensors’ readings.
Mah, maybe it’s not even worth the extra weight hehe
Plastic welding. Take an old soldering iron and plastic weld plastic back together, practice on something else first. Basically align the pieces, tack it together, and then take the iron and make a shallow groove between the two pieces. Then put some similar plastic on the iron so it’s melted and hot (credit card plastic works perfect) Then fill in the groove. The end result will be a plastic weld that will be as strong as the original. I’ve found this to be a stronger lasting repair than epoxy.
does this Plastic “weld” method work well with 3d (nylon 32?) printed material?
If you have a Dremel you can put some filament in the end of it and friction weld the parts together. Google friction welding and you should see some good examples.
what do you mean “strip the 5V and GND cables for three of four ESCs, so the flight controller and radio receiver is only powered by 1 ESC” do you mean you cut them off completely and they are not used? thank you
that’s right. Each ESC has a BEC (5V power supply), you have 4 ESC’s, so 4 BEC’s I only connect one BEC to the flight controller, the rest are not connected.
where in the uk can I buy the Cobra motors ??
I have bought a frame V3 FPV250 also a futaba t8j radio for my son to day as he wants to build a quad we will be building from your build log
a clueless dad
I got mine on ebay. There are a few international webstore that have them I found on google, but i have never used them so I can’t recommend any.
Hi oscar
good article, interesting read. I recently returned to rc after a fair absence. I switched to mode2 flying so things have been extra interesting. But to cut to the quick..i built a 250 Cf frame that is unbelievably strong, good design and clean cc cuts, all for 59 ozi $. Seen it advertised under Emax …they call it the 250 pro..also seen it cheaper else where. I bought a second for spares but never had to use it as the original is still solid…keep breaking props …and an expensive motor arghhhh. Keep up with the blog.
Hi Oscar,
love your build, my last build quad was based on it, I stop using power distribution boards. On this mini’s as they are to big and extra height.
My build uses DYS 1806 motors, very good motors, you should try them, also using the Plush/Hobbywing 12A ESC with BLHELI firmware, controller is the MWC Crius 2.5 SE, I have a Naze that I’m planning to try soon.
Now the frame, I tried the C250 frame, it fly ok, is not a symmetrical X and it seems the MWC can’t fly as good as on a real X frame, didn’t compare with the Naze on it so can’t say if it’s better. Meanwhile broke one arm right on the middle of it, I didn’t finish a roll and it went half speed against the ground, it wasn’t concrete there was some vegetation that should have softened the crash, but even so it broken, it also crash other times without a scratch.
Now I’m trying another 250 frame, it seems much better than the C250, allows other construction options (ex: the ESC bellow on the frame (still prefer them on the arms!, and better cable routing), the arms are extra tick and should take more impact.
This site is in UK, can also be found on know chinese sites and ebay:
[link]
BR,
Luis
[link]
This frame does look quite tough :D
I might give it a try, once I break my current carbon fibre frame :)
Oscar, thanks for the reviews and information you provide here. I need to register for email updates. I’m new to this hobby and have been flying a Syma x1 but have been working on doing a scratch build using pvc. Came here because I was considering letting the pvc wait and getting either the Diatone FPV 250 or the ZMR / Fake QAV clones. What I see though is a lot of broken arms around. So money over quality I suppose. Being new and knowing how I fly a quad now, I’d wager mine would break the first or second day out.
Good luck with the Blackout clone. Be interesting to hear your experience. The guy, can’t remember his name but does YT RC Model reviews. The big problem he sees is the area of the motor mount pads. Not enough material from the holes, compared to the Blackout and had a break. I hear that some nylon bolts for mounting the motors is a better choice, providing a failure point before the actual arm on a crash.
Thanks Stuart, I will keep updates coming on the blackout clone. I damaged the FPV camera accidentally few days ago, so still waiting for a new one to arrive.
The FPV250 used to be really tough, but the new design cage made it more vulnerable.
I have seen the RC Model reviews guy’s video about the weak point. He’s got a point, but his analysis is based on what happened to him. I have seen a few other people breaking the arm at different places.
Yes you are right about the nylon bolts, that’s what I am going to use to replace the metal ones :)
happy flying :-D
Hey Oscar,
Check out this mini Hex!
[link]
Cheaper and better in configuration as compared to the BlackOut Hex.
I’m thinking of getting this with the Cobra 2208 2000Kv motors! 12A Simon Ks, HQ5040 props. What say you?
Still expensive for me :-D But this frame looks nice!
you will need much bigger ESCs to go with the 2208 motors, and they seem to run better with 6 inch props.
Oscar,
The cobras are great! I fitted them on my Nemesis and flew with 3S setup initially with HQ6045 props. They flew great! Then I changed to 4S 65C 1800mAh and…..wow! I didn’t even have a chance to go full throttle! I think max was about 70-80% and the quad climbed like crazy! It was amazing! I’m still trying to get it tuned up now! Can’t wait to see your video on your new 250 quad!
haha, yes the cobras are great motors! I would love to see your pictures and videos if you have got any :-D
Hi Oscar,
Great Blog! I was encountering the same weird and wild spin some time back! It was like totally crazy! Some days for some crashes, It was also with some very light rain. But some other days, it was not. I noticed that these wild spins came only when I started to set failsafe on the CLI. After removing the failsafe on the CLI, I have not encountered any more wild spin crashes! (Fingers crossed) I have since have more then 40-50 flights without the wild crashes. BTW, I’m flying the Nemesis 240 mini. Great quad and I’m flying it with HQ 6045 props, sunnysky 2204 2300KV.
I’m thinking of getting the Cobra 2208 2000KV motors and flying 4S. and is thinking of getting the Blackout HEX. What you think?!
Cheers and safe flying bro!
Hi Kenneth, Thanks for the kind words :)
the 2208 is A LOT OF power! I was tempted to upgrade too, but I am a bit low in budget at the moment.
The blackout hex was actually going to be “the” mini multicopter for me, but the price scared me off, and it happened Hobbyking started selling this cheap frame… If you got the budget/permission from your misses, go for it! :-D
With the 2208 motors it would be a jet! I have seen videos from Blackout it’s crazy!
Hi Oscar,
hmm…..I just saw a site “Foxtech Hobby” that sells the grasshopper 300 which is bloody similar to the Blackout Hex! But it’s soldout at the moment! I believe it’s about $56!!
huh? HK sells a similar hex? or your mean this 250 frame that you are flying? I have two of the frames that you are flying. I really recommend that you get a CF frame. you can’t believe how many crashes I had too! “pretty close to yours” and my Nemesis 240 frame is still going strong! The 250 frame that you have flex a lot too!
Since you already have 4 of the cobra 2208, get another 2 of it and 2 of the esc and !!!! boom! you are all set for the blackout Hex! I can’t wait to see you fly the Hex! Since you have already improved so much! I love the area that you are flying! It’s south of UK right?
Can’t agree more on what you say about the Hobbyking 250 frame. I have also got a CF 250 frame now and due to replace the Hobbyking one.
I will definitely go for an upgrade to a mini hex, but I think I can still improve my skills on the mini quad, so maybe later.
And yes, it’s south coast of UK :)
Hi Oscar,
Thank you for sharing your builds.
I’m stepping up from the first phase quads ( rtf’s..) to build a complete mini quad.
You said to Dan that you can cheaper the build. Since I’m tight on my budget how cheaper it can be lowered from your experience?
Your recommendations will much be appreciated
Cheers
Ariel
Hi Ariel,
this is what i can think of in a few seconds:
– cheaper motors
– use 3S lipo rather than 4S
But again cheap means low quality, and difference in performance. It really depends on what you want to do with it.
thanks
Oscar
Hi Oscar,
Great blog with good build info..
I have played with helis a few years and very interested in fpv quads!
Will try to follow your build so can you advise total cost so far?
Dan
Hi Dan,
Thanks for the kind words.
I must have spent $250 to $300 on this one.
But I am sure it can be a lot cheaper if you choose less expensive parts.
I never flew a heli, but the mini quad is great fun! :)
Oscar
Oscar,
$250-300 covers only the very basic! ie. frame, motors, escs, and board. Not adding the vTx, vRx, Cameras, Mobius, GoPro, and many many many PROPS!
haha….(better not let my wife see this post!)
Well, that’s the thing, I don’t want to discourage new comers by the costs you see :D.
Most of the parts are long term investments anyway, radio, battery/chargers, vRX/TX, so on… it can be reused in the future, so the cost is not as bad as it might look :-D