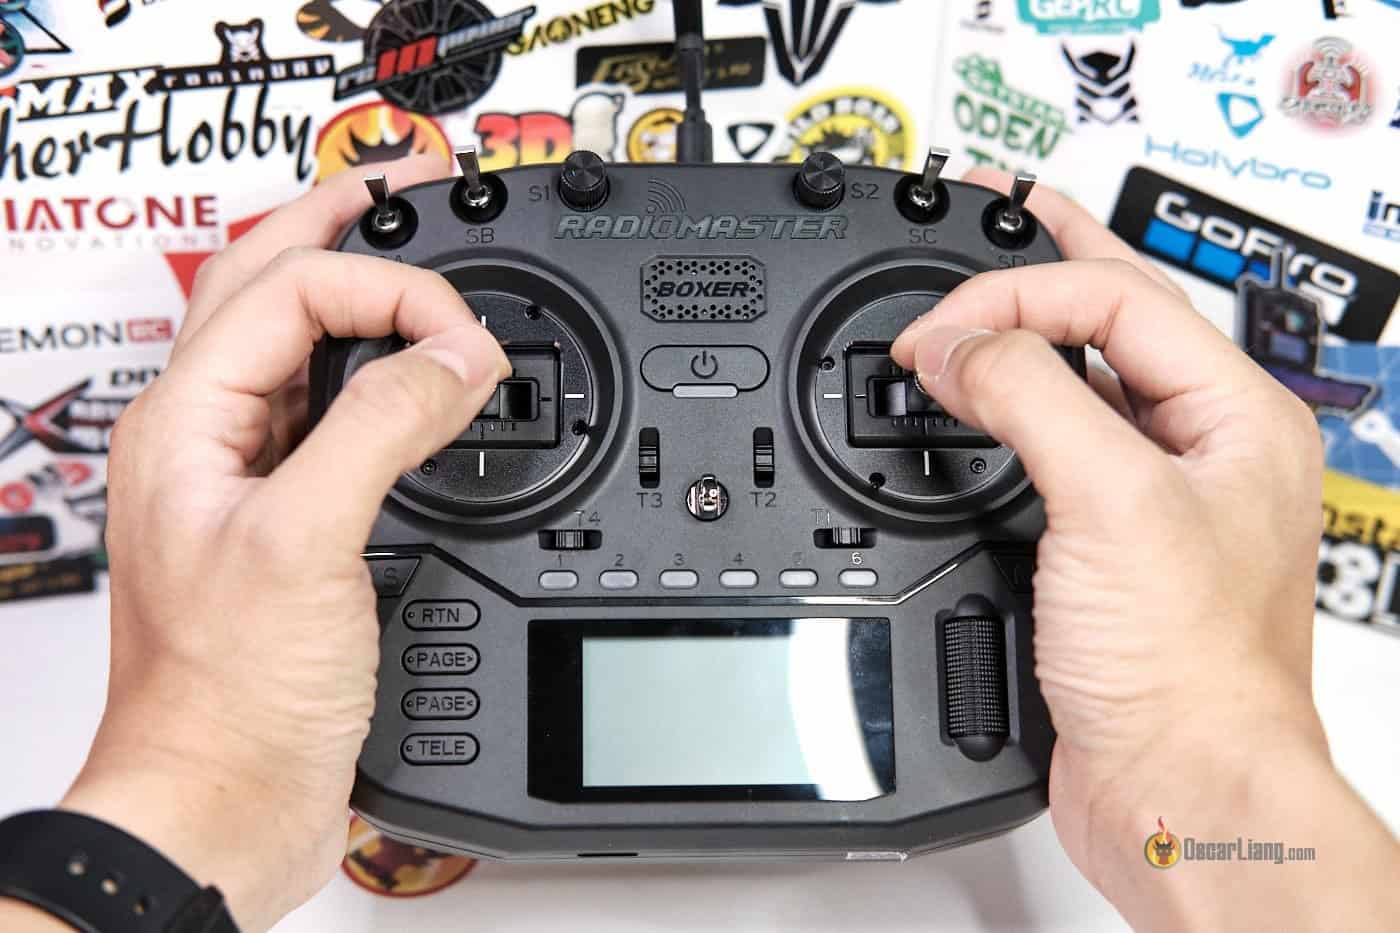
If you’re looking to get the most out of your Radiomaster Boxer, you’re in the right place! This article will take you through setting up the EdgeTX equipped Radiomaster Boxer out of the box, tips and tricks, providing you with a comprehensive, easy-to-follow guide to make your FPV flying experience more enjoyable.


Check out my review of the Radiomaster Boxer: https://oscarliang.com/radiomaster-boxer/
Table of Contents
Installing Antenna
Ensure that the included antenna is attached before powering on the radio. Powering on the radio without the antenna can cause the RF chip to overheat quickly or even become damaged.
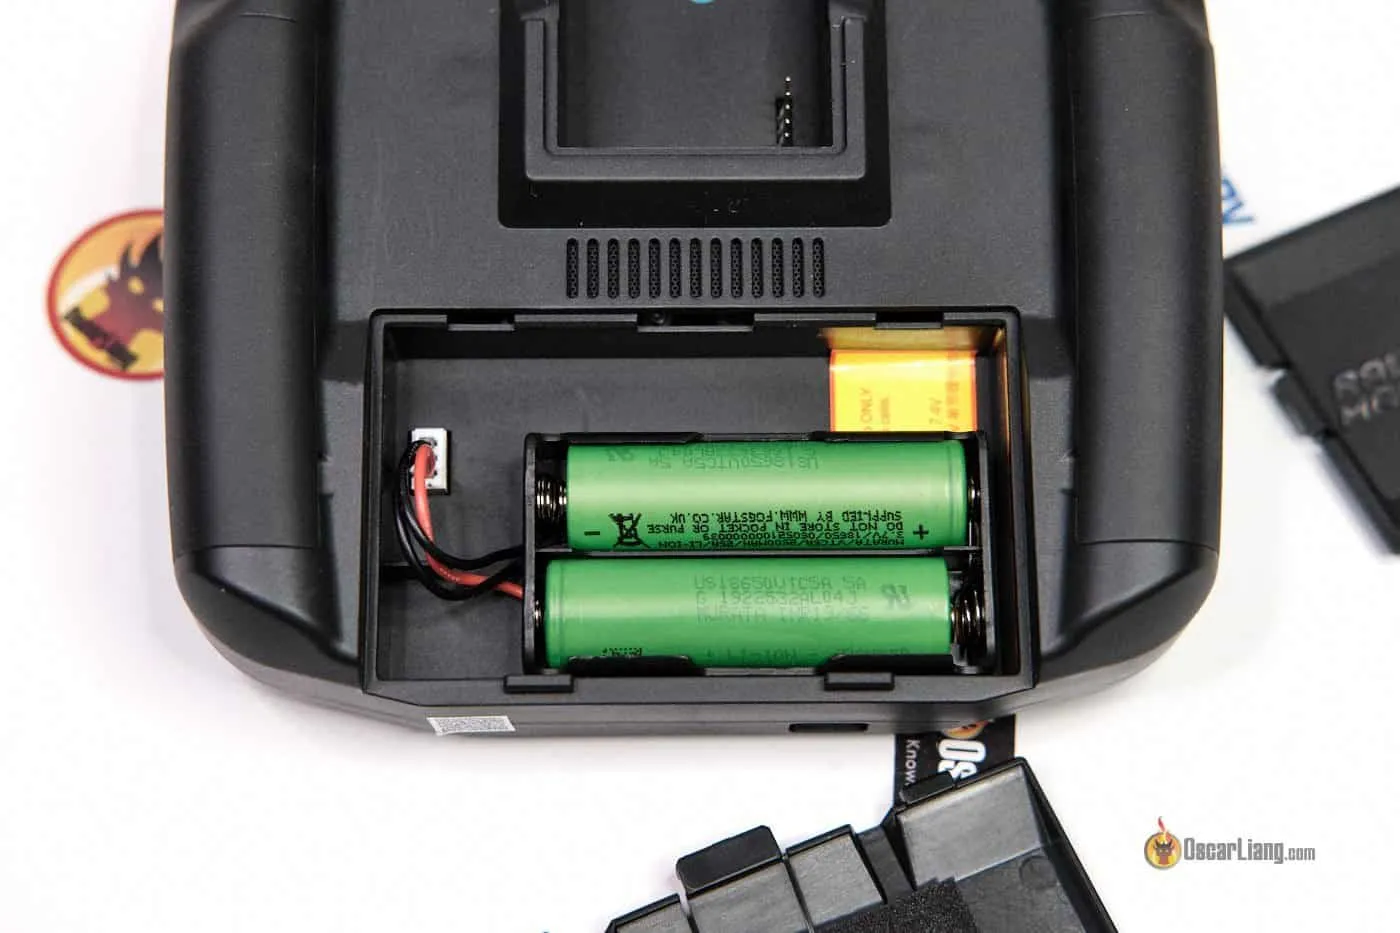
Installing Battery
You will need two 18650 Li-ion cells (unprotected) which are not included. Simply insert them in the battery holder and plug it in to the radio in the battery compartment. I tested a bunch of 18650 cells and found these to be the best options for radios:
Panasonic NCR18650B 3400mAh:
- Amazon: https://amzn.to/2W93Uwp
- GetFPV: https://oscarliang.com/product-h1sg
Molicel P26A/P28A 18650:
- RDQ: https://oscarliang.com/product-1np7
- GetFPV: https://oscarliang.com/product-ghz0
- Amazon: https://amzn.to/3A99ocl
Sony VTC6 18650:
- Amazon: https://amzn.to/3zMZfSm
- GetFPV: https://oscarliang.com/product-rlio
Alternatively you can also use a 2S LiPo battery, for example this large capacity battery pack from Radiomaster designed specifically for the Boxer: 2S 6200mAh Pack

Potential Start-up Warning Explained
To turn on the radio, hold down the power button for 3 seconds.
A brand new radio shouldn’t give you any warning when you first turn it on, but in case you do, here’s a list of possible warnings and what they mean.
- Throttle Warning – your throttle stick is not at the lowest position when the radio is turned on. Simply move the throttle stick (left one) all the way down will get rid of this warning
- Switch Warning (aka Control Warning) – some of the switches are not in their default positions. Simply put all the switches to their UP position (push away from you) to remove this warning
- Alarms Warning – This warning will appear if Sound mode is set to mute
- SD Card Warning – SD card content version does not match the firmware version. If you get this warning, follow this guide to fix it
If everything goes well, you should get to the default home page, which should look something like this.

Radio Settings
In Radio Settings, you’ll find options for setting up your radio’s display and audio etc. To configure radio settings, hold down the SYS button, it will take you to the TOOLS page. Press the PAGE> button twice to scroll to Radio Setup page. Here are the settings you might want to change for the first time.
Set Date & Time.
Battery Range:
- Li-ion battery: 6.4V – 8.2V
- Lipo battery: 7.4V – 8.2V
Battery Range affects the battery indicator on screen, at what voltage it shows empty and full. Why setting minimum voltage to 6.4V since a 2S Li-ion battery can be discharged to lower voltage you may ask? Well, you can certainly set it lower e.g. at 6.0V, but a little higher voltage gives you earlier visual warning.
And why setting max voltage to 8.2V, and not 8.4V? Because as soon as you power on the radio, it draws current from the battery which causes voltage sag, basically you will never see 8.4V on the screen, and we can treat 8.2V as a full battery.
Alarms:
-
- Battery low
- Li-ion: 6.4V
- Lipo: 7.4V
- Inactivity => 10m (if the radio is untouched for 10 minutes, it starts shouting “inactivity alarm”)
- Battery low
This is the battery voltage limit when the radio begins shouting “voltage low”. If you fly long range you might want to set this higher so you have enough battery to make your way home.
Backlight
-
- Mode => Keys
- Duration => 15s (backlight stays lit for 15 seconds)
- OFF brightness set to lowest to save battery
- Alarm => Enabled (backlight turns on when there’s a warning on the radio)
Backlight -> Mode: Keys
Why Key Mode? By default both sticks and buttons will trigger the backlight, which is unnecessary and waste battery in my opinion. By changing it to Keys, only the menu buttons would activate backlight, sticks and switches won’t, this saves battery as you don’t need backlight while flying. When you are flying you are not really watching the screen so allowing only the keys (menu buttons) to trigger backlight is more sensible
Contrast (backlight brightness): 17
Why? I found higher contrast than this leaves “black ink” on the background when screen changes
Pwr Off delay: the time it takes to hold down the power button to switch off the radio, this is basically a safety feature to avoid accidentally turning the radio off. I personally set it to 1s for faster shut down, but if you want to play safe just leave it at default (2s).
Pwr On delay: fastest possible.
Finally, scroll to the Hardware page by pressing the PAGE>, scroll down to Int. Module. If you have internal ELRS module, set it to CRSF. If you have the internal multiprotocol module, set this to Multi. This is usually set correctly out of the box, but just in case you should double check.
Other optional settings:
- USB mode: set it to ASK.
- Sound Settings (including volume, beep length, pitch, wave volume, background music volume, and vario settings): set Sound to “All” so you get the “beeps” when scrolling.
- Haptic Feedback (adjust strength and length of vibration feedback): I use lower haptic strength and length, because the default was a bit too strong.
- Backlight (different modes, duration, brightness, alarm)
- Splash Screen (power on/off delay)
- Each of these subsections allows you to customize your Radiomaster Boxer to your personal preferences, ensuring an optimal flying experience.
IMPORTANT: Go to the Hardware page in System setup, and turn off ADC Filter!
Gimbal Calibration
If the sticks are too stiff or too loose, you can adjust the gimbal spring tension. You probably want to do this first before calibrating the gimbals.
Adjusting gimbal tension is very convenient with the Boxer, you can do that from the front without tearing down the radio.
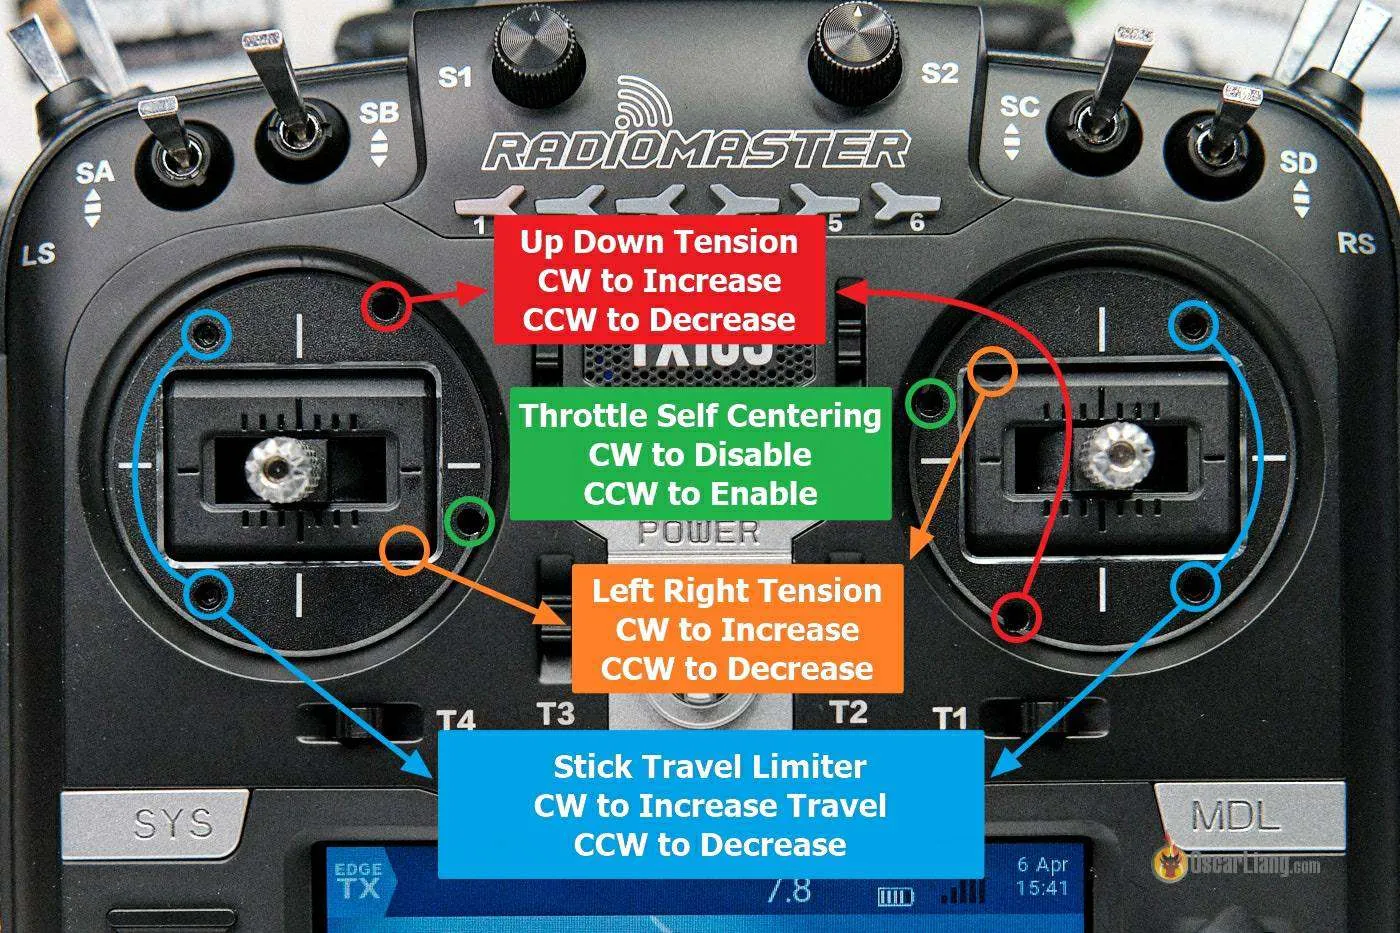
You should calibrate the gimbals before using it. You might also want to do this after flashing EdgeTX/OpenTX firmware.
Go to Radio Setup page again, then press “PAGE” button a few times to go to “HARDWARE” page, select “Calibration” option to calibrate the sticks and sliders. Just follow the instruction, it’s pretty straight forward
Make sure you only move the sticks as shown in the following image. For best result, avoid moving the sticks in circle. Be as gentle as possible when pushing the sticks, so the radio reads the end points correctly.

Make sure you also move the sliders and rotary switches. You also need to calibrate the 6 flight mode buttons, they are actually treated as a slider in the radio. If your flight mode buttons are not working, chances are you haven’t calibrated them yet.
Battery Voltage Calibration
To ensure accurate battery voltage reading, you should calibrate the radio’s battery voltage.
Measure the voltage of the Li-ion battery inside the radio using a digital multimeter. Because the cells are connected in series, it should read somewhere between 6V to 8.4V. The goal is to make sure the voltage is the same between the measurement and the value shown in the radio.
If you don’t have a multimeter, you can also do this with a voltage checker. However, this doesn’t take into account the voltage drop when the radio is running, which leads to inaccurate reading. The difference can be significant especially if you are transmitting at a high output power, voltage can drop up to 0.5V or more.

To calibrate voltage, go to the “Hardware” page, scroll down to Battery Calibration and verify if the readings are the same. You can adjust it using the wheel button.

Model Profile
The Boxer comes with a few model profiles pre-created for you out of the box, you can use one of them depending on what type of model you intent to fly. To see what models profiles are available, you can go there by holding down the MDL button.
For FPV drones, you can just use the “Boxer” profile, it has already enabled the internal RF module (ExpressLRS), and assigned all the controls and switches to the appropriate channels in MIXES. All that’s left to do now is to bind the receiver in the drone to the radio.
This guide explains how to bind ExpressLRS receiver to a transmitter: https://oscarliang.com/bind-expresslrs-receivers/
If you have the multiprotocol version (i.e. 4in1 or CC2500), you can follow this section on how to setup the internal module for your desired protocol: https://oscarliang.com/setup-tx16s-t16-radio/#model-settings
Creating a Profile for FPV Sims
If you plan to play FPV simulator with this radio, I’d recommend creating a dedicated model profile with both internal and external RF module turned off.
To do this, simply copy the Boxer profile, and make a duplicate profile. Then set both internal RF and external RF to off in model settings.
Backup and Restore Radio
I recommend backing up your radio settings regularly (e.g. before firmware updates and whenever you make big changes). EdgeTX has made it really easy to do so.
Radio settings are all stored in a single file called radio.yml, it’s located in the RADIO folder on the SD card. Models Profiles are all stored in the MODELS folder on the SD card.
Follow instructions here to backup and restore your radio SD Card Content: https://oscarliang.com/backup-restore-models-radio-settings-edgetx/
Volume and Backlight Controls

Global functions enable you to set up additional features, such as controlling the volume and backlight brightness with a potentiometer on the radio. One great use of Global function is to use the potentiometers (S1 or S2) for adjusting radio sound volume and screen backlight brightness. This is how to do it:
Go to Radio Setup Page again, then press “PAGE” button a few times to go to “Global function” page, and assign volume control to a knob. You can also do it under model setup, special function, but I prefer doing this in Global function so it works on all models. Repeat this for Backlight brightness.
Updating EdgeTX
The first step in the upgrade process is checking the version information in the system menu (Radio settings => Versions). My Boxer was shipped with EdgeTX 2.8.0. The upgrade process uses the online flashing tool, EdgeTX Buddy, which is the simplest way to update EdgeTX firmware.
You may want to keep your radio’s EdgeTX firmware up to date for bug fixes and new features. You can follow this guide to flash and update EdgeTX: https://oscarliang.com/flash-edgetx/.
If you mess any thing up, don’t worry, the stock EdgeTX firmware file for the Boxer is in the FIRMWARE folder, you can re-flash the radio with this file and it will bring it back to its original state.
Updating Internal ExpressLRS Module
For the ExpressLRS (ELRS) version, the steps for updating the internal module are the same as the Zorro, which involves using ExpressLRS Configurator software: https://oscarliang.com/update-zorro-elrs-firmware/, but you should pick a different Device before flashing, in this case it would be the Radiomaster Boxer.
To summarize the steps:
- Use the top USB-C port on the Boxer for data transfer and select “USB Serials (VCP)”.
- In the configurator, choose the latest firmware version, Radiomaster as the device category, and Boxer as the device.
- Select EdgeTXPassthrough as your flashing method.
- Configure your regulatory domain (ISM_2400 for FCC) and enter your binding phrase and Wi-Fi details.
- If flashing via USB, click “Build & Flash”. If flashing via Wi-Fi, click “Build” and follow the Wi-Fi flashing steps.
If you have the multiprotocol module (4in1 or CC2500), then you need to follow these instructions to update it: https://oscarliang.com/flash-edgetx/#update-internal-multi-protocol-module
Upgrade Gimbals

The Boxer is totally compatible with the AG01 gimbals, it’s a direct swap.
The original Hall gimbals in the Boxer are pretty decent, however, the upgrade to the CNC AG01 gimbals has been an absolute game-changer for me. The AG01 gimbals bring a solid, smooth, and more precise feel that plastic gimbals can’t provide, especially at the extremes of stick movement. But let me clarify – the original Hall gimbals were far from disappointing; it’s just that the CNC AG01 gimbals bring a certain solidity and sturdiness that is very appealing.
You can upgrade to the premium fully CNC metal AG01 Gimbals if you wish without doing any custom mod, it’s a direct swap. Buy them here:
- AG01 CNC Hall Gimbals: https://oscarliang.com/product-1xjq
- AG01 CNC Hall Gimbal Sets New Colors: https://oscarliang.com/product-h1w5
Installing these gimbals is a straightforward process. You start by removing the original gimbals. There are only 4 screws at the corners of each gimbals.

Then install the AG01 gimbals.

Make sure to re-calibrate the gimbals in the Hardware page once it’s done.
Tips and Tricks
Stickend Upgrade

The Boxer gimbals support “M4 threaded stick ends”. My current favourite stick ends for the Boxer are these Sticky360, get the M4 version: https://oscarliang.com/radiomaster-sticky360-stickends/
Custom Sound Pack
You can download custom sound pack and replace the original one. My favourite is Amber sound pack, the sound quality is better than the original.
Download here: http://open-txu.org/home/version-2/v2-2-resources-2/
Unzip and replace the files in the SOUND/en folder on the SD card.
Playing Custom Sounds
You can play custom sound files on your Boxer. I have a tutorial on how to create custom sound file for OpenTX radios (same technique applies to EdgeTX). You can even play your favourite songs.
Make sure the filename doesn’t exceed 6 characters, and the file extension doesn’t exceed 3 characters, or the file won’t appear. And avoid symbols in the filename.
File format required: 32000khz Mono Wav
Switches Covers

Radiomaster offers these silicone switch covers with labels. No more confusion on what your switches do.
Product Links:
Exploring the Tools Page

The Tools page on your Radiomaster Boxer is a collection of useful LUA scripts. The LUA script that you will use the most would probably be ExpressLRS, which allows you to configure your ExpressLRS module.
Replacing Internal Button Cell Battery

If your radio stops saving settings such as date and time, you probably need to replace the button cell battery inside the radio. You can buy this quite cheaply online.
Lithium 3V CR1220, Amazon (affiliate link): https://amzn.to/3yDyDBe
Conclusion
We hope this comprehensive guide has been helpful in setting up your Radiomaster Boxer ExpressLRS. By following these easy-to-follow steps, you will be well on your way to customize your radio to meet your unique preferences.
37 comments
You can here convert online your mp3 file to a suitable file format for edgeTX :)
carbon-eagles.de/edgetx-soundconverter.html
Hello Oscar
Great review. My qutis I’m looking for a new transmitter but still use Spartan Vortex fbl. Would the Boxer (4 in 1) be compatible with an older flybarless system?
Many thanks
Pete
Hi, can I use 6.6V life battery?
Tip for playing sounds: it is important to set the language on the boxer to english if you want to play the files in the „en“ folder on the sd card located in the boxer ! Sounds will not be played if the menue language is different to english! …took me a while to solve this…
Hi Oscar,
Thanks for the tutorial ! I just ordered the same Murata18650 VTC6 battery as shown above but wondering if it is compatible because Radiomaster ask for button type, unprotected and 3.7V battery. this one is 3.6V only. Wonder if it is a problem ?
Those batteries should be fine.
Hi, I am adjusting the stick travel limits. When I turn CW it decreases the distance, when I turn CCW it increases the distance. I have AG01 gimbals. Is it different because of them or did you mix it up in the photo by mistake? Thank you for response.
I am trying to update my boxer on my iMac and all the examples on internet is for windows. Is there a site that shows how to on a mac? I have been at this for a couple of days and think I have done more harm than good. When I try now to download to the storage on the radio it says no space on disk. Would Best Buy Geek Squad or someone be able to update my radio? I just wanted to fly a drone and didn’t know it would be this hard.
Do you know what firmware version you have on the radio? Maybe you don’t need to update it if you only just bought it recently.
Also it might be worth to just pick up a cheap windows laptop for $50 on ebay or something, comes in handy for setting up FPV drones.
I have a cc2500 and bought an elrs rf to upgrade it and I have it installed but when I go into the settings and try to configure it in settings it shows up as multi (what the old rf would show up as)
Hi, If you setup the S3 as a ‘multipos’ switch in hardware settings, and calibrate right (‘4’ as the center, press 1,2,3,4,5,6,5,4,3,2,1 when to move the sticks/pots) then new switches appear: S31 – S36. Now you can use them as normal switches.
I find this very handy.
excellent, thanks for the useful tip!
FYI the prebuilt models all have a curve applied which adds a small deadband (it’s called CV32 and can be found at the bottom of the curves list). I removed that as I can add my own deadband in Betaflight. Thanks for the tips, I didn’t know I could run the Lion 18650s down to 6.4v. That’ll let me get a few more packs in flying my Tinywhoops around the house! And another tip for sim use is to get a short (15cm) USB cable with a 90 degree connector, plug that in and use cable clips to attach it to the radio. I’ve seen a number of reports of the USB port being damaged from overuse. I then use a USB extension to connect with the short cable on the radio.
Hi Oscar, great tute, thank you so much. Can you point me to how to change a Mode 2 Boxer to Mode 1? I’m still unsure if I will need to take the back of the case off it or not? Can I just achieve the mod with the screws on the front of the case?
Cheers
Jeremy
I’m unaware of a tutorial out there, but I do plan to make one in the future. I have no timeline though.
Yes you’ll need to open it because you cannot adjust the vertical axis (throttle or pitch axis) tension from outside the radio. With the right gimbal, while you can turn off centering from the front, it will have no tension as the tension bar is fully off. So when you open the radio you need to release tension on the left stick and add tension to the right stick. It’s easy, only four screws to release the back plate (two screws are under the rubber side grips) and it also lets you see inside and learn how all the front adjustments actually work which is good to know. Be careful when putting it back together because the pins for the external module bay are fragile and could easily be damaged if you don’t line them up with the hole they go through. There’s a tutorial on Youtube for adding gimbal spacers, I suggest you watch that so you can see a breakdown. Look for “radiomaster boxer ciaoFPV”. I added the spacers to mine, it’s a good upgrade because I have pretty small hands!
Can I use Radiomaster Boxer without the antenna for FPV sims?
I have already switched OFF internal / external RX in the settings menu.
I want to do that because factory antenna is so fragile, I dont want to brake it near the table with PC accidentally. Thanks.
I’ve bought this radio with an additional Crossfire Module. Can you add a paragraph of going through setting it up with the TBS module in addition to ELRS? Really hope you (or someone in comments) can help out. This website is the best resource for anything fpv.
Here’s my Crossfire setup guide: https://oscarliang.com/crossfire-betaflight/
my radiomsater boxer is not binding with recivers frsky flysky
I’m having same issue, unable to bind to frysky.
It seems like a huge mistake to not include include installing the antenna before powering it on, since you go as far as battery installation and how to power it on. Not attaching the antenna while the RF module is on apparently damages it, reducing its maximum output or destroying it depending on how long it was used.
You are right, I’ve added it at the beginning.
Kind of a dumb question, I just don’t want to screw anything up. But it’s okay to delete the pre-installed models right?
Absolutely you can. But it’s best if you back it up first just in case. I explain how to back up the radio in this guide.
Thanks for your work Oscar, very helpful!
The only problem I’m having is adjusting the throttle tension on the right stick (after disabling the self-centring) – the screw you’ve labeled in your gimbal diagram (TX16s) doesn’t seem to be tightening the throttle. Is this because the spring is disengaged on this axis? Does this mean I need to open up the radio to tighten my throttle? I don’t want to void the warranty…thanks again
Correct, the throttle stick doesn’t use spring for increased tension, it uses a metal bar that holds it tighter for increasing friction.
I’m having the same issues. Just got my RadioMaster Boxer Radio and the throttle tension is very minimal to the point it falls down when holding the controller up vertically. Just to confirm I need to open the back of the controller to adjust the throttle tension?
You can make it “less loose”, there’s a tension bar that presses on the throttle you can make it tighter to increase friction.
NICE article! It really help a lot
Your thoughts on internal antenna mod? Or a stubby antenna maybe?
It’s not great for range, but if you just fly around yourself without too much obstacles it should be fine. I don’t recommend it if you fly mid/long range though.
Hey Oscar, another AMAZING article!! You’re helping everyone you have no idea how much! Do these 18650 batteries need to be button top or flat top ones are also OK? I am asking because we all remember Taranis X9 Lite wouldn’t work properly (no full contact) if we didn’t have button top batteries inside. Batteries wouldn’t sit properly inside, and wouldn’t touch contacts all the way. We had to improvise and put something in between to make contact. I actually ended up buying proper button top batteries. What is the deal with Boxer when it comes to this? Just want to make sure we all have correct information and know which ones to buy. My Boxer is out for delivery as we speak, so perfect timing! Thank you in advance!
The battery holder that comes with the Boxer is designed for the “unprotected” cells (I guess it’s what you mean by flat top). I am not sure if it will fit button top ones as I haven’t tried it.
Yes, a lot of people call them flat top and button top here in North America, even in Europe: https://www.fogstar.co.uk/blogs/fogstar-blog/what-is-the-difference-between-flat-top-and-button-top-18650-batteries
Can the Boxer be programmed to Spektrum AR631 to use SAFE ?
Thanks !!
I am not sure, but I couldn’t find any info on this so probably not.