
The Speedybee TX1600 Ultra video transmitter is a compact powerhouse in the world of VTXs, boasting a 20x20mm mounting and an impressive output power of up to 1600mW. Designed for long-range flights and strong signal penetration, it’s an ideal choice for the serious FPV pilots.

For a deeper dive into VTX, I recommend checking out our buyer’s guide: https://oscarliang.com/video-transmitter/
Table of Contents
Where to Buy?
Available for purchase at these retailers:
- Speedybee: https://oscarliang.com/product-ts7q
- AliExpress: https://s.click.aliexpress.com/e/_DFi4eBX
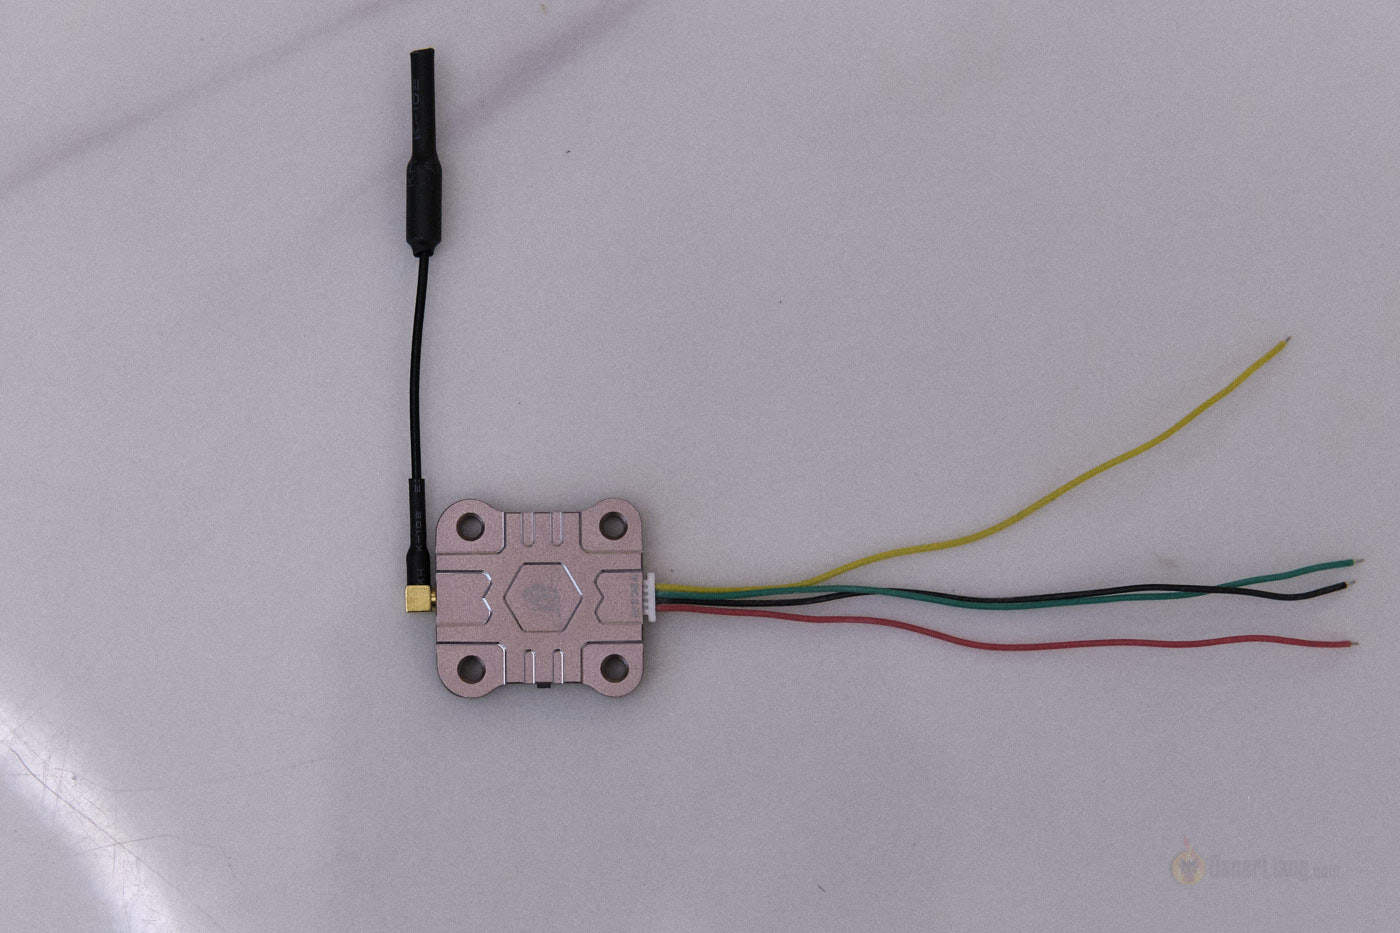
Despite the manufacturer labeling it as “TX Ultra” on their product page, it’s the same as the TX1600. Includes the following accessories:
- 1x MMCX Antenna
- 1x MMCX to SMA Cable
- 1x 1.0mm 4pin JST Cable

Specifications
- Frequency & Channels: 5.8GHz, 48 Channels across 6 Bands
- Output Power: PIT / 25mW to 800mW / 1600mW (MAX)
- Operating Current: 12V @ 90~560mA
- Input Voltage: 7-28V (supports up to 6S)
- Output Voltage: 5V @ Maximum 300mA
- Video Input Impedance: 75 Ohm
- Antenna Connector Type: MMCX
- Weight: 3.2g without heatsink/antenna, 5.7g with heatsink, 7.0g with heatsink/antenna
- Dimensions: 29x28x6mm
- Mounting Holes: 20x20mm M2
Design and Form Factor
The TX1600, equipped with a removable heatsink, is remarkably lightweight at just over 3 grams. However, I recommend using it with the heatsink, especially at higher output levels, to minimize the risk of overheating.

Its 20x20mm mounting fits perfectly into modern freestyle frames, such as the Source One V5, and the PCB’s wide screw holes accommodate M3 screws easily. For M2 bolts, washers may be needed for a snug fit.
Antenna
Featuring a sturdy MMCX antenna connector, it’s far more durable than the smaller U.FL connectors. The package includes an MMCX to SMA cable for flexible antenna mounting.
While the included basic dipole antenna is sufficient for short-range flights, I suggest upgrading to a higher-quality antenna for improved performance: https://oscarliang.com/best-fpv-antenna/#The-Best-FPV-Antennas-for-FPV-Drones
Important: Never power the VTX without an antenna attached, as it risks overheating and damage.
Usage and Connection
The TX1600 is equipped with three LED indicators (blue, red, orange) to display the current channel, band, and power level. There’s also a push button for adjusting settings, but it’s cumbersome to use. Instead, I recommend setting up VTX Control in Betaflight and using the OSD menu for changes. Note that this VTX uses the IRC Tramp protocol, not SmartAudio.
For connecting to the flight controller, you can either use the included JST connector cable or solder wires directly to the VTX pads.
It has a 5V output but only has enough current for powering things like your FPV camera. Most FC has dedicated 5V for cameras anyway so you can normally leave the 5V on the VTX unconnected.
Supported Channels and Bands
It supports the following 5.8GHz channels:
| A | 5865 | 5845 | 5825 | 5805 | 5785 | 5765 | 5745 | 5725 |
| B | 5733 | 5752 | 5771 | 5790 | 5809 | 5828 | 5847 | 5866 |
| E | 5705 | 5685 | 5665 | 5645 | 5885 | 5905 | 5925 | 5945 |
| F | 5740 | 5760 | 5780 | 5800 | 5820 | 5840 | 5860 | 5880 |
| R | 5658 | 5695 | 5732 | 5769 | 5806 | 5843 | 5880 | 5917 |
| Low Race | 5362 | 5399 | 5436 | 5473 | 5510 | 5547 | 5584 | 5621 |
Unlocking the TX1600
Out of the box, the TX1600 video transmitter came locked, restricting some channels (in orange), and limiting power to only 25mW. You can access all the channels and up to 1600mW by unlocking the VTX.
To unlock the TX1600, simply long press the button for 10 seconds.
You can lock the VTX again by holding down the button for 10 seconds.
How to Change Channels/Power?
To adjust VTX settings, you have two options:
- Use the push button on the VTX.
- Utilize the Betaflight OSD menu or a LUA script.
For button operation:
- Short press the button to switch CH1/2/3/4/5/6/7/8.
- Long press the button for 2 seconds to enter the BAND mode; then short press to
switch band1/2/3/4/5/6. - Long press the button for 4 seconds to enter the POWER mode; then short press to
switch to 25/200/800/Max mW. - Long press the button for 10 seconds to unlock/lock.
LED indicators meaning:

To be able to change VTX settings via Betaflight OSD menu, you have to setup VTX control as explained below.
VTX Control Setup (VTX Table)
To enable VTX control via Betaflight, connect the IRC pad from the VTX to a TX pad on a spare UART on your flight controller.

In Betaflight’s Configurator, under the Ports Tab, select “IRC Tramp” for the corresponding UART.

For VTX control to work properly in Betaflight, you need to copy this snippet in the CLI:
vtxtable bands 6
vtxtable channels 8
vtxtable band 1 BOSCAM_A A CUSTOM 5865 5845 5825 5805 5785 5765 5745 5725
vtxtable band 2 BOSCAM_B B CUSTOM 5733 5752 5771 5790 5809 5828 5847 5866
vtxtable band 3 BOSCAM_E E CUSTOM 5705 5685 5665 5645 5885 5905 5925 5945
vtxtable band 4 FATSHARK F CUSTOM 5740 5760 5780 5800 5820 5840 5860 5880
vtxtable band 5 RACEBAND R CUSTOM 5658 5695 5732 5769 5806 5843 5880 5917
vtxtable band 6 LOWRACE L CUSTOM 5362 5399 5436 5473 5510 5547 5584 5621
vtxtable powerlevels 4
vtxtable powervalues 25 100 200 500
vtxtable powerlabels 25 200 800 MAX
Learn more about VTX table here: https://oscarliang.com/smartaudio-tramp-vtx-control-vtxtables/
VTX Pit Mode
The TX1600 supports Pit Mode activation via a switch, it basically reduces the output power of your VTX to an extremely low level (only enough for a few meters of range) so it won’t interrupt other pilots while they are still in the air, it also keeps your VTX cooler. It’s useful for troubleshooting when you are in a race/meetup or when your quad is down.
In the Modes tab in the Configurator, assign an Aux channel to VTX Pit Mode.
Output Power Testing
I tested the TX1600 using the ImmersionRC Power Meter V2. While the results are not the most accurate due to the test equipment being hobbyist level. the numbers look pretty decent compared to other VTX I’ve tested in the past. Wondering which channel is best for FPV? Check out this post.
During testing, I found the VTX skipped 200mW and MAX levels. When selecting 200mW, it output the 800mW level, while selecting 800mW level, it output the MAX (1600mW) level. Not sure what was going on but at least we know it’s doing that.
| R1 | R2 | R3 | R4 | R5 | R6 | R7 | R8 | |
| 5658 | 5695 | 5732 | 5769 | 5806 | 5843 | 5880 | 5917 | |
| 25mW | 26.9 | 26 | 25.5 | 22.6 | 19.3 | 17 | 14 | 10.5 |
| 200mW | / | / | / | / | / | / | / | / |
| 800mW | 660 | / | / | / | / | / | / | 320 |
| MAX | 1398 | / | / | / | / | / | / | 1202 |
Conclusion: Is the TX Ultra for you?
Do you need the TX1600 or TX800?
Even with some basic onmi directional antenna on both the transmitter and receiver, you can expect to get 2km of range on 800mW in ideal conditions. With good directional antennas on your goggles, you should be able to double your range (or more). At 1400mW as tested, the TX1600 offers about 2.5dB of additional power than the TX800, that’s about 36% increase in range. Not really a day and night difference, but improvement in penetration should be noticeable. Learn more about how to calculate FPV range in this tutorial: https://oscarliang.com/calculate-fpv-range/#How-to-Calculate-FPV-Range-with-dB
You can get the TX1600 VTX from these vendors:
- Speedybee: https://oscarliang.com/product-ts7q
- AliExpress: https://s.click.aliexpress.com/e/_DFi4eBX
Be mindful of the increased risk of overheating which might impact VTX performance, ensure good airflow and take off as soon as possible. Also it can get noisier for other pilots nearby when operating at maximum output power.
The other consideration is input power. The TX800 only takes 5V which is very limiting, while the TX1600 can take 7-28V, meaning it’s possible to power it directly from a LiPo. However it’s normally not recommended to power VTX directly from LiPo because it’s usually very noisy, causing noise in your video feed. It’s best to power VTX from a regulated power source, such as the 9V BEC on a flight controller, which is very common nowadays. In that case the TX1600 is perfect.
For most people, I think the TX800 might be good enough and offers better value for most people, but the TX1600 offers wider range of input voltage support and more range and penetration. The choice boils down to your requirements.
Get the TX800 here if you are interested: https://oscarliang.com/speedybee-tx800/
10 comments
LES LIENS NE VONT PAS CAR EREURE COLLER COPIER IL FAUT ENTRE DANS LCI
# vtxtable ET TAPER LA TABLE UNE LIGNE PAR LIGNE ET METRE SAVE EN FIN DE LINGE
# vtxtable
vtxtable bands 4
vtxtable channels 8
vtxtable band 1 BOSCAM_A A CUSTOM 5865 5845 5825 5805 5785 5765 5745 0
vtxtable band 2 BOSCAM_B B CUSTOM 5733 5752 5771 5790 5809 5828 5847 5866
vtxtable band 3 FATSHARK F CUSTOM 5740 5760 5780 5800 5820 5840 5860 0
vtxtable band 4 RACEBAND R CUSTOM 0 0 5732 5769 5806 5843 0 0
vtxtable powerlevels 5
vtxtable powervalues 25 200 400 600 600
vtxtable powerlabels 25 200 400 800 800
save
I’m sorry, but I didn’t understand… you say that when I set it to 800, it will be 1600, but in the table you have 660mw along the 800mw indicator, and how can we understand this? Actually, how do I set it to get the maximum 800mw?
I cannot get over 505mw using any of these tables. I am using BF 4.6. possible issue there?
Good day,
Thanks for the post!
Please note that the VTX table is incorrect.
Speedybee sent me the correct one:
{
“description”: “Betaflight VTX Config file”,
“version”: “1.0”,
“vtx_table”: {
“bands_list”: [
{
“name”: “BOSCAM_A”,
“letter”: “A”,
“is_factory_band”: false,
“frequencies”: [
5865,
5845,
5825,
5805,
5785,
5765,
5745,
5725
]
},
{
“name”: “BOSCAM_B”,
“letter”: “B”,
“is_factory_band”: false,
“frequencies”: [
5733,
5752,
5771,
5790,
5809,
5828,
5847,
5866
]
},
{
“name”: “BOSCAM_E”,
“letter”: “E”,
“is_factory_band”: false,
“frequencies”: [
5705,
5685,
5665,
5645,
5885,
5905,
5925,
5945
]
},
{
“name”: “FATSHARK”,
“letter”: “F”,
“is_factory_band”: false,
“frequencies”: [
5740,
5760,
5780,
5800,
5820,
5840,
5860,
5880
]
},
{
“name”: “RACEBAND”,
“letter”: “R”,
“is_factory_band”: false,
“frequencies”: [
5658,
5695,
5732,
5769,
5806,
5843,
5880,
5917
]
},
{
“name”: “LOWRACE”,
“letter”: “L”,
“is_factory_band”: false,
“frequencies”: [
5362,
5399,
5436,
5473,
5510,
5547,
5584,
5621
]
}
],
“powerlevels_list”: [
{
“value”: 25,
“label”: “25 ”
},
{
“value”: 100,
“label”: “200”
},
{
“value”: 200,
“label”: “800”
},
{
“value”: 500,
“label”: “MAX”
}
]
}
}
wrong vtx table. here is the right value that speedybee send to me by email.
vtxtable bands 6
vtxtable channels 8
vtxtable band 1 BOSCAM_A A CUSTOM 5865 5845 5825 5805 5785 5765 5745 5725
vtxtable band 2 BOSCAM_B B CUSTOM 5733 5752 5771 5790 5809 5828 5847 5866
vtxtable band 3 BOSCAM_E E CUSTOM 5705 5685 5665 5645 5885 5905 5925 5945
vtxtable band 4 FATSHARK F CUSTOM 5740 5760 5780 5800 5820 5840 5860 5880
vtxtable band 5 RACEBAND R CUSTOM 5658 5695 5732 5769 5806 5843 5880 5917
vtxtable band 6 LOWRACE L CUSTOM 5362 5399 5436 5473 5510 5547 5584 5621
vtxtable powerlevels 4
vtxtable powervalues 25 100 200 500
vtxtable powerlabels 25 200 800 MAX
and which power r u using now max of 800?
I read the whole article very carefully, many times. I need advice. If I connect the TX 1600 to the F405 v3, should I solder the red cable to 9V or to 5V, as shown in the diagram for F405?
Vtx table is not Wright if you put it on r8 its r2 in the gogles
Hey, thank you for the review!
I also had issues with setting up power levels.
Can you please try the following settings to see if they give the correct output level when used?
vtxtable powerlevels 5
vtxtable powervalues 25 100 200 500 800
vtxtable powerlabels 25 200 800 1W MAX
Thanks, STAN, for your input. I have applied your power levels, but it didn’t work for me.
1. What is orange LED indicator status when you only power on the drone?
2. What is orange LED indicator after you arm the drone? Does it correspond to your BF setting?
In my case I have orange LED off (1) and it stays off after I arm the drone (2).
If I long-press the button for 10 seconds, orange LED starts blinking once per 2 seconds.
I tried to switch the power mode in all above cases using OSD menu (and saving the configuration twice on the way back) but VTX never reacted.
Also I never managed to switch the power level using a button. Was it successful in your case? Thanks in advance!