Imagine having a 100g micro drone that’s capable of shooting GoPro quality video… Well, dream has come true! In this post I will show you how I built a drone that carries the GoPro Hero 6, but is even lighter than a GoPro :D

Here is the bigger brother of the Umma85, the Umma95 with DJI Vista.
Update (Mar 2021): I think it’s probably easier if you just buy it, the Umma85 build is very challenging. The new BetaFPV 95X V3 with their GoPro Lite case is a really good combo.
Table of Content
- Introduction
- Shopping List
- Umma85 Overview
- Preparation for GoPro
- Building
- Betaflight Setup
- Conclusion
Redefining the Term “Cinewhoop”
The Umma85 cinewhoop weighs 104g excluding battery, running 2″ propellers. You could run 4S on this guy and get 5 to 6 minutes of flight time.
With this small and light weight setup, you can basically fly anywhere without worrying. Combining with the magic from Reelsteady, there is so much potential for some epic cinematic footage!!
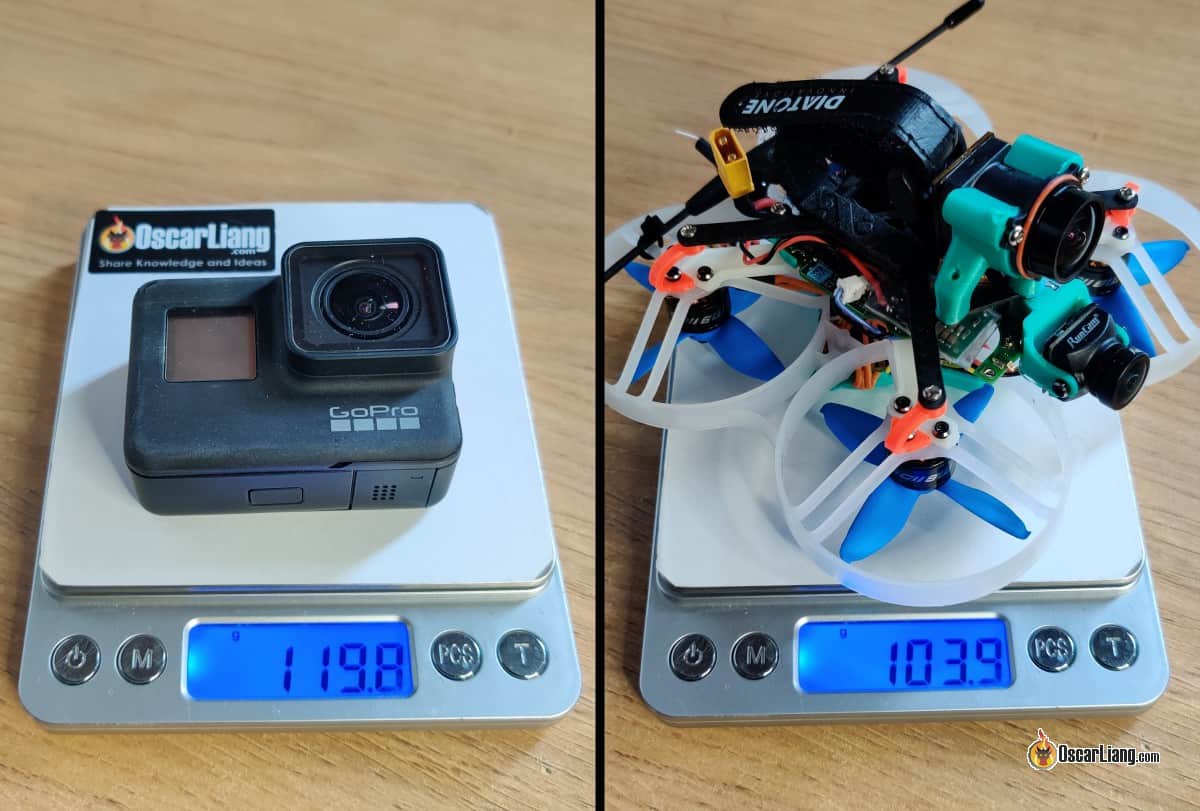
GoPro weighs more than a quad carrying a gopro, it’s insane!
Who needs a 3″ cinewhoop when you can pack everything in a 85mm form factor? :D
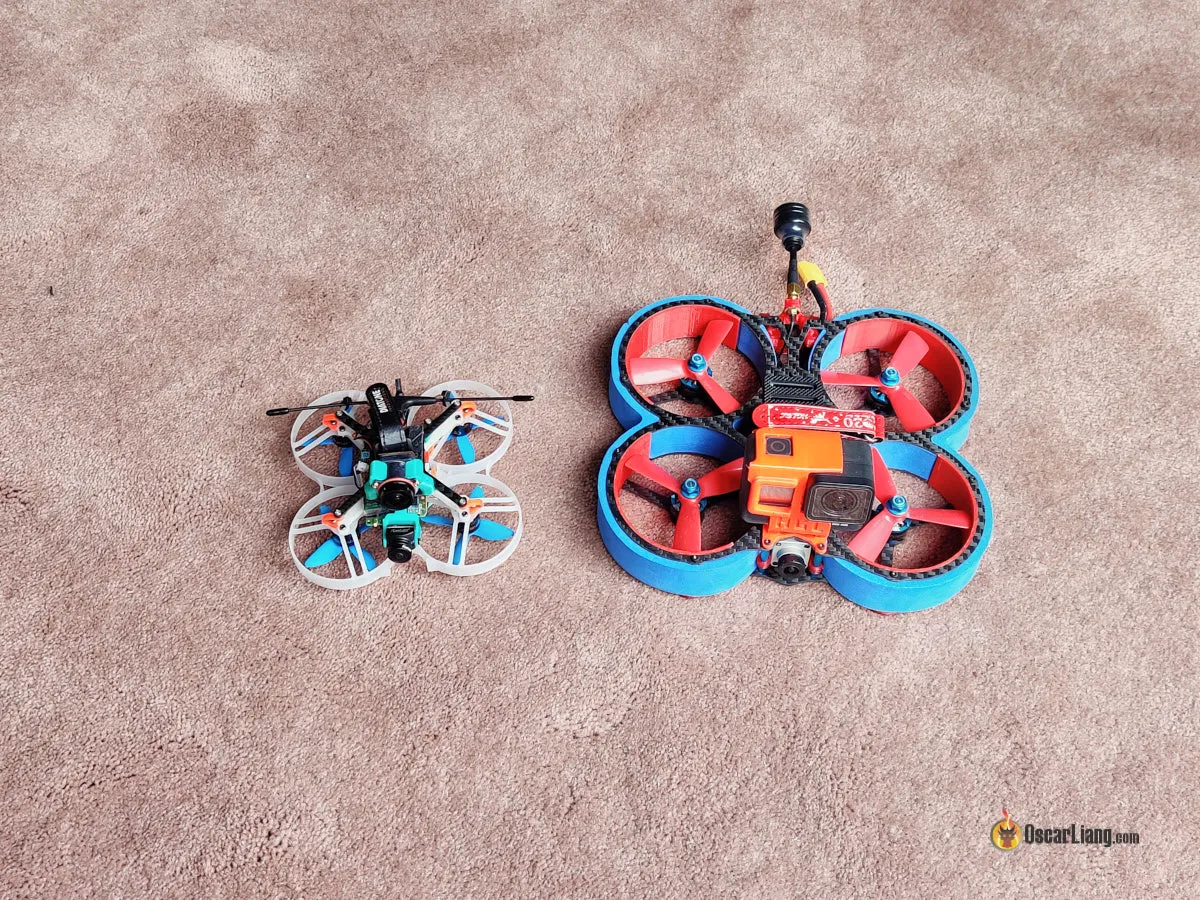
On the right is the HGLRC Veyron 3″ Cinewhoop
Here is a video I recently shot with the Umma85:
By the way, all the images in this build log were taken with my new phone – OnePlus 7 Pro. After some research, I honestly think this is one of the best value phones in 2019/2020 :) Check it out:
- Amazon: https://amzn.to/3dxBCAx
- Banggood: https://bit.ly/2XZrnOT
Shopping List for Naked GoPro Cinewhoop

Table of Contents
Drone Parts List
Instead of getting all the individual parts, you might find it easier to just get the Beta85X 4S RTF (pre-built model):
- GetFPV: https://bit.ly/2Xw5VBS
- Amazon: https://amzn.to/3cEUX1u
- BetaFPV: https://bit.ly/2XWHAnQ
BetaFPV recently released a new Beta85X model, specifically for the naked GoPro. It uses almost the same components as the 4S version above, except it has a nano FPV camera with screw holes on both sides for easy mounting. It’s also $10 more expensive, so it’s up to your which one to get: https://bit.ly/2YnAh99
Otherwise, you can get the components individually and build it from scratch. It gives you more control what parts you want to use and how to put it together.
- Beta85X Frame: GetFPV | Amazon | RDQ | BetaFPV
- FC/ESC Boards
- Motor
- Emax AVAN 2″ Micro Props: Banggood | GetFPV | Amazon | RDQ
- Nano FPV Cameras
- VTX
- Upgrade VTX Antennas
- Radio Receivers
- Battery Strap (10mm x 130+mm): BetaFPV | Banggood | Amazon
- Battery Pad (3+mm thick): RDQ | GetFPV | Amazon
The FC board from BetaFPV is a better fit for the frame since they are made by the same company. It also has higher ESC rating than the Mamba F411 AIO. I am using the Mamba only because I already have one and don’t want to spend extra (it was taken from the Diatone Tina Whoop).
Same for the motors, I already have the Mamba 1105, so I didn’t have to spend more for new motors (they were taken from the Diatone R239). However they are 5500KV, which might be a tad too high for 4S, at least for me that is. My FC wasn’t reliable running 4S on those motors, and it gets extremely noisy, so I just run 3S on it for now, which works beautifully. if you want to use 4S, perhaps get the 5000KV.
For LiPo batteries, check out my LiPo testing and recommendations, best size IMO is 4S 450mAh or 3S 450mAh – 520mAh. Should give you 5 mins flight time.
Note that these builds are very strict about battery weight – they need a battery that weighs roughly 40-60g in order to properly dampen vibrations to the GoPro.
For the best props for this build, check out my testing.
Umma85 Conversion Kit
Umma85 kit can be purchased here:
- US/Worldwide: https://bit.ly/2XyBYBl
- UK/EU: https://bit.ly/3dxcwBC
Or you can also try to 3D-print it yourself: https://www.thingiverse.com/thing:4294515
It requires a carbon fibre plate, but it’s possible to replace it with 3D printed using rigid material (not tested).
Naked GoPro Related
- GoPro Hero 6 Black
- Amazon: https://amzn.to/2MkEjJy
- BetaFPV GoPro Lite (already stripped): https://bit.ly/309A1gc
- USB-C Male Connector for Power: https://amzn.to/2Uaqoua
- 5V BEC (at least 1A): Banggood | Amazon
You should check out the Naked GoPro Guide on my blog, it has a lot of info regarding using GoPro Hero 6 on cinewhoop.
Umma85 Overview and Assembly
The Umma85 is a conversion kit designed specifically for the Beta85X frame, by Ummagawd.
It converts the Beta85X into a “pusher” so you can mount the GoPro flat on top, results in better aerodynamics and smaller form factor. The whole quad is basically flipped upside down, including the FC and motors.
When you strip down a GoPro to reduce the weight from 117g to 17 grams, it becomes more susceptible to vibrations. So he also added a dirty-clean design, to separate the GoPro from the frame using dampeners, so vibrations cannot get to the camera and cause jello in the footage.

This reminds me of my tricopter back in the days which used the same technique.
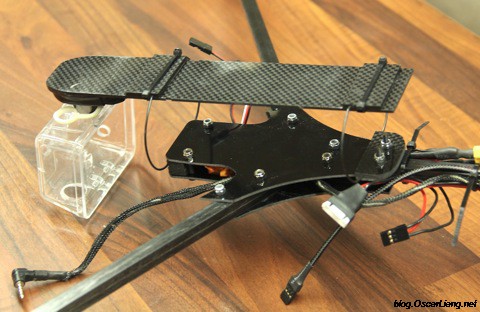
The Umm85 kit comes with the following items:

Here I will show you how everything is put together.
Start with putting the lens in the camera mount.

Then screw the camera mount to the carbon fibre plate on the two outer legs, then feed the ribbon cable through the carbon plate.

Attach the camera ribbon cable to the logic board.

Get the 12mm screw and put it through the top center hole in the logic board, and add the FPV camera mount which also acts as a standoff. Screw into the center leg of the GoPro camera mount, but do not fully tighten down yet.
Attach the rear board mount (this can be done first), again don’t fully tighten down.
Here comes the scary part, you have to twist the camera ribbon cable by rotating the logic board 90 degrees. The ribbon cable is quite rigid, so make sure you do it very gently and slowly.
Try heat up the ribbon with a hot air gun (or hair dryer), it makes twisting easier.

Watch the ribbon cable while rotating the board until the board fits in the rear mount, then tighten down the screws.


Here is a closer look at the twisted camera ribbon cable, which I have been told, is normal :)

Preparations for Naked GoPro
If you still haven’t disassembled your Gopro, here are some tips how I did mine.
Here is my recommended settings for the GoPro.
To power on the GoPro, simply short these two pads (PWR and GND). After that, your GoPro will turn on as soon as there is power.

Here is a pinout diagram, notice the yellow line on the top right corner, that’s the connection between PWR and GND.

To start recording, we can connect the GoPro’s REC pad to the FC’s buzzer negative pin. Instead of soldering a wire between the two, I am using a connector here, so I can disconnect the GoPro from the FC when needed without soldering again.

I will be powering the GoPro through the USB port. Get one of these male USB connectors with solder pads to solder the wires to. They are cheap ($1-2) and light weight (0.5g). And you can plug these into the GoPro USB port.

I am using a Pololu 5V 1A BEC.

This is my “DIY power module” which can convert LiPo voltage to 5V for the GoPro. The whole thing weighs 2.2g.
Again I am using connector at the input here, so I can conveniently unplug the GoPro from the quad when I want to.

This step is not required, but a good idea to conformal coat your GoPro (as well as other exposed components), not only it provides certain degree of water resistance, it also protects the tiny surface mount components from falling off (they are basically like glue).
I have a tutorial on conformal coating electronics in case you are new to it.

Building Umma85 Cinewhoop
Install the motors on the frame.
The newer Beta85X frame comes with a carbon fibre plate that is attached under the motors. It stiffens up the frame which I think should improve flight performance.
I have the older version and it doesn’t have it, so I designed and printed mine with ABS filament. I uploaded the design on thingiverse: https://www.thingiverse.com/thing:4424994

Mounting VTX and Crossfire Nano Receiver in the battery bay – we will be mounting our LiPo on top so that space is not used. I put a sheet of insulation between the VTX and FC, just in case :)

Solder all the wires to the FC.

Mounting antenna and props.

Red/black cable is the power to the GoPro, coming from the LiPo pads on the FC
Blue/black cable is for controlling the record button on the GoPro, coming from the Buzzer negative pad and GND.

We can now try power on the quad, and see if it works. Of course, always use “smoke stopper“! The little FPV screen I recently built is so handy for testing and showing people my flying :)

If everything works as expected, we can proceed to mounting the GoPro.

First, install the dampeners, watch out for the orientation.

There are two different thickness of dampeners, the thicker one will provide more clearance between the GoPro and frame. The thinner ones (cyan) didn’t work for me so I switched over to the thicker ones (red).

Correction – Dampeners are in the wrong orientation in the above images, follow the next 3 images please. Sorry for the mistake!

![]()
![]()
For the clean/dirty plate to work effectively, there has to be enough clearance.
![]()
Now we can install the GoPro properly in the Umma85 kit, with the 5V BEC and USB ribbon connected.
Oh, and you might also want to install the battery strap now to avoid frustration of removing everything again.

This is a really tight fit.

So tight I had to add a couple of o-rings to increase the height of the mount

Install it on the Beta85X, and that’s it!

Looking good :)

As you can see, I will be mounting the LiPo battery side way.

How to Setup Umma85 in Betaflight
Let’s configure the Umma85 in Betaflight and get ready for our first flight.

Because the FC and motors are flipped upside down, we have to make these changes in Betaflight.
Board Roll Offset
In the Configuration tab, find Board and Sensor Alignment, and Set Roll degrees to 180

Now go to the Setup tab, and confirm if the 3D model is now moving the same direction as your quad.
Motor Remapping
Next, Remap motor 1 to motor 3, and motor 2 to motor 4. You can do this in Betaflight CLI. I have a tutorial explaining what Resource Remapping is.
Enter ‘resource’ and take note of the pin numbers for motors 1-4. This is going to be different on different flight controllers. These are the pin numbers from mine.

Simply swap the pin numbers for motor 1 and 3, and for motor 2 and 4, enter it back in CLI, in my case, this becomes:
resource MOTOR 1 B06
resource MOTOR 2 B07
resource MOTOR 3 B03
resource MOTOR 4 B04
save
Now test your motors and see if they work properly.
Setup Props Rotation
Finally, check motor spin directions, reverse them if necessary. You should also decide whether you want to run “props out” or “props in” (I prefer props out on this build):
Setup Switch to Control GoPro Recording
Connect GoPro REC pad to the Buzzer negative pad on the FC, then configure it in Betaflight following the instructions in this tutorial.
Setup RPM Filter
You can try setting up RPM filter to make your quad fly more smoothly. RPM filter is now supported on both BLHeli_32 and BLHeli_S ESC’s: How to Setup RPM Filters in Betaflight: Unlock Smooth FPV Flight Performance
Lens Protector and ND Filter
Don’t forget to put a lens protector on :)

There are many designs on thingiverse:
– https://www.thingiverse.com/thing:4035039
– https://www.thingiverse.com/thing:4426217
Alternatively you can also just use ND filters, not only they provides protection they also makes your footage look smoother! See my guide about how ND filter works.
I ordered some ND filters and see which one works best for the Naked Gopro, will report back soon. Follow me on Instagram or Facebook to get updates.
Learn about Naked GoPro 6
I only scratched the surface here, there is so much more to learn about the Naked GoPro 6 and there are hacks that you might find useful, for example adding LED indicator for recording, and connecting WIFI etc…
All the info is in this “naked gopro 6 guide” and I am still updating it as we go.
Conclusion
Yes, this drone is really a powerful tool for shooting high quality cinematic footage in tight spaces that bigger drones cannot get to.
However this build is NOT for everyone.
It’s not cheap, and you could damage the GoPro during the tear-down. There are so many ways things can go wrong. Not to mention all the crashes your naked GoPro will be going through, so be prepared to do a lot of tinkering and repairing.
But the result is very rewarding and it’s been an enjoyable challenge personally :) I feel much more comfortable flying this near people than my 3″ cinewhoop. Yes it doesn’t handle the wind as well as bigger quads, but it’s also not as loud and aggressive, and it allows me to go through tiny gaps and get closer to people. It’s just a lot of fun to fly and it has so much potential! :)
25 comments
Also waiting on the PID tune, doesn’t fly great on stock betaflight.
Ummagawd’s pid tuning guide here:
https://docs.google.com/document/d/1pr1Keda1WNXBnsf7Zf1-mdbudHe9SXlXs_ossa-2c9c/
Any update on pids tuning.. thanks…
Been waiting on the PID tune!! Please let me know what you have for the 85x I’m desperate !
Hi! I’m new to this hobby. Can you make a video tutorial for the 85x? Please. ?
The avan props always crack at the hub and fall off. What alternate prop would you recommend?
Hi have converted my 85x to umma style and i am having hot motors. Can u suggest anything for making it not hot please??
What do you think about taking 1204 5000kv betafpv motors and 4s 6500mha lipos?
I put the board in the correct direction and removed motor pins. soldered the motors. So I shouldnt have to reconfigure the board. I havent flown yet.
Great work.
I have read this several times.
Can I use gopro 7 in this build with hypersmooth? on? Will flat board ok for hypersmooth.
Never tried that so not sure, I think it might not work because there is no way you can change board orientation for Hypersmooth, not sure how it will react to it.
Hola, tambien es posible hacerlo con una gopro 7?
Can we use a caddx vista for hd fpv with this build?
Yes, but i think it won’t like the extra weight, and have poor performance. Use the Beta95X build for that.
Thanks for these great information, as always !
One thing tho, you’re not showing how you bent the sensor ribbon, is there a good/wrong way to do it?
Thanks
There is no technique, you just bend it 90 degree as shown in the picture.
For RSGo, is the GoPro’s IMU/Gyro on the back of the camera? Great walkthrough!
correct!
Great post. Just about to start my build.
Is there a reason why you went with a Pololu 5V 1A BEC and not just take the 5v from one of the pads on the FC to power the GoPro?
You don’t want to stress the BEC on the FC, and having a dedicated BEC like the Pololu is more reliable, also there is more filtering on the BEC.
Awesome article, Oscar! I really want one of these things. Thanks for all the detailed info!
Fantastic job !
The next step is to find an ultra small GPS (like those inside a phone) and to connect to BF.
That would be awesome.
Oscar,
As always GREAT JOB!
The ultimate question to me is: Can we pull real time video signal from GOPRO and use it as FPV video instead of having TWO cameras onboard??
@Estevan, Not really…
Neat build! Love your blog. A fount of FPV knowledge.