The Reptile S800 V2 is my second FPV wing and I absolutely love it so far! Extremely durable, affordable and easy to build. It flies pretty nice too! In this build log I will document what I did and offer some tips for anyone new to wing FPV.


Why I Recommend S800?
- Great for mini quad pilots as it can take most mini quad parts
- very affordable and crash-resistant, great for wing beginners
- The foam are very dense and seem to be durable; but i have also seen people breaking it in half in hard crashes so it’s not indestructible. Laminate it if you can
- Designed for FPV – mounts for HD camera such as the Hero 3 or Xiaomi Yi, as well as FPV camera
- Straightforward build
So far, I am loving this model, especially if you come from mini quad background you can just use whatever spare parts you have :)
You can buy the S800 here:
- Banggood: http://bit.ly/2qddwDQ (They are doing 45% off now, only $39!)
- Amazon US: https://amzn.to/2rsa892
- Amazon UK: https://amzn.to/2Ur5K7A
My S800 came nicely packaged, the box is undamaged unlike some reviewers complained about.

Here are all the parts that came in the box. This is a kit version so there is no electronics included. However it does come with a PDB which I think is designed to be used with the stabilizer they sell. I won’t be using that.

Some Tips Before Building
The manual doesn’t really explain everything you need to know about building the S800, especially for beginners I am sure you will have lots of questions. That’s why I decided to write this build log in the hope that it will make your life easier.


I recommend reading through the whole guide before building, or even buying your wing. Also check out build videos on Youtube, it’s going to help.
First off, avoid the PNP kit, the components are not that great according to all the reviews I’ve read so far. And you don’t need a stabilizer to fly a wing, just get the wing kit.
Learn how to fly manually. After talking to several experienced wing and plane pilots, I’ve been advised to learn flying wings without any help from stabilizers or flight controllers. And after a couple of months of wing flying, i do find it easier than it looks.
Tools You Will Need

Here is a list of tools, glues and tapes you will find useful for building wings, for this build I mostly used the follow items:
28AWG Wires: https://amzn.to/2L3oINb
VTX, FPV camera, receiver and other components are usually placed far apart on the wing, so you will need a lot of light-weight silicone wires.
Sand paper – https://amzn.to/2QgJONU
80-120 grits are great to roughen up foam surface without ripping bubbles off.
Glue – http://bit.ly/2Eb6Azg
Hot glue is also fine. But I only used E6000 in this build, because they take a while to dry and gives me more time to position the parts, they are very cheap and very strong. Get the 110mL, it’s going to take about 20mL just building this wing :)
“Pearl head pins” – https://amzn.to/2L3kjK9
I learned this trick from RagTheNutsOff on youtube – I push them into the foam to hold the foam parts and spars in place while the glue cures.
Masking Tape – https://amzn.to/2G6yZJH
I used this to hold the wings and fuselage together while the glue dries; It’s very easy to peel off afterwards and doesn’t leave any mess behind. Also used it to hold the wires.
Disposable gloves or cotton swabs
If you don’t want to get glue on your hands, you should wear some gloves, or use some cotton swabs like I did :) Great for wiping excessive glue !
Parts List
Like I said, you can use a lot of mini quad parts in the S800, and that’s what I did! Most stuff are just left-over from my quadcopters.
- Motor: Brotherhobby R4 2206 2450KV
- Props: Kingkong 6040 prop
- ESC: HobbyKing 30A ESC
- Battery: 4S 1300mAh – 1800mAh
- Servo: MG90S Metal Gear
- RX: Frsky D4R-II
- VTX: Eachine TS5828 with 90 degree adapter
- FPV Camera: Rotorriot Swift 2
- LC Filter (16V 1A should be enough)
Any mini quad motor should work just fine, e.g. 2205, 2206, 2207, 2306 etc… As for KV, 2300-2500 should do nicely. I recommend running 6″ bi-blade props because you certainly need the thrust for this model – it’s quite heavy!
As for ESC, I recommend 30A ones, and try to find one with built-in 5V BEC. Ideally 2A or even 3A, you will need the current to power the servos. That’s why I like using these old Hobbyking 30A ESC’s, they have bad performance for a quadcopter but totally fine for a wing or plane.
Cheap 9g servos with plastic gear should work just fine, but I prefer the metal gear ones. I used those plastic gear servos in my first wing and they stripped a lot! Get a few more spare won’t hurt, you might need them for another wing very soon :)
FPV setup is just normal 5.8GHz ones we use on mini quad – I only plan to fly around within 1Km so that should do nicely.
The D4R-II receiver is just an old part that I no longer use on mini quad, because we are all using SBUS now (X4R-SB). However it’s perfect for wings because they have 4 PWM output and we only need 3 :)

The connection / wiring diagram is relative straight forward. There is a missing wire in the diagram – it goes from the battery’s positive to the camera’s VBAT pin. It’s for monitoring the battery’s voltage so you can display the voltage in the Runcam’s OSD.

Step-by-Step Building S800
Table of Contents
Preparation
Prepare the foam – cleanup and trim all the unnecessary bits on the edges to make it nice and smooth.

Before building, you should sand any foam surfaces you want to glue, using sandpaper. This ensures stronger joints regardless what glue you are going to use. I highlighted the areas you need to sand:

Sand the spars and carbon fibre plates under running water too. It will help the glue to stick better.

Tips: Wear gloves when handling glue, use cotton swabs for applying glue to small places; E6000 should dry within 30 mins, but I left mine over night just to make sure everything is dry inside. Oh, and use this glue in a well ventilated environments, it does smell a bit.
Assembling the Wings
Before inserting the spars – you can use the tip of a spar to scratch / roughen up the inside of the slots, so the glue can grip better.

Put a good amount of glue in the slot and push the spars with your finger nails (are you wearing gloves?). I used these pins to hold the spars down while the glue is drying, thanks to RagTheNutsOff’s idea.

Do this for both wings, while it’s drying we can move on to the Fuselage.

Assembling the Fuselage
The first thing I did was putting the spars in. Stick some glue into the holes in the fuselage where the spars will pass through, then push the spars in. Measure with a ruler and make sure both ends are the same length.

I’d probably leave it a few more minutes before moving on. Now glue the wings to the fuselage, you can use some masking tape and pins to hold them on securely.

Then glue on the spar covers. Make sure they are the right way in, otherwise one side will stick out.

Last Few Bits
Glue the wing-tips to the wings, use some pins to hold them on while the glue sets.

Glue carbon plates to the fuselage lid

Glue the wooden battery mount inside the fuselage.

At this stage, I left my model overnight to let the glue dry completely (leaving the pins and tapes on).

Installing Servos and Control Horns
As soon as the glue is all dried up, we can begin installing the electronics. Let’s work on the control surfaces first.
The servo bay is a bit too small for the MG90S servos, so you will need to remove some foam.

Insert the servo in the slot, don’t glue it in yet. Use something straight like a ruler or stick to mark where the control horn is going to be on the elevons. The stick should be at a right angle to the elevon.

Poke a hole with a screwdriver or a knife 2-3mm behind the hinge

Then squeeze some glue in the hole, and push the control horn in there, with the holes facing forward. Optimally, the holes on the horn should align with the hinge.

Put a bit more glue on the bottom and push the other piece on the control horn, it will lock it in place (it’s like a zip tie).

The elevons came very stiff and needed a lot of exercise to loose up :) Just keep doing it for a few minutes, until they can move up and down without much resistance.

Now install the pushrods.

It matters which holes on the horns you install the rod to. It basically affects how much elevon travel you have when moving the stick.

I am using the second hole from top on both horns.

Installing Motor / ESC
This wood plate will be glued to the back of the fuselage. Oh, and make sure you sand the foam surface first!

The original S800 motor mount is not really optimal. Once you’ve glued the motor and motor plate on the wing, you can’t remove it easily without ripping the mount apart.

So I decided to get a motor mount extension when I bought the wing: http://bit.ly/2rpkINN
With this motor extension, not only your motor will be removable, it also moves the motor further away from “dirty air”, results in higher efficiency. But note that it will shift your CG towards the tail so more weight would be needed in the front to balance it later.
Glue the carbon fibre plate on top of the wood plate and that’s it!

They designed the ESC bay for slim ESC’s without BEC, and so it’s way too small for mine.

Not a big deal, just remove some foam.

And there it it with the motor and ESC mounted.

And “close the door” for the ESC :) I used some 2mm spacers between the plate and the ESC.

Installing FPV Setup
Installing VTX, with a 90 degree angle adapter. You will need some very long wires as the VTX is located in the middle of the wing.

I used some left-over foam to fill the space between the VTX and the wing, to prevent it from moving during flight.

Put the door on and some tape over the wires.

Here is how the the camera is installed in the front.

I am using an LC filter for the FPV setup. It’s not a necessary component, but you should get a cleaner image as it minimizes the noise from the motor and ESC getting to the VTX and camera.

That’s how it looks like when everything is installed. I think this model is designed primarily for 3S LiPo, as none of my 4S batteries would fit in the fuselage with the lid closed completely. For now I am just going to tape down the lid.

Taping
Stick tapes on your wing wherever you feel vulnerable!. For example, the leading edges or the wings (can’t see it very well in the photos). Oh, and that’s how I am mounting my RX antennas for now. It’s only temporally, I will 3D-print some proper mounts in the future. For short range this should be fine.

And tape on the servos.

Most importantly, the elevons and hinges! Double check the tape doesn’t interfere with the hinge’s movement.

CG Balance
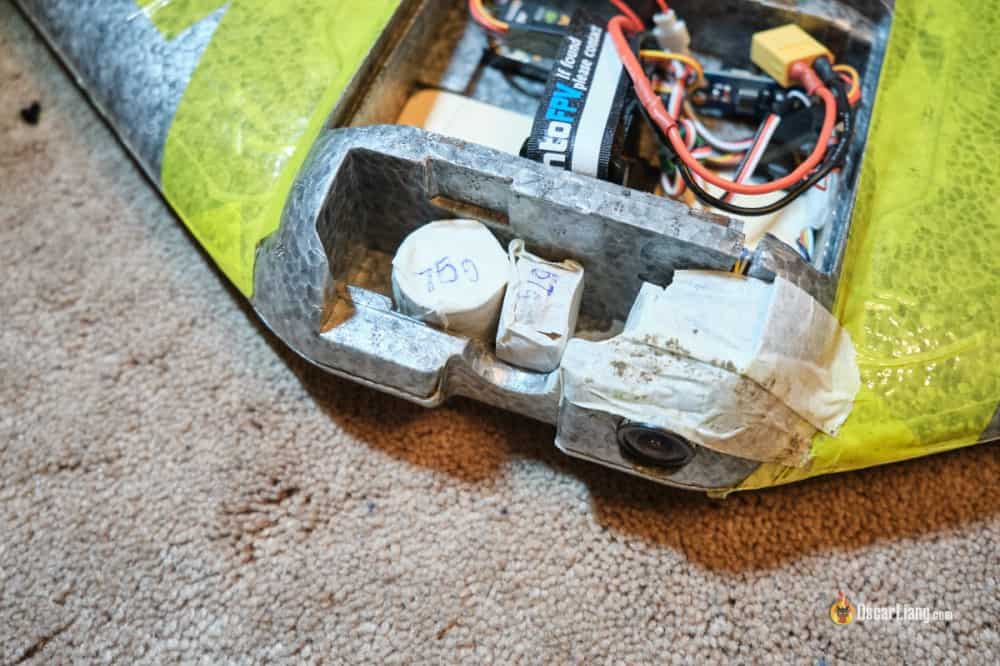
I simply used some pennies (1p/2p coins) as weight in the wing to balance CG (centre of gravity). There are weight you can buy on eBay, comes in 5g and 10g bars, but I think it’s cheaper to just use coins! :D

To my surprise I had to use over 130g of weight in the camera cage to achieve good CG. So even if I use a HD camera in the front (such as the Xiaomi Yi – 73g) I still need around 50g of weight there.
Radio Channel Mixer
Follow this guide to setup your mixer in the radio.
Reflex
I used just a tiny bit of reflex in my first flight – 2-3mm.
But this is what I have after first flight trimming. Right wing.

And Left wing.

Fix Low ESC Resolution
The Hobbyking 30A ESC has low throttle resolution, and it doesn’t start the motor until throttle reaches 15%! I could flash BLHeli firmware on it to calibrate the ESC properly, or buy a ESC programming card for that. But I decided to just “fix it” using a throttle curve in the Taranis.
Simply create a custom curve with two points, which starts from -70 to 100. Done! :) You don’t really need that much resolution anyway on planes and wings.
Create Arm Switch
For safety, I recommend setting up an arm switch for your wing. And that’s all the setup I went through before first flight.

First Flight
The key with launching is to throw it very hard :) It needs some good speed to take off because the S800 is actually quite heavy (around 560g dry weight without battery).
Here is my tutorial how to launch a wing.
I crashed a couple of times trying to launch before I learned the lesson :) The good thing was it just bounced off the ground and nothing was broken. I was well impressed!
If it’s your first time, maybe get someone else to launch it for you so you can have both hands on the radio :)
Here is some footage from my first flights :) It was a calm day and the flying experience couldn’t get any more enjoyable than this :)
Here is the first time I mounted an HD camera on the S800 – the Xiaomi Yi camera.
Mods, Tips and Tricks?
Check out my post of S800 mods.
Does it fly without wingtips? Hell yea :D
The wingtips of my S800 FPV wing broke off after a hard crash, so I decided to give it a try flying without them as a challenge :D It still flies, in fact better than I expected :D
However It waggles a lot and way harder to control, making it more challenging going through trees and controlling altitude. But still it was manageable and was actually fun to fly lol :D
19 comments
Hola Oscar! entrará un pack 4s1p de pilas 21700? peso 300grs o en su defecto el mismo con las 18650 que pesan 200grs. Muchas gracias Saludos desde Argentina
Even 18650 is pushing it really. Especially if you have an FC inside the compartment it’s going to be really tight.
I’ve never tried 21700 so I am not 100% sure it will fit.
Looks good doood. Mines on its way and a few people have complained about the CG. What point did you cg end up on. ? As per book ? Thank you in advance.
I just followed the CG suggested by the manual, works fine for me
Hey Oscar,
Would you please provide a link for your wing tape? Lots of opinions floating around but I’m working your build for this s800 and wanna follow your components all the way.
Thanks for the great build guides!
To be honest, any sellotape or packing tape would do just fine.
I am planning on doing this build but I am unsure of the wiring diagram. Does the RX get its power from the Throttle connection/ESC? If not, please explain the connection. On the D4R-II manual i see a wiring harness but it is listed as a ‘data’ wire so where does the battery connect on the RX?
your help is greatly appreciated
Roger
Yes, RX gets power from ESC, because it has a built-in 5V BEC. That’s why i selected that ESC.
I followed your build almost to a T but for whatever reason im getting a “grainy” looking FPV image. Any ideas? I’m using the Eachine TS5828S and the Foxeer Falkor camera. I’ve tried it with and without the LC filter.
maybe faulty camera? have you tried a different camera?
Hi,
Mein Wing ist fertig!!!!
In einem kleid aus Glass und
20 Gramm epoxy
Jungfernflug
üben…….
Fotos sollen kommen
Andreas aus hannover
GREAT LOOKING STUFF DOES IT HOVER ?????????????????
HAS IT GOT GPS STABILITY ETC ?
I got mine from HobbyKing and used a small cheap motor with a 20A opto esc. There was a bed provided and I used that. I do not have FPV and mounted an orange flight stabiliser and an orange FASST rx to complement my Futaba 6EX TX. I also used a 3S 1500mAh battery and managed to shoehorn them into the fuselage. My aerial stick up at he rear behind the hatch which I lost on my first flight after a nose dive into the ground. It bounce out of the fuse and I never found it. I did use some 6mm foam sheet to make a replacement. I slap managed to get my Turnigy camera (SJ4000) camera into the front and a little weight in place of the FPV camera. Flies very well, but on one flight the prop fell off and I had a very quick landing. Looking forward to flying it again this coming year.
Great! You should add an FC and run inav on it. I recently built a Nano Goblin with the Matek F411 wing fc. Really fun long range plank!
thanks :) yea eventually i think i will try out long range on iNav :)
Good log as always oscar.
About the limited battery space, I glued the wooden battery mount under the fuselage.
That way I get Just enough room for a 4cell. Plus there is less stress on the foam holding the strap.
Waiting for your log on putting inav in it… ?cheers
BK
that’s a good idea!
anyway, I 3D-printed a lid with thinner thickness and it now fits 4S batteries :)
Yea, getting into iNav hopefully in January/Feb :)
Great build log. Over time, would you mind linking 3D printed stuff you found useful? Thanks!
Yes, I am currently testing and compiling a list of 3D printed accessories/mods for the S800 :)
It’s fun experimenting these stuff! I will do a post about these at some point this week after I edited the flight video I did yesterday :)