I will show you how to setup and use DJI FPV system with Betaflight. This tutorial will cover activation, wiring and installation in an FPV drone, pairing between FPV goggles, Air Unit and Remote controller, finally the basic operations.

Still wondering if you should get the DJI FPV system? Check out my review. You can get the DJI FPV system from these vendors:
- Banggood: http://bit.ly/2IEwZY2
- GetFPV: http://bit.ly/2IEZ6Gg
- RDQ: http://bit.ly/2M4L7fd
- Amazon: https://amzn.to/2Mr1KR8
Table of Contents
Turning on FPV Goggles
- Install the four stub antennas, make sure they are well tightened
- Power on the goggles with a 3S or 4S LiPo battery using the provided cable (I am using a 4S 1500mAh LiPo for my drone)
- Put on the goggles, and adjust IPD sliders at the bottom to ensure clear view
- If you want to record video in goggles, you need to insert a Micro SD card (what SD card do I need?)

Activation
Visit https://www.dji.com/uk/fpv, click Downloads, Under Software, download the latest version of DJI Assistant 2. Install the program on your computer.
Make sure you download the FPV version of DJI Assistant! The wrong version will not detect your FPV goggles and Air Unit.
Power on the DJI FPV Goggles first before connecting it to your computer via the provided USB-C cable.

Launch DJI Assistant 2 and login with your DJI account (Sign up if you haven’t already).

You should see the “DJI FPV goggles” icon. If you don’t see it, reconnect the USB cable. Note that it could take a minute or two for the computer to install the driver when you connect it for the first time.
Click the icon, and you will be prompted to activate your device. Make sure you have internet connection!

You will have to activate each component separately, but the steps are the same. Repeat these steps for the Air Unit (and remote controller).
Installing Air Unit In the Drone
If you are building a drone from scratch with the DJI FPV system, it’s best to get a frame that is designed for the DJI Air Unit. Usually it comes with 3D printed parts to fit the Air Unit and Antenna.
Here is a list of frames made for the DJI Air Unit.
If you are upgrading your existing FPV drone, and don’t want to invest in a new frame, check on “thingiverse.com” and see if there are custom designs for your frame that you can 3D print. I am still using the Martian II frame from 2015, and there are already some really nice designs available.

Connecting Air Unit to FC
Full Size Air Unit
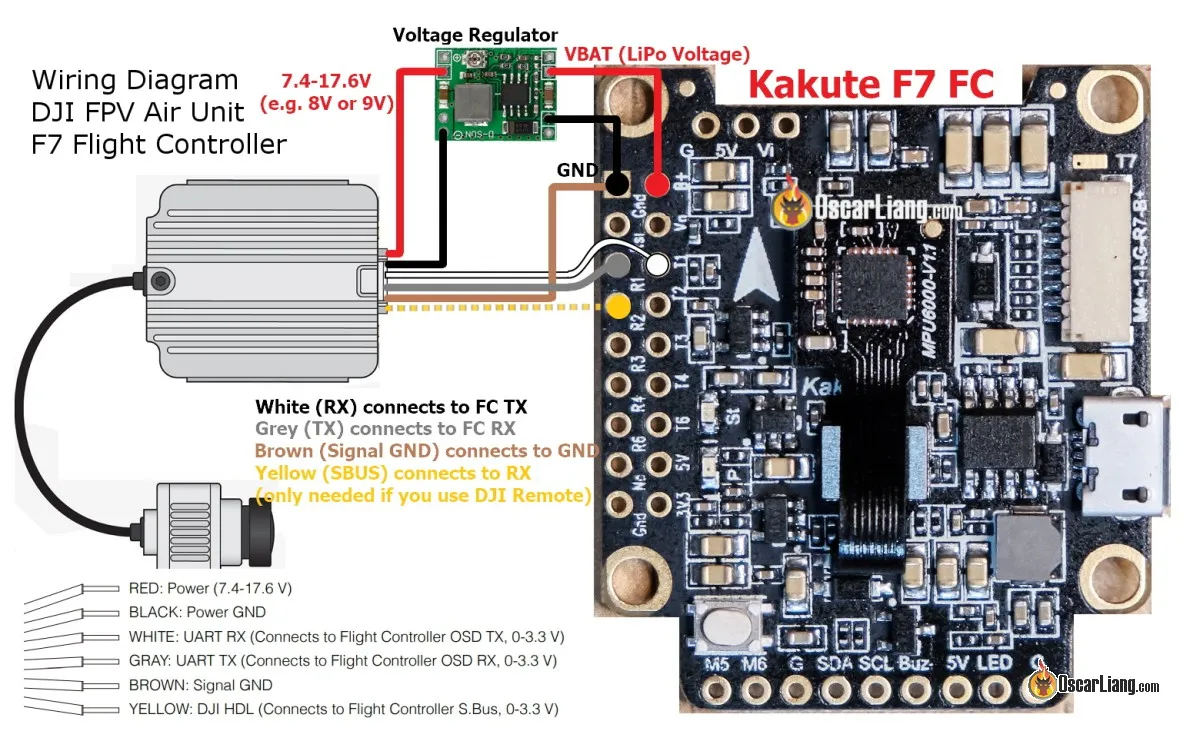
If you get a flight controller designed for the DJI Air Unit, you can simply connect them with a ribbon cable, and forget about all the confusing wiring diagrams :) But if you don’t want to spend extra on a new flight controller, I will show you how to connect the Air Unit to your FC.

The DJI Air Unit takes 7.4V to 17.6V voltage, you can power it directly from a 3S or 4S LiPo battery.
However, I’d recommend powering it from an external voltage regulator, or a BEC on the FC. That’s because voltage spikes from motors and ESC could damage the Air Unit (same way it could damage your analogue VTX). Installing extra capacitor might mitigate this problem.
Caddx Vista
The Caddx Vista Air Unit even supports higher voltage up to 6S, and therefore you might get away with powering the Air Unit directly from 4S LiPo Battery. But if you want to play safe, use a voltage regulator or BEC on the FC.
With the Vista however, there is no JST connector, you have to solder your own wires to the pads.
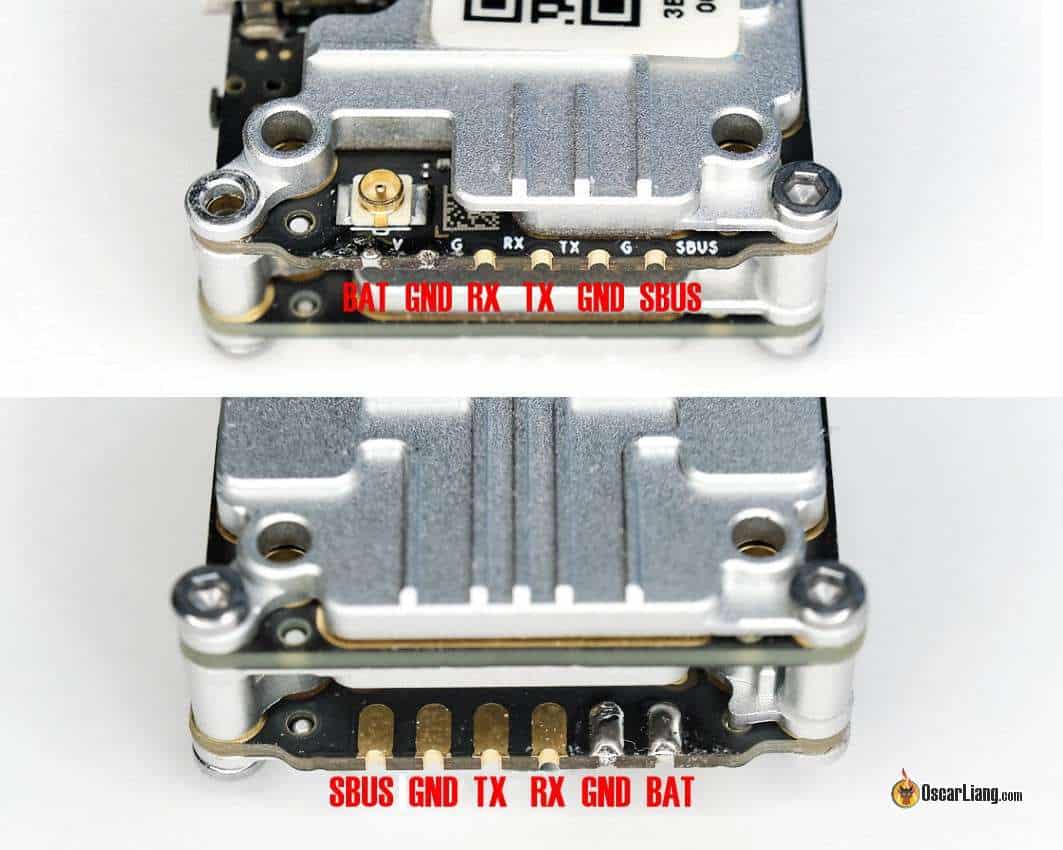

* SBUS connection to the flight controller is optional
BEC Requirement
If you are using a BEC / voltage regulator to power the Air Unit, make sure it can supply enough current. Max power consumption is 8W for the Air Unit, the current requirement changes under different input voltage:
- 9V => 0.9A
- 12V => 0.7A
- 16V=> 0.5A
If the BEC on your FC doesn’t meet the voltage or current requirement, you could use an external voltage regulator. I used this little voltage-adjustable regulator with good result.
Before Powering Up
Before powering on Air Unit, make sure the antennas are attached and the wiring to FC is correct, otherwise it could cause irreversible damage.

With the Caddx Vista, don’t forget to install the antenna connector holder properly!

Pairing FPV Goggles and Air Unit
In order to get image on your goggles from the camera, you have to first pair/link your DJI FPV goggles with the Air Unit.
Power on both FPV Goggles and Air Unit.
Use a small pin or needle to press the link button on the goggles that is located next to the power connector. After that you should hear a continuous beeping, which indicates the goggles are ready to be linked.

Wait until the LED on the Air Unit becomes solid green, then press the link button on the Air Unit which is located under the SD card slot.

The link button on the Caddx Vista is located near the USB port (it’s a push button).

Pairing should complete within a few seconds. Once they are paired, the beeping should stop and you should see an image in the goggles from the camera.
Using DJI Remote Controller
It’s NOT compulsory to use DJI’s remote to control your drone, you can use whatever RC link you prefer, such as Frsky and Crossfire. But there is already receiver capability built into the DJI Air Unit, so you could save an additional receiver :) Totally up to you!
Here is my review of the DJI Remote.
To turn the radio on or off, simply press the power button once, then hold it for 2 seconds.

Pairing Remote to Air Unit
If you are using the remote, then you need to pair it with the Air Unit.
Note: you should bind the FPV goggles to the Air Unit first before binding the remote. otherwise you could lose the bind to the goggles and you have to do it again. It’s a weird bug.
First, pair the Air Unit to the FPV Goggles first before the radio, otherwise you’d have to repeat this process.
Power on the Air Unit and Remote Controller, but turn off the FPV goggles.
Wait until the LED on the Air Unit becomes solid green, then press the Link Button on the Air Unit.
Press the record button, C button and the right dial at the same time. The Radio should now beep continuously.
The linking will take a few seconds, once paired, the beeping should stop and the status LED on both devices should turn solid green.
Note to Japanese users: If you bind your goggles to the air unit, then bind the controller, your goggles might stop working and shows a message on the screen “Image transmission stopped”. This could be due to the Japan firmware restriction. To work around this, I’ve been told you could try performing FCC hack on the Air Unit, after you bind it to the goggles, then unplug everything and bind the radio.
Radio Settings
You can configure radio settings through the OSD menu in the Goggles, “Settings” => “Remote Controller”.

Here you have Servo Setup, Function Mode, Stick Mode (mode 1 and mode 2) and Calibration.
The First thing you should do is to calibrate your sticks in the “Calibration” menu.
Then go to “Servo Setup” to make sure all your channels are sending out 1000 – 2000 when you move your sticks to its maximum position. These are called “End Points”. It’s okay to have your end points slightly beyond the 1000-2000 range. For example, your lowest end point can be around 995 to 1000, and your highest end point can be around 2000 to 2005.

The switches on the radio are pre-configured and take up channel 5 to channel 8:
- CH5 = SA
- CH6 = SB
- CH7 = SC
- CH8 = SD
Now go to Betaflight’s Ports tab, enable “Serial RX” for the UART which you’ve connected the SBUS wire to on your FC.

Under Receiver in Configuration tab, select SBUS in “Serial Receiver Provider”.

Go to the Receiver’s tab and check if the “bars” are responding to your stick movement. If channel outputs are responding to the wrong stick, here is how to fix channel map.
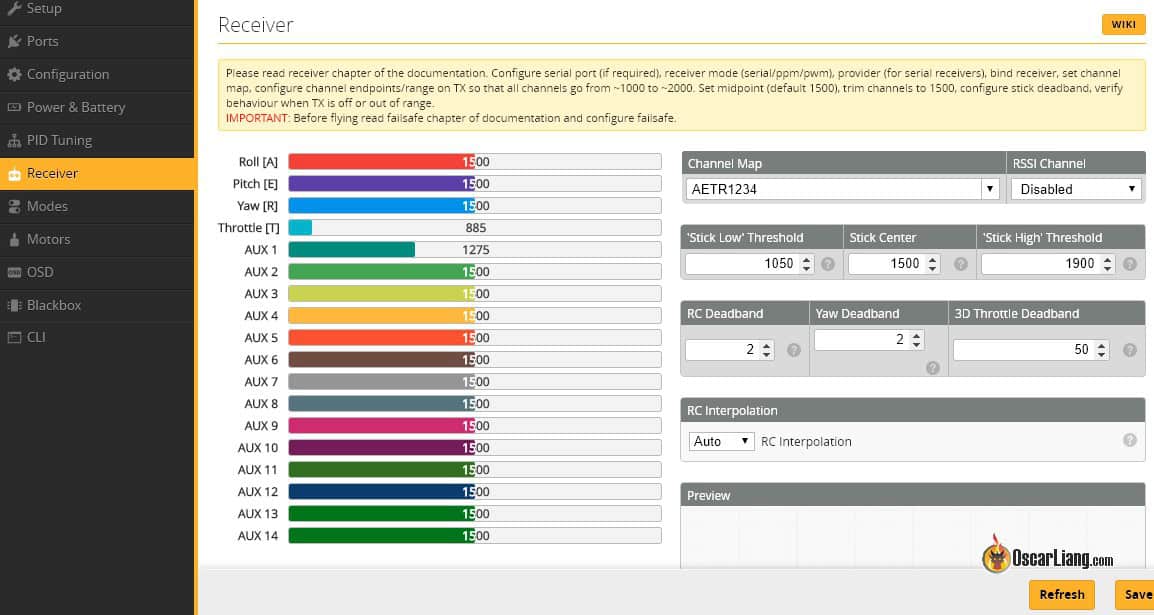
If everything looks right, you are now ready to use your radio to fly your drone :) Oh don’t forget to setup switches for arming first :)
Gimbal Tension Adjustment
Finding the sticks too loose or too tight? You can adjust gimbal tension by turning the screws on the back of the radio.

You can access these screws by pulling back the rubber plates.

Stick ends are M3 threads ( in case you want to get some custom stick ends).
Lock Mode
There are only two buttons on this radio, a power button and a “C Button”. Power button is self-explanatory, the C button is for “locking” all the sticks and switches so no RC signal will be sent out. This is a safety feature to avoid accidentally arming your drone.
Simply hold down the C button, and the status LED will flash purple to indicate it’s in lock mode
Remote Antenna Placement
For maximum performance you should have them both pointing up when transmitting.

Removing Battery
If you ever need to remove the battery, open the cover, hold down the battery release button and push the battery downward.

Remote Status LED / Beeping Explained
- Solid RED – Powered on, but not connected to receiver
- Solid Green – Working, connected to receiver
- Blinking Blue and beeping at medium speed – Binding
- Blinking Purple – Locked mode (Hold down C Button to lock/unlock sticks and switches)
- Beeping alternate sounds and vibrating – Requires calibration (do this in FPV goggles)
- Beeping and vibrating – Low battery <10%
- Beeping at low speed – throttle stick is not at its lowest position
Betaflight OSD Setup
In order to get OSD working, you must connect the TX and RX pins on the Air Unit to a spare UART on the flight controller, as shown in the wiring diagrams above.
Depends on which UART you connected the DJI Air Unit to, enable “Configuration/MSP” in the Ports tab in Betaflight Configurator for that UART (and keep all other options disabled).

In the Configuration tab, under “Other Features”, enable OSD, and TELEMETRY.

Finally, in your DJI FPV goggles, turn on Custom OSD under Settings, Display.

Now you can select the elements you want to display in the Betaflight OSD tab. Not all the elements are supported yet, but DJI has been making some progress to support full Betaflight OSD.
For now the following elements are supported as on Mar 2021.

You can drag the elements around on the preview screen to change their locations, same as the normal Betaflight OSD, it will get updated in real time in your DJI goggles. You can also set and save element position using CLI.

Video Feed Quality
You can adjust video feed quality under “Settings”, “Transmission” in the OSD menu.
Best Image Quality Settings
- Preference: High Quality
- Focus Mode: Auto (or OFF)
- Bitrate: 50Mbps
If you don’t have the Bitrate option, you should update your DJI firmware to the latest. If it’s greyed out, it means you are on CE mode, 50Mbps only available in FCC mode. How to switch to FCC mode.


Lowest Latency Settings
- Preference: Low Latency
- Focus Mode: Auto
- Bitrate: 50Mbps
Using 50Mbps bitrate doesn’t seem to affect latency (similar latency to 25Mbps), but you will only have 3 channels available instead of 8.
With Focus Mode enabled (set to on), you will constantly get blurry edges in order to reduce the amount of data when signal gets weaker, this can be quite distracting. By setting it to auto minimizes blurry edges.
Example of focus mode (blurry edges)
- Focus Mode – optimizes the center of the view, makes it smoother and clearer when signal becomes weak. I recommend leaving this setting at AUTO.
- LED Mode increases color saturation on the LED racing track in low light, making it easier for the pilot to fly in any direction.
- Racing Mode increases the display contrast, which makes obstacles more distinguishable in day light.
- Standard Mode is suitable for most environments – use this mode if you are not sure what is best.
How to Record Video?
Insert micro SD card in the FPV Goggles and Air Unit (except the Vista which doesn’t have a SD card slot). Here are my SD card recommendations.
And format the SD card inside the goggles using the menu, this will avoid many issues later on.
Set your recording preference in the FPV Goggles settings. You can change resolution if you are recording in the full size air unit, between 720p 60fps and 1080p 30fps. However you cannot change resolution for the FPV goggles recording (DVR), as it’s fixed at 720p 60fps.
By default, the recording starts when you arm the drone, and it automatically stops and saves the video when you disarm. You can also start recording by pressing a button by changing the setting in the goggles.
OSD data is saved in a “.srt” file (subtitle format), these are just plain texts, you can overlay it on top of your video when you play it, or edit it.


By default the SRT file is quite a mess with possibly a lot of unwanted data in there. You can clean that up using a tool I made.
Uploading FPV Footage to Youtube
I’ve found the best way to upload DJI FPV footage to Youtube is to “upscale” them to 2K, or even better 4K. This is because Youtube retains higher playback bitrate for videos with higher resolution.
You can learn more about this in this post.
Other DJI FPV System Tutorials
- Frequently Asked Questions and Tips
- How to Update Firmware in DJI FPV Goggles, Air Unit and Remote Controller
- Switch to FCC Mode
- 1200mW Output Power Hack
- Enable 50Mbps Bitrate
- Must Have DJI FPV System Accessories / Upgrade Parts
Official Manuals
- DJI FPV Goggles: https://dl.djicdn.com/downloads/DJI+Goggles/20181230/DJI_Goggles_User_Manual_EN.pdf
- Caddx Vista Air Unit: https://cdn.shopify.com/s/files/1/0036/3921/4169/files/Usermanual.pdf
- Basic operations of their FPV system: https://dl.djicdn.com/downloads/DJI_Digital_FPV_System/20191101/DJI_Digital_FPV_System_User_Manual_EN.pdf
Edit History
- Mar 2020 – guide created
- May 2020 – updated OSD setup
- Jun 2020 – updated instructions for the DJI Remote
- July 2020 – added “Video Feed Quality” and “How to record video”
- Aug 2020 – added links to “enable 50Mbps” and “how to upload to Youtube”
80 comments
I have a baby hawk 03 with elrs, could I bind the DJI remote 2 with the elrs still physically soldered?
Depends on which UART you have the SBUS wires from the O3 Air Unit soldered, if you have them connected to the same UART, then you should remove the ELRS receiver if you are not using it.
Hi Oscar, what a great article, any chance of a 2024 update on the v2 goggles primarily for custom fpv quadcopter use, currently using analogue I’m on the fence with dji and the v2’s are still seen as the best goggles and I am still able to buy a new set of V2 but they are seemingly no longer supported by dji and from what I can gather there are now some real issues making the goggles unusable with certain receivers without hacking, your help and advice would be very beneficial, thank you🙂
If you can get them quite cheaply as second hand, the V2 is okay and functional, but I wouldn’t buy them new, as you said it’s no longer supported by DJI.
See if you can get a good deal on a second hand Goggles 2, as many are upgrading to the Goggles 3.
In my Googles feed no feed is coming on only osd values are displayed iam using djicamera with vista unit
Oscar, this is great!
I completed building my first quad using DJI o3 with DJI Goggle v2.
Everything seems in order, except I’m stuck on a betaflight flag of the throttle channel too high. I looked over your past posts exactly on this topic, and the remedy was adjusting the receiver. Since I’m using a DJI controller, I’m unsure how to adjust those thresholds and finally get the drone to fly.
If you have any solution to remove the throttle channel too high, that would be amazing!
Best,
E
Hey Oscar, can you help: Tried to change drone and do binding, but couldnt get connection and afterwards wasnt possible even to get green light for other drone i just was flying before. Is there some function i did by mistake when radio stops making connection to Vista. In simulator DJI Remote Controller mode 2 works fine.
Hey Oscar, I’m sure you might have heard already, but WTF.com just released new software today, that makes getting BF OSD much easier, with almost no IT skills or CLI inputs. and it’s 100% full Betaflight OSD, up to and including 4.3.
JB just released a tutorial about 9 hours ago, here it is…..youtu.be/KuKjWDJ6XeU
Hi, do you have any udpate regarding to what elements are supported in BF 4.3? For example element “GPS speed” is not supported right now resp. I can not see it in my DJI Goggles. Thank you Jan
Hi Oscar, using a tmotor mini f7 stack with caddx and tried multiple scenarios with ports tab with no luck getting OSD in googles. Appreciate your help.
look at my comment above.
This is really helpful Oscar but having tried everything to get my protek 35 flight beast F745 board and DJI air unit talking I am struggling. I have everything set up correctly as far as I can tell and yet no response to stick inputs on Betaflight and unable to arm the drone
What receiver are you using? It’s best to post your question on “IntoFPV.com” for troubleshooting as I only check comments once a day, reply will be slow here.
Did you find the answer to this?
There is some confusion when discussing DJI FPV when discussed alomg with the DJI Digital FPV system which is the one generally referred to when talking about the DJI Air Unit, to note the V2 goggles are the same however the controller for the DJI FPV is NOT the same as the one they call the DJI digital controller which works with the v2 goggles and flight controllers connected to the DJI Air Unit but it will not operate the DJI FPV nor will the DJI FPV remote work on the DJI AIr Unit…
Primarily because the DJI FPV has special functions built in which have additional controller functions.
Oscar, I have been told that the new DJI FPV Goggles V2 will work fine with DJI Air Unit. So far I am unable to link the DJI FPV Goggle V2 with my DJI Air Unit. My Air Unit is linking fine with DJI Controller though.
I do own the new DJI FPV drone as well and the Goggles work fine with the new drone.
1. I powered up DJI Goggle V2.
2. Next I powered up the DJI Air Unit.
3. I put the DJI Goggle V2 in bind mode. The Goggles started to beep.
4. Next, I pressed the link button on the DJI Air Unit, the green light goes red but the two devices never bind.
Any suggestions on what am I doing wrong?
Furthermore, for the new DJI FPV Goggles V2, the correct software from DJI is DJI Assistant 2(DJI FPV). What is the correct software for DJI air unit?
Thanks for your help in advance.
You need to change you goggle in setting mode to ready to connect with dji fpv system. Find this option in goggle settings – adjust or something like this.
hi my frend. or not if i use dji controler for this type of drone
Hi, Oscar!
Thank you for such a great job! I already got a lot of useful information from your blog and I am already building my first fpv drone. I gonna use Mamba F772 flight controller together with DJI FPV module. But with another RC Transmitter and receiver (actually, it will be Zorro from Raiomaster). Will it be possible to connect the DJI FPV air unit with some different goggles, from another developer?
thanks :)
To your question, No, DJI FPV air unit only works with DJI FPV goggles.
Is the power consumption 8W when the air unit outputs 1200mW? Trying to determine if 1.5A @8V is enough. Thanks!
Hi , thank you for good explanation, I have an issue and i need to fix it , I have iflight nazgul 5 hd version I figured that rught stick is functioning inverted means right goes left and forward goes backwards, I fixed it by inverted the pitch and roll from goggles but i think it is not propper as it seems not ok with me to invert the stick to work as normal !!! I have dji fov remote mode 2
Hi Oscar,
Thanks for detailing this info. I have the DJI Air Unit, Googles and DJI Controller and have the OSD operating. Is it possible to access the INAV menu on the goggles? I am accustomed to the stats after disarming and ability to load a mission…
Is it true that the new controller coming with the DJI-FPV-Combo isn’t compatible with DJI-BNF (Nazgul V5 Envoque HD)???
what about `set sbus_baud_fast` ?
Hi
Would i be able to connect a DJI mavic pro remote/radio controller to the DJI HD units?
Are these units capable of taking photos via radio controller?
Hello Oscar, everyone,
Newbie question:
Why are the DJI HD units connected to the FC?
What is the purpose/function?
Is it because it’s also a built in receiver?
Hello Oscar! Will Dji osd work on the old airbot f4? which version of betaflight should I install?
hi Oscar,
got a BNF KOPIS Cinewhoop DJI Version 2.5 which i had flown for 3 months, i had a problem with the esc stack witch i had change to the same stack, the problem comes in when i had it connecting to betaflight, i cannot connect to my receiver witch is a dji controller… my controller does not work on the betaflight… any suggestions? done everything i can find on the forums, is seems i am not alone on this problem…their solution is to buy another unit which i cannot do… the DJI Controller does not connect to Betaflight… UART 3 im using…any thoughts?
You mean there is no stick movement? Can you also check if Betaflight OSD is working or not?
It’s possible that the diode between the SBUS signal and flight controller in the Air Unit has been damaged, you can check this following instructions here: https://oscarliang.com/dji-fpv-system-faq/#vista-osd-stops-working
Hi Oscar, can you confirm that the right antenna from rear of Air Unit is using only the TX to DJI remote controller ?
Cause in the JohnyFPV hack video we could see that he used only one antenna : youtu.be/zVB7yFvCDyQ?t=33
Nah, he’s using both antennas, pause it and look closer, one antenna is pointing up while the other is ziptied to the arm.
Oh yes correct !
But I unddrstood that one of the antenna from air unit is used for the DJI remote controler.
Could you confirm this information ?
No it’s diversity.
If the DJI remote needs a dedicated antenna, then you’d assume the Vista wouldn’t support the remote right? But the Vista also works with the Remote for having just one antenna :)
I still can’t get BF OSD in my goggles using CaddxFPV vista. I have done everything said here and what others suggest with no luck. Done the power hacks … I’m in fcc… 50 mbps…. 1200 mph hack… everything in BF is set … turned on… or off rssi adds or whatever it is …still stuck with just Default OSD….HELP PLEASE…could it be something in cli?….
There’s a possibility that one of the diodes have gone bad in your Vista, it’s a common issue that causes OSD to fail to appear.
Check out this thread, they show you where that diode is and you can try to bypass: https://intofpv.com/t-caddx-vista-bad
Oscar, i have the DJI FPV II system. I also have the EMAX BabyHawk HD. Any chance my DJI goggles will sync with the BabyHawk?
Thanks
Phillip
You mean You have the DJI FPV Goggles V2? In that case they should work just fine with DJI Air Unit and Caddx Vista.
hello Oscar!!! what is your frame please?
Martian
Hey Oscar,
Incredible write-up! It’s greatly appreciated. I recently purchased the DJI FPV controller 2 version. It’s very different than the one shown in this article. Are you familiar with whether I should expect a similar syncing process and set up with the latest remote?
Thanks!
The FPV Controller V2 is only compatible with the DJI FPV Drone. You can’t use it with custom built FPV drones.
Sorry a noob question. if i use 1200MW hack on the dji radio. Will that mean that it will have a better range than my Tango 2 ?
I watched some videos and i thought the main reason for Tango 2 is a better range? doesnt Tango 2 have max 500MW?
Without getting too technical, your Tango 2 on 500mW will still outperform the DJI radio on 1200mW, by a lot.
Hello my friend. Nice post!
I have a frame like this. do you have the 3D design of the part to hold the air unit and the camera?
They are on Thingiverse, not my designs. Just search for “DJI Martian frame”
I wondered if you could help me? I have BetaFPV 95x V2 running – F405 Flight Controller & 16A BLHeli_32 ESC. Im using TBS and it has Caddex Vista DJI. I’ve been trying for a week or so to get the Betaflight OSD information to show in the DJI google, but all i see is the standard DJI OSD info. I have enabled custom display in the DJI googles. And followed JB’s video on how to enable things but with no luck. I also checked all the DJI forums but can’t seem to find any information or things that work. Any help much appreciated!
Make sure you updated DJI goggles and Air unit to latest firmware too.
And update your Betaflight to latest version.
Hello your tutorials are very cool. I should beg I really like your tpu holder for airunit for Martian 2. You wouldn’t be so kind and didn’t send me a stl file for printing. thank you very much
HI Oscar, hoping you can help.
I purchased the iFlight Titan DC2 HD RTF bundle kit, which came with DC2 quad, dji goggles + transmitter, charger +batts. Great bundle. Everything updated fine and binded without hassle.
Problem lies with my DJI FPV Transmitter – after updating and binding, I wanted to test it in Liftoff simulator, and realized the right roll has a dead spot. Rolling left, pitching forward + backward is consistent, smooth, accurate and precise, even when doing micro movements. Rolling right is very jumpy, especially the first few millimeters of input. Tried it out on the DC 2, just arming the motors, and moving the pitch/roll stick, same as in Liftoff sim, rolling right spikes and looks like drone is gonna flip. done multiple calibrations, even stiffen the gimbal a bit, but no luck. Betaflight also show that ‘right roll’ input jumps from 1500 to 1750’s the first few mm’s of movement/input
Could this be a gimbal defect? Or could it be software/firmware related?
I’m finding no solution online, hope you can help. This DJI controller is brand new out of the box.
Thanks in advance
Have not tried a different firmware.
Hi Oscar, thank you for all your content that you share on the web and that solves many problems for us. I mounted a T-Motor Mini F45A hd stack on my frame HD. The Dji viewer works perfectly but the dji radio does not. I activated the right serial rx and set the SBUS receiver in betaflight. Everything looks good but the radio doesn’t connect. However, it binds perfectly with the Vista caddx, I also see the signal in the viewer, but in “reciver” on betaflight it does not activate. I tried to connect the radio to other free uarts but it doesn’t work. I tried to connect a 9r mini receiver as well but that doesn’t work either. So there seems to be a problem with the RX ports. Could you advise me what else I can check? thanks a lot
And also some of the other parts, like the camera bracket?
tnx
Ro
Hi Oscar,
i habe a question:
Where or how do i get the mouns for the air unit and antennas, you’ve used on this martian frame?
tnx in advance,
refgards
ro
It’s a 3D printed part, design file can be found on thingiverse (search term DJI mount for Martian)
Hello Oscar, can you recommend a descent 9V step up converter for Vista? I want to use Caddx Vista on my Tinyhawk 2 Freestyle like in this video youtube.com/watch?v=suwdTj06pXo . And Vista supports only voltages higher than 7.4V.
I’ve been using this one, working like a charm.
Dear Oscar,
Would it be possible to use a different camera with the air-unit? For example a commercially available camera with an HDMI output or with an output which could be compatible with the air-unit.
Thanks in advance,
Evagoras
No.
At the moment only the Nebula can be used with the DJI Air Uni.
Is it possible to just only record footage with dji air unit ?
In other words use the ” dji air unit like a go pro.
I want to buy a drone with Dji air unit but use my analog goggles and Tango 2 remote….
Thanks.
no, the Air unit has to be paired with the Goggles and they have to be on at the same time to work.
I think I found it:
thingiverse.com/thing:4169691
I do have a question related to the antenna mounts, are you using the factory supplied ones? there is a ‘square slot’ for them to fit into on the side panels but I can’t figure out the best way to mount them as its a 90 degree angle on the plugs?
Hi Oscar, what is the thingiverse code for that alien Dji frame mod you are using on the first picture?
4169691
I got my colors incorrect the first comment. I mean when connecting a vista to a dys f4 pro v2 would yellow go to video out and white go to video in? Or should I use a different rx/tx solder pad on the board somewhere? Thanks.
When connecting a vista to a dys f4 pro v2 would the white wire go to video in and the grey wire go to video out? Or should I just use a different rx/tx solder tabs somewhere else? Thanks!
Hi Oscar great info you have. Am still learning question I have bnf iflight A85 with dji caddx Vista nano , dji remote and goggles .when I fly with the goggles like 30% of the time my quad motors stop in flight and falls to grass camera is still on and I can see video they goggles very strange and my batt r over 50% when it happens and I fly close not far. If I fly without the goggles quad never fails. Is this a problem with goggles
Thanks for all of the info you post! I had been using the frsky x-lite remote with an rxsr receiver, but I just purchased the dji fpv remote and wanted to use it. I paired it with the vista unit on my one quad and the air unit on my other quad and it shows them Both being bound to the dji remote, but when I move the switches or sticks no Inputs read out in betaflight. So i unsoldered the rxsr receiver on my quad with the vista unit and then I was getting stick and switch input in betaflight and was able to set it up and fly. Can you not have a bound frsky receiver and the air unit bound on the flight controller on the same quad-even if you only have one of the transmitters powered on. Say I want to have the option of using my x-lite remote sometimes, and the dji remote sometimes?
I don’t recommend doing this. Not unless you have a way to power off the unused RX, otherwise when both RX are powered on, they will be sending signal to the FC at the same time and might confuse your FC.
Got my system about Three weeks ago and I love it never seen anything like it before it’s got the analog beat So far my only complaint is the power plug in the goggles can fall out real easy and then you lose all your video and I haven’t heard anybody talk about that anything can I do to keep it in tighter thank you
There is a 3D printed power cable holder you can make :)
Works great! scroll down in this article: https://oscarliang.com/dji-fpv-system-upgrade-accessory/
Oscar, is it possible to connect a VCR to the Caddx unit to get recording like the complete DJI unit does?
Would there be any lag or something similar?
I don’t think you can connect a VCR to the DJI system.
Hello i have a problem when i bind the transmitter the googles says “vidéo transmition stopped “i downgraded and upgraded firmwares on all the components nothing works ….
(Tried to help via email, he’s sending his kit back to DJI for repair)
Hi,
Just got off a ‘help chat’ session on DJI.com. Having just purchased the Mavic Air 2, I was interested in the new fpv goggles and wanted to make sure they would work with the Air 2.
Surprisingly, the tech ‘Verge’ told me that the fpv goggles do not work with DJI drones. Please tell me he’s full of it and they do work with the Air 2?
Any help would be appreciated.
No, the DJI FPV Goggles do not work with the Air 2, or any DJI drones. This is for the FPV Air Units only, which you mount on those racing drones.
Oscar, your Zeus35 diagram is wrong. Vista needs to go to TX1 and RX1, because SBUS is using UART2. Had to rebuild because of this. Ugh
Is there a way to get the Air unit feed onto the FC and then transmit it through an analog VTX?
Id like to get the best of both world, by having digital for short range and 2.4ghz when going long distance with the same frame. Independant of any interference risk there might be.
Nope.
Hi Oscar, Just want to thank you for your Pairing Remote Controller with Air Unit section here. I have just installed the vista on my diatone R349 which as you know is analogue. Linked goggles ,vista and DJI radio Wired it up to the fc , connected to Betaflight went into receiver settings, all controls working. Set sbus etc. Anyway could not arm with radio. Funny, all receiver sliders in betaflight working.tested motors on motors tab,all working, checked 1000/1500/200, modes tab arming etc. Totally stumped. Anyway after researching for hours I came Across your section here about pairing remote to air unit for Caddx Vista. After reading this article it dawned on me that I was trying to pair air unit receiver to radio not waiting for the air unit light to go green. THEN DO THE PAIRING!
It worked. It goes to show that although even if receiver sliders in betaflight show it’s working doesn’t mean the the radio and receiver are bound. If I had not read your article I woul still be scratching my head THANKS AGAIN!