The Supafly Flipmode mini quad frame has a slight resemblance to the ImpulseRC Reverb and Rooster at first glance. I am pretty excited about the Supafly Flipmode. It has a beautiful design, packs with features I want and yet it’s priced moderately at only £60 (US$80)!

You can get the Supafly Flipmode frame here: http://bit.ly/2yyAMU7
Further Reading: Read more about choosing mini quad frames.
Flipmode Frame Overview
The Supafly Flipmode V2 frame is designed specifically for Freestyle. It supports 5″ propellers with a diagonal motor to motor distance of 220mm. The motor geometry is similar to the Alien 5″, just a bit narrower left to right.
The best features about this frames personally are:
- Top mounted LiPo battery – great for freestyle
- Low profile body – the center of gravity is closer to the line of props and that improves flight characteristics
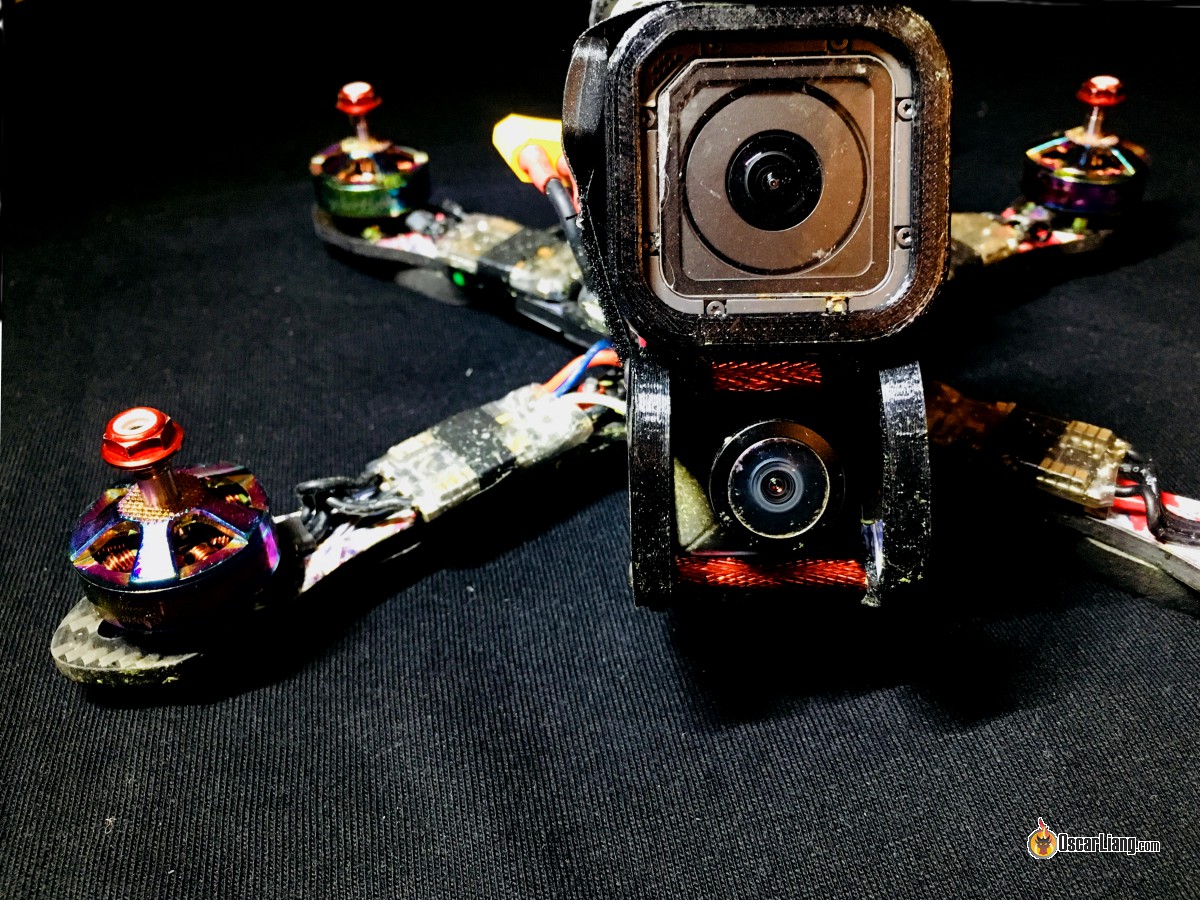
- You can mount the GoPro Session directly on top of the camera cage, which gives you a 30 degree tilt by default

The frame weighs around 110g with Titanium screws. They actually let you choose from 3 different hardware materials: Aluminium, Titanium and Steel, so the weight can vary.
The arms are 4mm thick carbon fibre, sandwiched between two bottom plates. Each arm can be easily replaceable by removing only two bolts.
The other not-so-obvious advantage of the Flipmode is that it’s designed and sold in the UK by Stephen Wright. Stephen is super helpful and seems to be always online if you need support or replacement parts. (I contacted him at 1am a couple of times and he answered!) :D Awesome customer service, can’t say the same if you bought a frame from China :)
Supafly Flipmode Unboxing
There are many accessories you can add to the kit. For example, vinyl skin for the frame, GoPro Session TPU Mount, TPU protectors, and different color hardware etc.

The basic frame kit includes parts such as velcro and foam pad for the battery, landing gear, battery straps, M3 Allen key, RX antenna tubes etc.

Carbon fibre and machining quality are top notch. The edges are quite sharp and they actually cut a battery straps in a crash, so I strongly recommend chamfering the sharp edges and here is how you can do it yourself.


Frame Assembly and Closer Look
Assembling the frame was pretty straightforward, the manual was easy to follow and concise.

See the two countersunk bolts in the middle of the top plate? That’s where you put the LiPo battery on. No protruding bolt head means no puncturing LiPo battery in a crash :) Kudos to the attention to detail!
The frame works fine with most 1300mah and 1500mah 4S batteries, though it’s not designed to take long batteries (e.g. 85mm or longer). The greater length can mess up your COG of the craft, and the two protruding bolt heads at the rear will also become a problem.

They supplied a red 3D-printed TPU SMA mount, it simply slides into the standoffs at the rear.

The height of the body is 20mm, so in theory you should be able to stack 2 boards in there if you keep the stack as compact as possible :) This allows an FC + 4in1 ESC, or FC + PDB combo.

The camera cage is 28mm wide and fits any standard size FPV cameras (not micro or mini). The camera is really well protected inside the cage even with a 2.1mm lens. Despite the low profile, the cage sticks out far enough to avoid the props in camera’s view. I can also confirm that the props are not visible in the GoPro footage.

You can buy these vinyl skins that go on to both sides of every piece of carbon fibre. This is one unique feature that makes your quad stands out from the crowd, and I have not seen it anywhere else.

Finally, a little insight about hardware choices before we move on to building the quad. For this frame, I am using Titanium bolts because it’s a good balance between weight and strength.
Aluminium is a little lighter than Titanium but it’s also softer. I had some bad experience with stripping in the past. And Steel is nearly twice as heavy as Titanium. Here is some data regarding weight:
- 16x Titanium 8mm screws 4.7g
- 16x Aluminium 8mm screws 3.5g
- 8x Steel 14mm screws 7.8g
- 8x Titanium 14mm screws 4.2g
Build Log
The components I am using in this build are:
- Speedybee F4 AIO Flight Controller
- BrotherHobby R6 2306 2450KV Motors
- Holybro Tekko32 ESC
- Frsky X4R-SB Receiver
- Runcam Eagle 2 FPV Camera
- AKK Nano2 VTX
- 1x 1000uF 25V Capacitor

When it comes to mounting receiver antennas, Supafly’s recommendation is to put them inside the provided plastic tubes, then mount the tubes under the rear arms. It surely protects the antennas very well, and it might work just fine for short range flying.
But I still prefer the good old heatshrink & ziptie method :) By placing your antenna too close to carbon fibre can leave you with really bad signal. Try to place them as far from the frame as possible and not blocked by anything conductive.
Further Reading: Check out this guide to learn more tips about building mini quads

The dry weight came to be around 380g, I can probably get it down considerably if I planned it better :) Oh well maybe in my next build (I’m going to order another frame)!
The frame holds the GoPro Session really well with or without the TPU mount. You have to buy the 3D printed TPU mount separately. It’s not necessary, but it gives your GoPro a bit more protection especially if you fly over concrete or rocks :)


The vinyl stickers on the frame really look COOL :) Not sure how long this will last though until it all covers in mud. :D

When it comes to repairing I would say it’s relatively easy. You just need to remove the 5 screws on the top plate and it pops right off, and you have access to everything inside the body.
For some reasons, when I was assembling the frame for the first time, the carbon fibre was scratching the vinyl skin. It made it impossible to fit the top plate on the camera cage. At the end I had to cut that part of the sticker off.

The FPV camera cage has 3 screw holes, and it supports a large range of camera options. The tilt angle can be adjusted, but for cameras with large lenses it’s limited to around 45 degree because of the top standoff gets in the way. Anyway 45 degree is plenty for freestyle, I personally fly 30-35 degree normally.


You can change the colour of the LED’s on the Tekko32 :) Not very bright in day light, but looks cool at night.

Another thing I really like is the GoPro mount design. It has a cut-out that allows you to open the door in the GoPro to access the SD card slot and the charging port without taking the camera out of the mount.

Conclusion
Overall the Flipmode is a brilliant frame for freestyle FPV flying and it ticks a lot of boxes for me.
It’s well designed and flies well. It’s strong and sturdy. It’s highly customizable with many accessories. And it’s affordable for a high quality frame. What more can you ask for? :D
Provided it’s durable enough from crashes, this is now my go-to freestyle frame :)
Some Footage
First flight:
Rebuild – Trying New FC (27 July 2018)
Trying the latest Kakute F7 AIO FC on this build while everything else stays the same.
Despite the “long” shape of the Kakute flight controller, the Flipmode handles it perfectly. Though you have to be careful with the wires, don’t let them touch the soft mounted gyro :)

The flight performance is beautiful, here is my advice on how to tune the latest Betaflight 3.4.
4 comments
Tried one and best qaud I’ve flown so far! So much so I am buying it next week!
I love the flipmodes they are amazing frames I run tatu rline 1800s and they fit perfect.
I love them so much I have 3
I’ve had a flipmode as my main quad for some months now, I can confirm it’s awesome. Happy to see it being featured here, I think Supafly deserves some more attention than it gets!
Skitzo did the vinyl stickers first on the Dark Matter and Nova frames. I didn’t check the dates though. I also don’t know if anyone did it even before him. Please correct that in your article.