
I sometimes rush to fly my quadcopters right after I finish building them. Unfortunately there were times the drone didn’t take off as expected due to mis-configuration. I even had magic smoke a few times because of faulty parts and short circuits.

Learning my lessons the hard way, I have come up with a list of things to check every time I build a new mini quad. Hopefully this guide will help you avoid surprises when powering on for the first time, and make sure your drone is ready for a safe maiden flight.
I compiled a list of tips and tricks on quadcopter building, maintenance and flying.
#1 NO PROPS on the Bench !
Remove those props (propellers) whenever you are working on it on the bench. Just don’t put them on until you are ready to take off.
Our drones are designed not to spin up when it’s unarmed, but accident happens. To prevent hurting yourself or damaging your properties, remember “no props on the bench” :)
#2 Check Motor Screws
The first thing I always do when finish a drone build, is to check if the motors screws are too long and touching the motor winding. I sometimes even do it right after mounting the motors on the frame.
This guide explains how to check if motor screws are too long.
As you know, mini quad frame is usually made of carbon fibre, and carbon fibre is conductive. If the screws are touching motor winding, it creates a short circuit that can burn out your motor and anything that is connected.
#3 Use a Smoke Stopper !
I can’t stress enough how useful a smoke stopper is to have for testing a new mini quad. It’s often overlooked because a lot of people can get away without it. Don’t risk it because of laziness. It’s heartbreaking to see smoke coming out of a drone you spend hundreds dollars on, and hours building!
In this tutorial, I explain how to build and use a smoke stopper.

#4 Check FC Orientation
Connect the mini quad to the Betaflight Configurator, go to the Setup tab and you should see a 3D model representing your quad. Move your mini quad around and ensure the 3D model is following the same movement. Repeat this for roll, pitch and yaw axis.
Pro Tip: 3D model is not moving? Make sure Accelerometer is enabled in the Configuration tab.

If it is not moving in the same manner, it’s an indication that your flight controller might be installed in the different orientation. You can easily fix it by going to the Configuration tab and change the settings in the “Board and Sensor Alignment” section (usually Yaw offset, if the board is rotated around yaw axis).
If you failed to do this check and FC orientation is wrong, your quadcopter will flip over (or freak out) on take off.
#5 Test Motors
There are 3 things you should confirm in this test:
- Are all the motors working?
- Are the motors in the right order?
- Do they spin in the correct direction?
Plug in the battery, go to the motor tab in Betaflight’s configurator, enable the “I understand” checkbox. One by one use the sliders to spin up your motors for a few seconds. You don’t need to spin them very fast, running motors too fast for too long without propeller is actually bad for them.
If one or multiple motors is twitching, or doesn’t respond at all, check your soldering and wire connection between mini quad motor to ESC, and ESC to flight controller.
You want to verify that the motors are arranged in the right order. If not, you can swap the ESC signal wires around on the flight controller. However I find it easier to do a motor output remap using resource remapping.
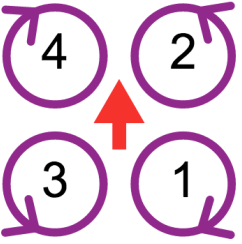
If the order is correct, you also want to check if they are spinning in the right direction as shown in the above image (arrows). For safety, you can put a prop on the motor but without screwing down the prop nut.
This guide shows you how to change motors direction.
If you don’t do this check and something is wrong, your quadcopter will flip over or freak out on take off.
#6 ESC Calibration
If you are using DShot, you DON’T need to calibrate ESC’s. This includes DShot150, DShot300, DShot600, DShot1200 and DShot2400.
However you need to calibrate ESC’s if you are using PWM, Oneshot125, Oneshot42 and Multishot. Here are the steps to calibrate ESC.
#7 Check Receiver
Go to the receiver tab in Betaflight Configurator. Here you want to make sure the channels are responding to your sticks and switches correctly.
- If you are not getting any movement, check if both TX and RX is powered on and the RX is indeed bound to the TX
- Is the RX setup properly in Betaflight? Here is how to setup SBUS
If the channels are moving, but in the wrong order, try a different Channel Map (AETR1234 or TEAR1234).
Pro Tip: Most flight controllers don’t power receiver by USB so you might have to plug in the battery for this step.
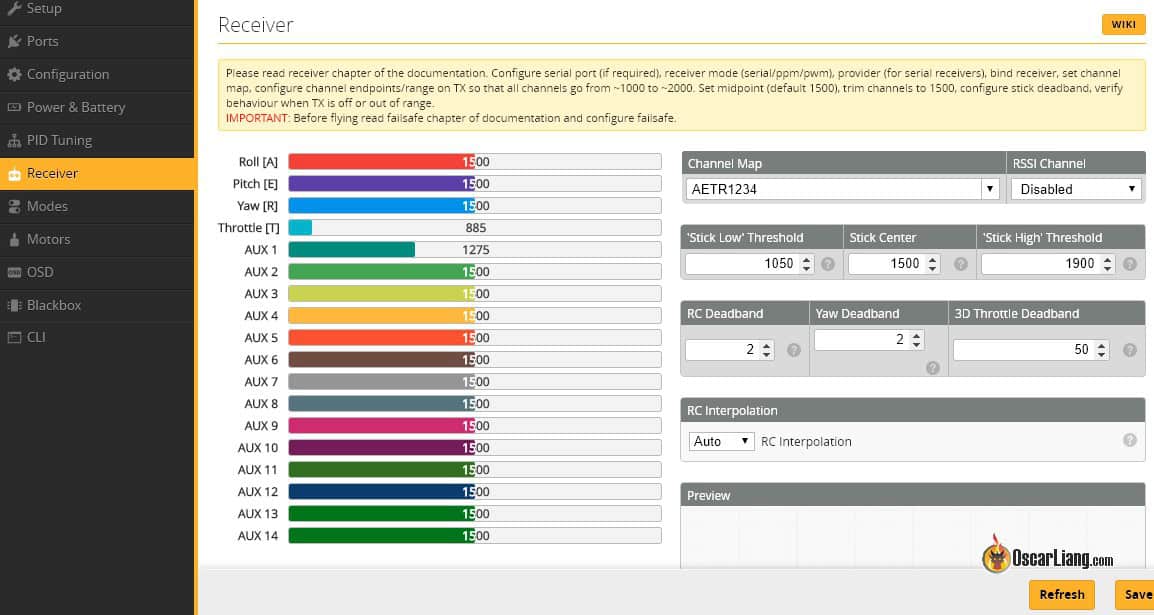
Next make sure your channel mid-points are at 1500 and end-points are 1000 and 2000. This will prevent drifting and ensure you are using the whole stick range during flight. This guide explains how to fix wrong mid-points and end-points.
It’s completely normal for the mid-point values to jump up and down a few points around 1500 even when you stick is idle. This might cause slight drifts and vibrations during flight. To fix it, you can add some “deadband“, for example if you see 1495-1505, use 4 to 5 as your deadband.
Finally, make sure throttle value is well below 1050 when the stick is at its lowest position (preferably below 1000). If it is not, then you may have trouble arming your quad.
#8 Arm and Throttle
Try to arm your quad with your transmitter and briefly spin up the motors by giving it some throttle (without props on of course).
Listen for any twitching or unusual vibrations as you apply higher throttle. If your quad freaks out at this stage it’s probably a sign of excessive noise in the system. It’s normally mechanical noise, quick fixes are:
- Soft mounting FC can help
- If you are using 32K/32K looptime, go back to 8K/8K. Gyro is a lot more sensitive when 32K mode is enabled
- or improve your Betaflight filter settings, for example, lower your gyro low pass filter frequency
If these don’t help then you may need to investigate further.
Having trouble arming your quad? Let me help you troubleshoot it :)
#9 Setup Failsafe
I cannot stress enough how important failsafe is. In my opinion this is one of the very first things a beginner should know about.
Without setting up failsafe properly, your drone will just fly away if you lose signal, until the battery is dead or when it hits something. Imagine the possible damages it can cause.
This tutorial explains how to setup failsafe.
#10 Setup Betaflight
Setting up Betaflight for the first time can be taunting, there are so many settings!
But don’t worry, I have a beginner guide to walk you through a basic Betaflight setup. Some simple steps, but enough to get you in the air for the first time. You can study the rest of features and settings later when you have time :) The links are all in the guide anyway.

#11 Test FPV System
Before heading out to maiden your FPV Drone, check if your FPV feed is working properly, e.g. VTX and VRX are on the same channel, and FPV goggles are getting perfectly clear image. Learn about the basics of FPV system in this guide.
If you are using OSD, you might want to learn about Setting up Betaflight OSD too.
#12 Don’t Power VTX Without Antenna
VTX can get very hot, it gets even hotter without an antenna which can possibly burn it within minutes if not seconds. Make sure to put on an antenna before powering on your VTX. You should also avoid powering on your VTX for too long on the bench without adequate cooling.
If you are having overheat issues with VTX, here are some tips to help you.

#13 Check if the props are on the right motors
Propellers have two directions, CW (clockwise) and CCW (counter clockwise). If you put on the wrong prop (which I still do occasionally after all these years), your quad will flip over when trying to take off.
This image shows you how it should be:

#14 Install a Buzzer
Not only for getting low voltage alarms or other warnings, having a buzzer in your drone can help you find it when you crash it in bushes or tall grass. Additionally you can also enable Motor Beacon as an extra layer of safety (requires DShot).

#15 Practice in a Simulator
Get on an FPV simulator and practice as much as you can before your first flight!
Trust me, it’s going to help tremendously! I witnessed it first hand, a complete beginner not only mastered acro mode in his first flight, he did a freaking “powerloop” 20 mins in on his first day.
It’s embarrassing to say, but when I first started flying mini quad back in 2013, there weren’t any sims back then. It took me 6 months to do my first roll…

Conclusion
So everything is working? It looks like you are ready for your first flight, congrats! Now you probably want to learn about tuning your drone :)
Have you got a question? If you can’t find an answer on Google, post it on IntoFPV forum. I and hundreds of other pilots are there to help!
Did I miss anything? Is there something else a beginner should do after building their mini quad, and before maiden flight? Let me know in the comment.
Edit History
- Jun 2018 – article crated with 11 tips
- July 2018 – added 4 more tips
4 comments
Why motors by default spins in beta flight in a such way that they throw grass into the lens? I found this extremely annoying, now i revert all my motors, but it’s interesting why this rotation was set by default in a first place – is there some advantages in such default setting?
I guess no one uses a KISS fc ? Duh…
One should also check the specs for any fc used !
1 2 3 4 placement isn’t always the same !
Even between versions , also the method of correcting the direction, soft/hardware option.
Ty Oscar. For all your good work for the hobby.
Thanks Oscar, this is a very useful guide! I missed some of these steps on my first build, but from now it will become my personal checklist.