In this comprehensive tutorial, I’ll walk you through the process of building an FPV drone from scratch, providing detailed guidance for both analogue and digital FPV systems. We’ll cover everything from selecting the right components, to wiring and assembly, and even share insider tips and tricks to ensure you have a reliable and enjoyable FPV drone experience.


Table of Contents
Can Beginners Build FPV Drones?
Absolutely! Even if you have no prior experience, beginners can totally build FPV drones.
Sure, it might be tempting to simply buy a ready-made drone off the shelf—but where’s the fun (and learning) in that? By assembling your own drone from scratch, you’ll gain valuable hands-on knowledge about each component and how they all work together. You’ll also be much better prepared to troubleshoot and repair your drone if anything goes wrong.
Now, I won’t sugar-coat it—building your first FPV drone will be challenging. It may take hours, or even days, to complete. Along the way, you’ll need to seek advice from experienced pilots online or figure things out through trial and error. But trust me—the sense of accomplishment and the skills you gain will make the journey incredibly rewarding.
So, let’s dive in and embrace the challenges ahead!
Mastering the Basics
Before we embark on this exciting tutorial, it’s crucial to familiarize yourself with the basics of a quadcopter.
To get started, check out our beginner-friendly guide: Getting Started with FPV Drone.
As you explore the world of FPV, you’ll likely encounter many acronyms and technical terms. Don’t let these intimidate you! When in doubt, refer to our handy glossary: Decoding Acronyms and Technical Terms in FPV.
Parts List
In this tutorial, we’ll be using the following parts to guide you through the FPV drone building process.
Just a quick note: the links provided are affiliate links. Making a purchase through these links won’t cost you anything extra, but it will earn me a small commission. This support helps keep the blog running and allows me to continue sharing my passion for FPV drones with you—thank you!
This particular build focuses on the DJI O4 Pro Air Unit. If you’re interested in building an analog FPV drone, check out my other build log here: https://oscarliang.com/how-to-build-fpv-drone-analog/
If you have a small budget, here is a list of the cheapest 5″ drone parts.
If you want more options, here is a list of parts that I recommend.

DJI O4 Pro Build |
||
| Frame | GEPRC Vapor | Amazon | AliExpress |
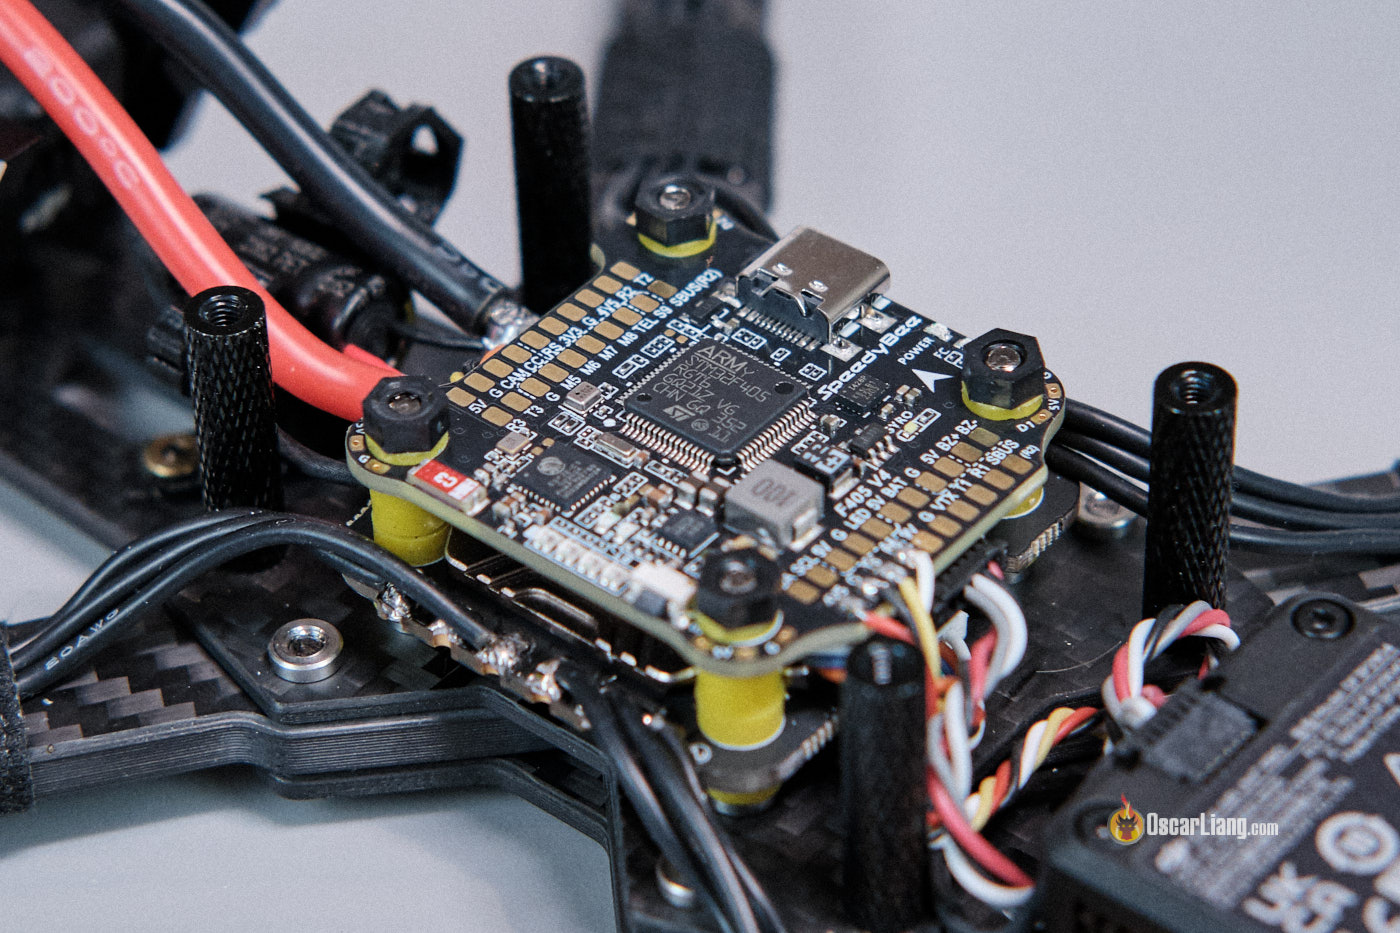
| FC / ESC | Speedybee F405 V4 + 60A ESC | GetFPV | Speedybee | Amz | AliExpress |
| Motors | 4x EMAX ECO II 2207 1900KV | AliExpress | GetFPV | Amazon |
| Propellers | 4x HQ 5×4.3×3 V2S | RDQ | GetFPV | AliExpress | Amazon |
| Receiver | BetaFPV ELRS 2.4GHz Nano | GetFPV | AliExpress | BetaFPV |
| FPV Setup | DJI O4 Pro Air Unit | AliExpress | GetFPV | RDQ | Amazon |
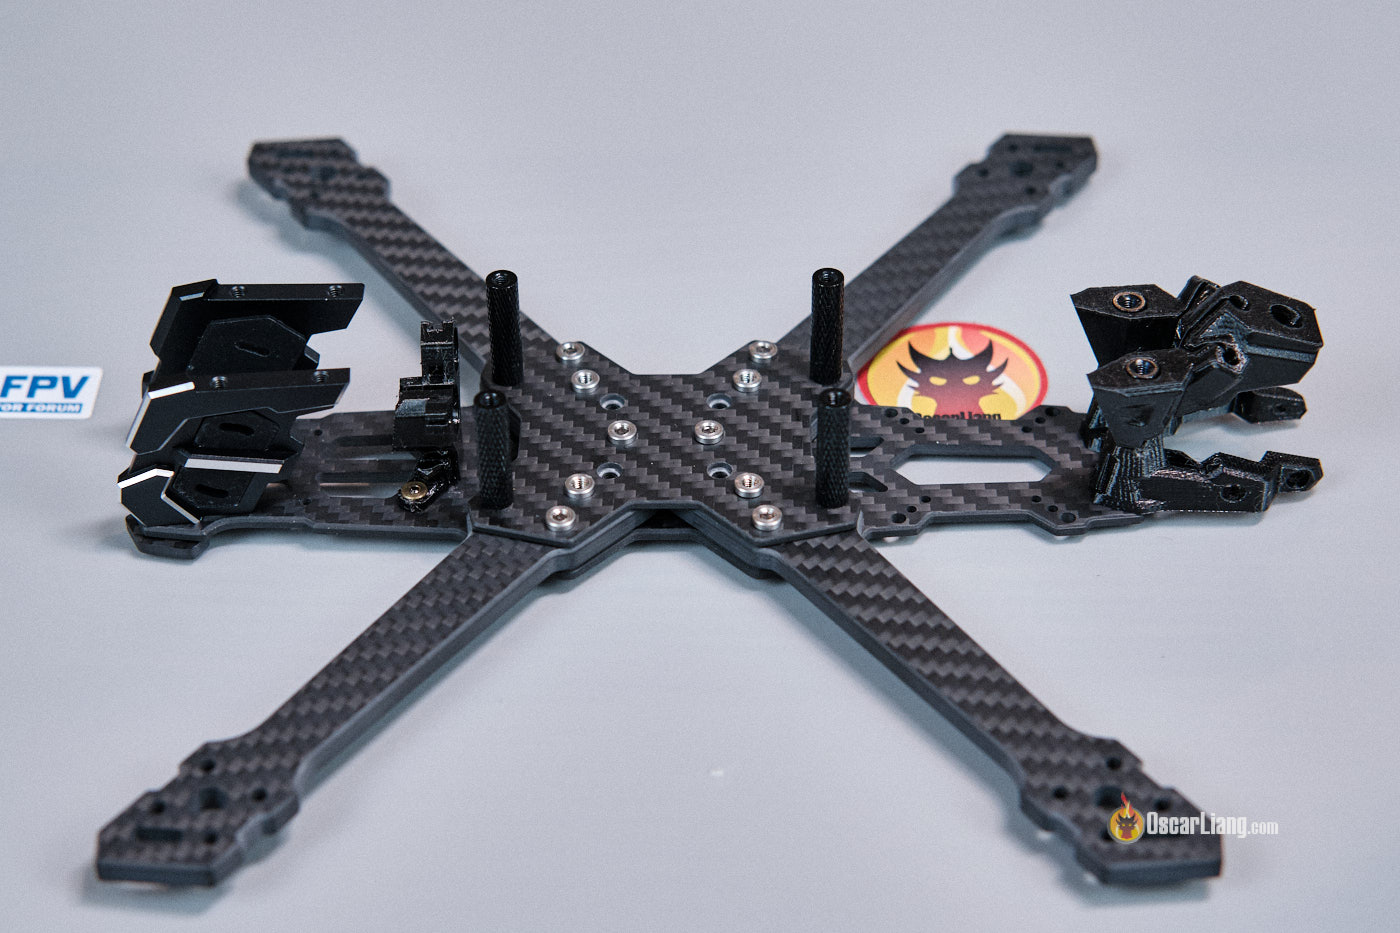
Frame

The frame is the sturdy structure that holds all of the drone’s components together.
For this tutorial, I’ve selected the GEPRC Vapor—an excellent choice thanks to its high build quality. It also comes with a variety of 3D-printed accessories, making for an incredibly easy and clean build.
Check out my detailed review of this frame, along with step-by-step assembly instructions, here: https://oscarliang.com/geprc-vapor-x5-d5-frame/.
FC and ESC
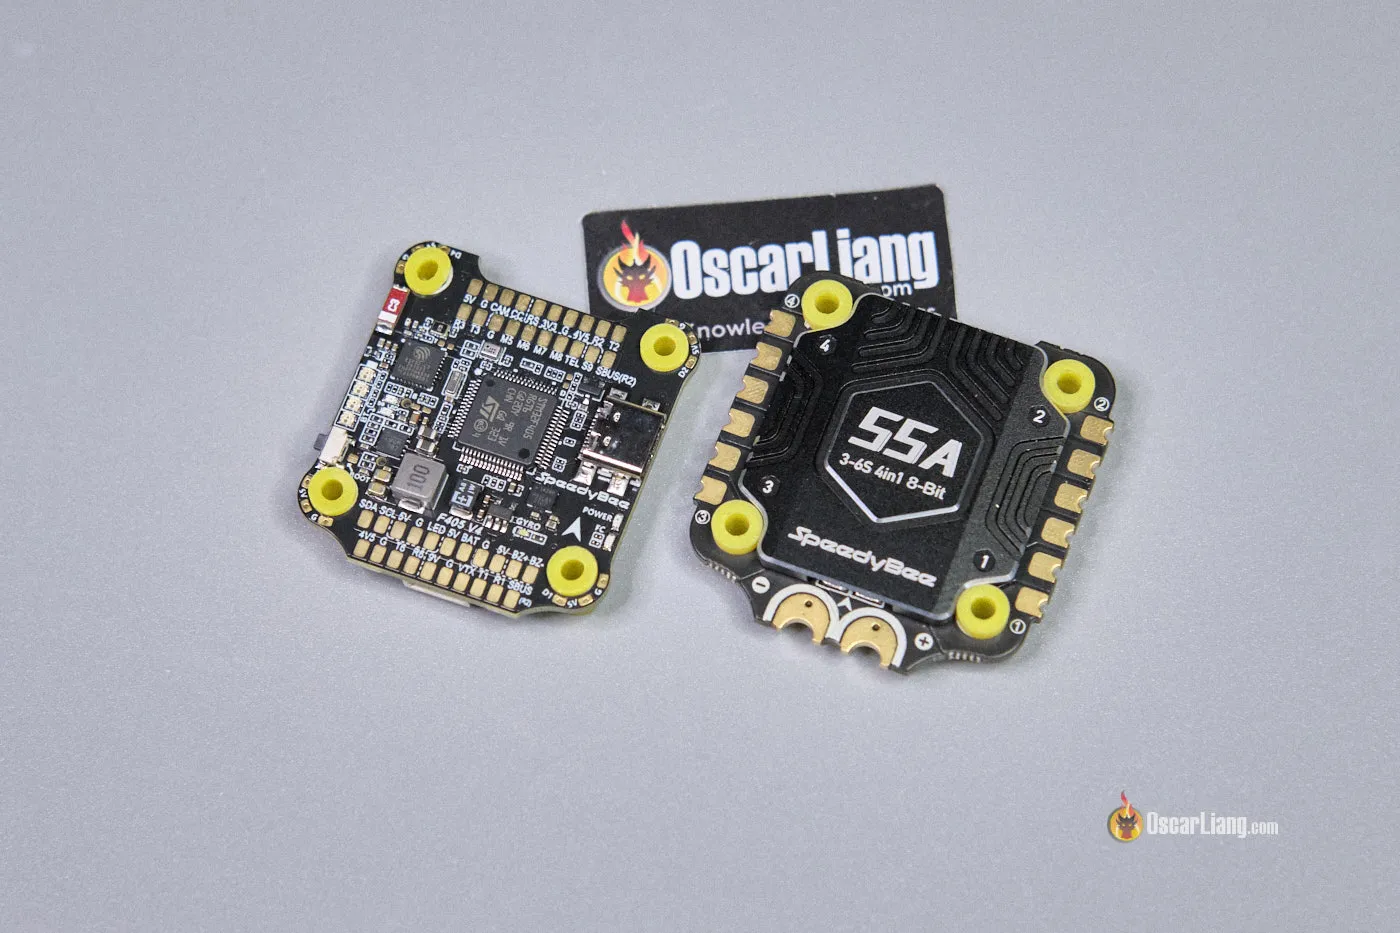
Buying the flight controller (FC) and ESC together as a stack is not only more affordable, but it also ensures that they are plug-and-play right out of the box, making the drone building process much smoother and more straightforward.
For this tutorial, I’ve chosen the Speedybee F405 V4 stack. Despite being one of the most affordable FC/ESC stacks on the market, it doesn’t compromise on features. It supports almost all modern functionalities you’d want in an FPV drone. Check out my in-depth review of the Speedybee F405 V4 here: https://oscarliang.com/speedybee-f405-v4/.
If the Speedybee F405 V4 is out of stock, don’t worry—there are plenty of excellent alternatives. Here’s a list of my top recommendations: https://oscarliang.com/flight-controller/#The-Best-FC-Recommendations.
Motors

FPV motors today are surprisingly similar in terms of performance, especially at the beginner level. That means there’s no need to buy the most expensive motors when you’re just starting out—most people wouldn’t even notice the difference. Budget options like the EMAX ECO II series are more than adequate for beginners.
For a 5-inch FPV drone, motor sizes such as 2306, 2207, and 2208 are all viable choices. Personally, I believe 2207 hits the sweet spot in terms of performance-to-weight ratio. Learn more about the differences here: https://oscarliang.com/2306-2207-mini-quad-motor/
Another important factor to consider is motor KV, which is linked to your battery voltage. For a 6S build, I recommend choosing motors with a KV rating between 1600 and 2000. Higher KV motors deliver more aggressive and power-hungry performance. In this build, I’ve chosen 1900KV motors, as the next lower option (1700KV) feels a bit too low for my taste.
There are many other excellent motors worth considering—check out my full list of recommendations here: https://oscarliang.com/motors/#Recommendations
FPV Setup

There are several FPV systems available on the market, but the DJI O4 Pro would be my top choice for a 5-inch freestyle drone. It offers the best image quality and signal reliability, and top-notch build quality. If you want to learn more about the different FPV systems and their pros and cons, check out my buyer’s guide: https://oscarliang.com/fpv-system/
Radio Receiver

Your choice of radio transmitter dictates the type of receiver (RX) you can use. If you followed my radio recommendations, your radio should support ExpressLRS (ELRS), which is currently my top choice for a radio link. ExpressLRS is affordable, high-performance, and incredibly reliable: https://oscarliang.com/expresslrs/
Numerous manufacturers produce receivers and transmitter modules for ExpressLRS. You can choose any of these, and as long as they’re ExpressLRS, they’ll work together. For this tutorial, I’ve selected the BetaFPV ELRS 2.4GHz Nano, which is one of the cheaper options on the market and works well.
To help you set up ExpressLRS, I’ve put together a step-by-step tutorial: https://oscarliang.com/setup-expresslrs-2-4ghz/
Other Equipment
To fly a quadcopter in FPV, you’ll need the following accessories. Take a look at my everyday gear for inspiration. Here is a summary:
- Radio Transmitter: A radio transmitter is essential for controlling your drone. Here are my recommendations: https://oscarliang.com/radio-transmitter/#Radio-Recommendations
- FPV Goggles: To use the DJI O4 Pro Air Unit, you will need a pair of DJI Goggles. There are 4 options compatible with the O4: https://oscarliang.com/which-dji-fpv-goggles-g3-g2-integra-n3-v2/
- LiPo Batteries: For this build, 6S 1000mAh-1300mAh LiPo batteries would be ideal. Check out my LiPo Recommendations here. Be sure to familiarize yourself with LiPo batteries using this Battery Buyer’s Guide, as improper handling can be dangerous.
- Battery Charger: Lastly, you’ll need a battery charger. I’ve put together a list of recommended LiPo chargers for your convenience. Make sure to read about how to choose LiPo chargers and power supplies.
Tools and Supplies
To build the drone, you’ll also need the following tools and supplies. You may already have some of these items, if not, they should be easily found online or at your local hardware store.
Essential:
- Soldering Iron, flux and solder wires
- Hex screwdrivers set, must have sizes are 1.5mm, 2.0mm and 2.5mm (Buy from Amazon)
- A small Phillips head screwdriver (Buy from Amazon)
- A pair of scissors for stripping and cutting wires
- Electrical tape or cloth tape for securing motor wires (Buy electrical tape from Amazon, buy cloth tape from Amazon)
- Prop tool (for tightening/loosening propeller nuts): https://oscarliang.com/fpv-tools/#Prop-Nut-Tools
Optional but recommended:
- Thread locker (for securing motor screws): https://oscarliang.com/threadlock/
- Digital multimeter (Buy from Amazon | Banggood)
- Short Saver (aka smoke stopper): https://oscarliang.com/vifly-short-saver-2/
For those truly passionate about the hobby, here’s a comprehensive list of tools that you may find invaluable on your FPV drone-building journey.
Steps of Building FPV Drone
Click the link will take you to the section in this article:
- 1. Frame Assembly
- 2. Installing Motors
- 3. Wiring Diagrams
- 4. Installing ESC
- 5. Testing ESC and Motors
- 6. Receiver Setup
- 7. Installing DJI O4 Pro
- 8. Finishing Off
- 9. Setting Up Betaflight
- 10. Tuning
- 11. Learning How to Fly
1. Frame Assembly
Follow my detailed step-by-step tutorial to assemble the GEPRC Vapor frame: https://oscarliang.com/geprc-vapor-x5-d5-frame/
You need to complete the frame assembly to this stage before moving on to the next steps.
2. Installing Motors
Now, it’s time to mount the four motors onto the arms.
The EMAX ECO II motors come with screws of different lengths. Use the screws with a 7mm thread length, which are suitable for 5mm thick arms.

It’s highly recommended to use threadlocker (such as Loctite) on the motor screws, as vibrations can cause them to loosen over time.
Some motors come with threadlocker pre-applied (appearing as a blue coating on the threads), but the ECO II motors do not, so you’ll need to apply it yourself.

Some builders use only three screws or even two to save weight, but I recommend using all four screws for maximum durability.

Important: Before fully tightening the motor screws, make sure they are not too long and aren’t pressing against the motor windings. If you’re unsure, follow this guide: https://oscarliang.com/check-motor-screws-touching-winding/


3. Wiring Diagrams
If you’re using the components I recommended, refer to this wiring diagram for guidance.

Before cutting and soldering any wires, you can “dry fit” all the components in the frame. This process allows you to gauge how long the wires should be, determine the best location for your components, and identify any potential spacing issues.

4. Installing ESC
Start by installing the four long bolts that come with the Vapor frame into these holes.


Slide the 4in1 ESC and FC boards onto the bolts.
Normally, the ESC’s power pads (+ and -) should face the rear. However, because the Vapor frame routes the battery lead through the middle, it’s best to rotate the ESC 180 degrees. This means you’ll have to remap the motor order later in Betaflight (don’t worry, I’ll explain how).

Check carefully, nothing should touch between the bottom of the ESC and the frame, and between the ESC and FC boards.

Next, we will solder the motors to the ESC. If you’re new to soldering, refer to the tutorial How to Solder for Beginners: https://oscarliang.com/soldering-guide/.
There are three common ways to route motor wires:
- Simple and casual routing: Just solder the wires directly to the ESC pads casually. It’s quick and easy, but the build won’t look as professional. If you are new to soldering, this is recommended.
- Neat routing around stack screws: Wires loop neatly around the screws. Looks clean, the motor wires are hidden when the FC is mounted on top, but it requires longer wires so it adds a few grams of extra weight.
- Tight stacking routing (my favorite): Wires are cut as short as possible. Very clean aesthetic, very efficient, but you must cut the wires to the exact length, and challenging to solder as the wires are stacked on top another.

Secure the motor wires on the arms with cloth tape or electrical tape. The Vapor frame kit includes plastic tubes for wire protection, they do look neat and professional, but I found them impracticable and heavy.
Measure and cut motor wires, it’s always better to leave a little slack.

Strip about 2mm off the tip of the wires and tin the ends.

Tin all the motor pads on the 4in1 ESC (fill the pads with a nice dome of solder first before soldering the wires).

Don’t worry about the order of the motor wires—you can easily reverse motor spin direction later in Betaflight.

Now, solder the capacitor that comes with the Speedybee stack. Insert the provided heatshrink tubes, shorten and bend the legs.
Solder the capacitor onto the battery pads (+ and -) on the ESC. Pay attention to polarity – the negative leg is marked by a light-colored stripe on the capacitor.
Why a Capacitor?
A capacitor reduces voltage spikes and electrical noise from the motors and ESC, protecting your electronics as well as reducing noise getting to the gyro, improving the flight performance of your drone. Learn more about why capacitors are important: https://oscarliang.com/capacitors-mini-quad/

The capacitor can now sit securely inside the included TPU mount.

Now, solder the XT60 power lead to the power pads on the ESC, pay attention to polarity (positive and negative). This is perhaps the most challenging step in this build, due to the amount of heat required to melt the solder on the large copper pads and thick wires. Be patient and use a higher temperature on your iron.

Soldering Tips:
- Use a good amount of solder and solder flux (solder paste) for the large pads, ensuring the solder joints are shiny and full. If you can see the wire strands, you haven’t applied enough solder.
- Apply more flux if the solder “sticks” to the tip when you remove it from the joint.
- Feel free to use a high temperature when soldering large solder pads, but be quick and avoid overheating the pads for too long. Use 450°C (840°F) for motor wires and XT60, and 380°C for signal wires.
5. Testing ESC and Motors
We will now test the ESC and motors by connecting the battery.
But before plugging in a LiPo battery for the first time, ensure there are no electrical shorts. Using a multimeter in continuity mode, test the positive and negative terminals of the XT60 (or directly on the ESC power pads). If there is a short circuit, the multimeter will beep continuously. In this case, do not plug in the battery, as it may damage your components. Instead, troubleshoot and fix the issue that is causing the short circuit.
For more information on using a multimeter to test your drone, check out this tutorial.
Pro-Tip: A short beep followed by silence may occur when testing continuity due to capacitors charging. This is normal and shouldn’t cause concern. As long as it stops beeping after a second or two you should be fine.

Now, connect the FC to the ESC using the provided 8-pin cable, and connect the FC to your computer via a USB cable.
It’s highly recommended to use a smoke stopper when plugging in a battery for the first time. While not mandatory, it’s a useful investment to avoid damaging components.

Do not put on propellers yet.
To test the motors, plug in the battery and connect the USB cable to the flight controller. Open Betaflight Configurator, and go to the Motors tab.
Choose DShot300 in ESC Protocol. Click Save and Reboot.

Now, enable motor control, and you should be able to spin up the motors – do this one by one, move the slider to around 1100 is enough.

You wan to make sure the motor that is spinning matches the number in the diagram, e.g. motor #1 is the rear right, motor #2 is front right etc.

If the motor order is wrong (most likely wrong because we rotated the ESC 180 degrees in our build), you can easily fix it by clicking the “Reorder Motors” button in the motors tab, and just follow the simple instructions. You can also fix it using CLI commands but it’s quite complicated, so just use the tool :)
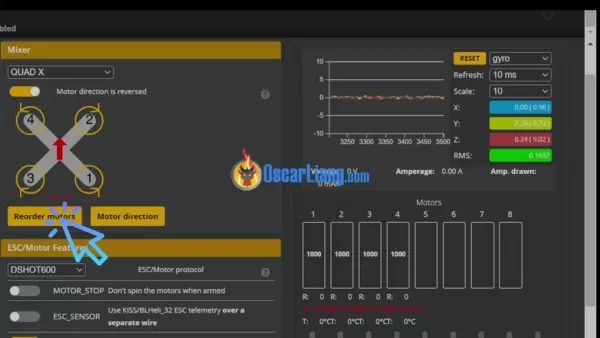
Once the motor order is correct, you need to verify if they are spinning in the correct direction. To reverse a motor direction, there are a few ways, the easiest is to use the Betaflight Configurator (Motors tab) as explained here.
Troubleshooting tips:
- If motors aren’t spinning, ensure the battery is connected and you’ve turned on the Short Saver if you are using it. And the ESC should beep as soon as you plug in the battery. Make sure the ESC is connected to the FC, and that the pin connections are correct.
- If all motors spin except for one, that particular ESC, motor, or the ESC signal from the FC might be faulty. To troubleshoot, swap the non-functioning motor with a working one on the same quad to determine if the issue lies with the ESC or motor.
For further assistance, ask in the forum: https://intofpv.com
6. Receiver Setup
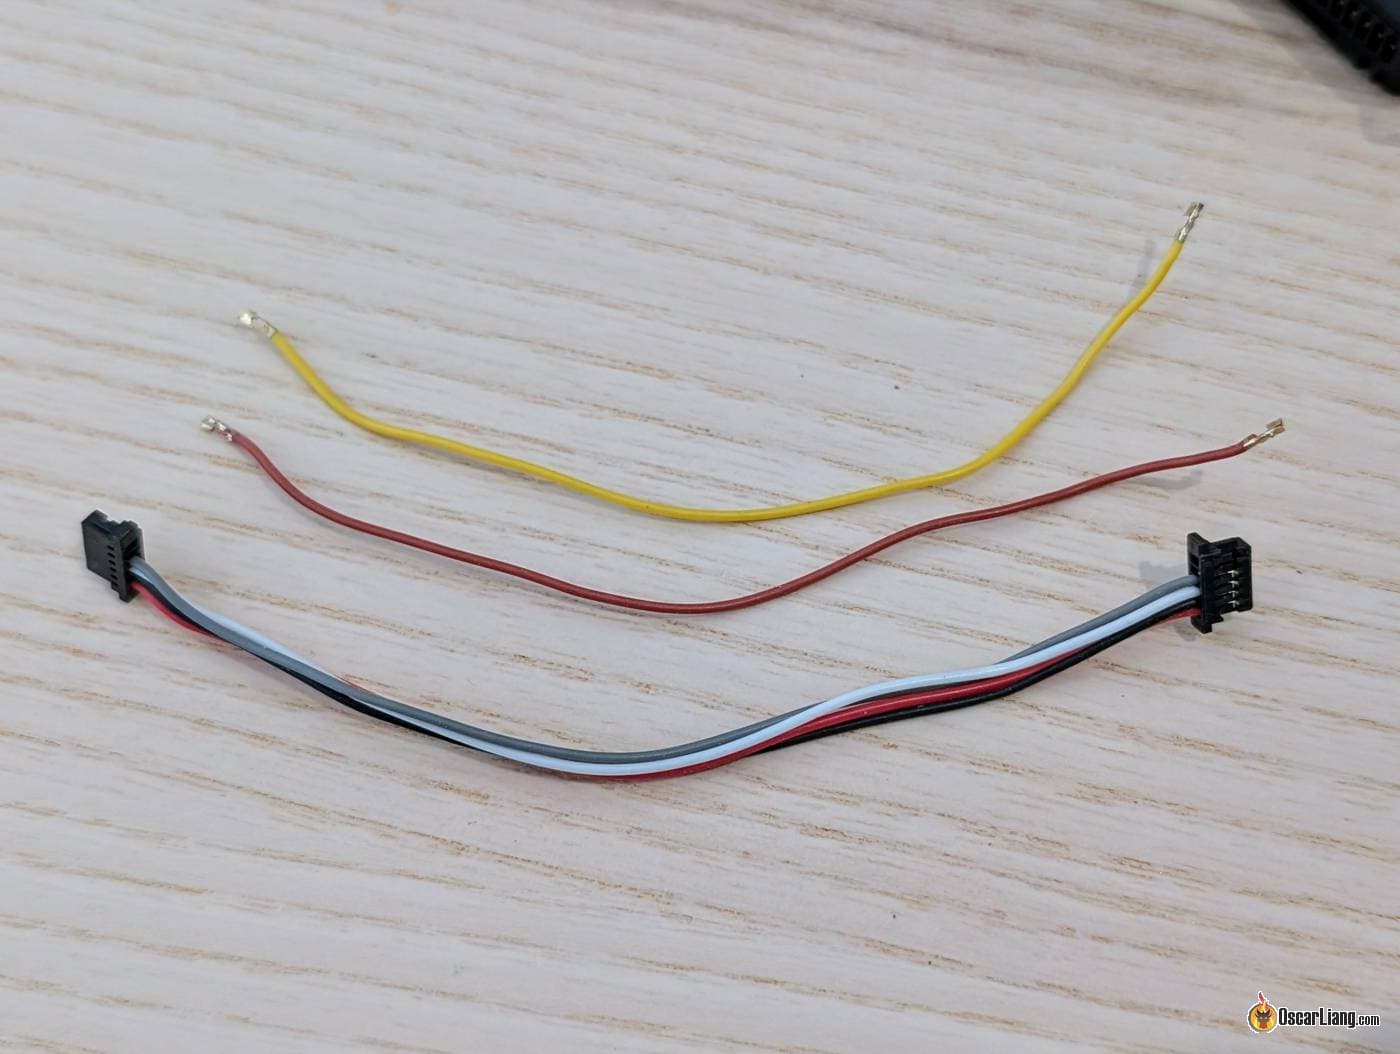
Start by soldering the provided wires to the receiver.
Pro Tip: When soldering components to the flight controller (FC), avoid routing wires across the board. Dangling or loosely routed wires can introduce vibrations that negatively affect gyro performance.
Additionally, twist your wires. This not only helps minimize electrical interference but also reduces slacks and gives your build a cleaner, more professional look.
While the wire colors technically don’t matter, following a consistent color scheme makes troubleshooting much easier. I recommend using this color coding:
- Black wire → GND (G)
- Red wire → 5V (V)
- White wire → TX (T)
- Yellow wire → RX (R)

The frame includes a TPU holder where you can neatly put the receiver in.

Wire the flight controller to the receiver like this (from FC to receiver):
- 4V5 → V (5V)
- G → G (Ground)
- T6 → R (Receiver RX)
- R6 → T (Receiver TX)

Mount the receiver and antenna securely inside the frame like this.

Now, bind your radio to the receiver by following this tutorial: https://oscarliang.com/bind-expresslrs-receivers/.
Once that’s done, we can set up the receiver in Betaflight configurator:
- Go to the Ports tab and enable “Serial RX” for the UART connected to the receiver (UART6 in our example, because we connected it to T6 and R6). Click Save.
- In the Receiver tab, select “Serial (via UART)” in Receiver Mode and choose “CRSF” in Serial Receiver Provider. Enable Telemetry. Click Save.


After this, the receiver should be working. To confirm, go to the Receiver tab, and the bars (channel values) should change when you move the sticks on the radio. If the wrong channels are responding, try a different Channel Map such as “default (AETR)” or “TAER”.
You will need to setup switches on the radio for arming, flight modes and beeper. Follow this tutorial to learn how: https://oscarliang.com/setup-switch-mixes/

If you have any questions, post in the forum: https://intoFPV.com
7. Installing DJI O4 Pro
Connecting the DJI O4 Pro Air Unit to the Speedybee flight controller couldn’t be simpler—just plug in the provided cable and you’re good to go. The O4 Air Unit will be mounted on top of the receiver.

Push the two O4 Pro antennas securely into the holes in the rear TPU antenna mount.

If you’re controlling the drone using ExpressLRS, you may want to remove the SBUS and GND wires from the O4 connection cable. These wires are intended for the DJI remote controller, and leaving them connected can cause conflicts if you’re using the same UART for another device.
Mount the camera between the silicone dampers included with the frame.
If you’re new to flying, you might want to start with a lower camera tilt angle like 10° to 15°. As you become more comfortable and start flying faster, you can increase the tilt to 20° or even 30° for better forward visibility at speed.

Now we’ll configure OSD (On-Screen Display) to show important flight data like battery voltage, flight time, and warnings directly in your DJI goggles.

I have a full step-by-step guide here if you want more detail: https://oscarliang.com/how-to-setup-dji-o4-pro/
To summarize the process:
- In Betaflight Configurator, go to the Presets tab.
- Search for “OSD for DJI”.
- Select the preset you find.
- In the options, select “map to displayport”, “set HDOSD”, and the UART you’ve connected the O4 to (in our example that’s UART1).
- That’s it.


Now, head to the OSD tab, enable your favourite elements and move them around as you wish. Make sure you’ve selected HD under Video Format so you are using all the screen space available. I have my own OSD layouts if you want to copy: https://oscarliang.com/betaflight-osd/#My-OSD-Setup-CLI-Commands

8. Finishing Off
Secure the flight controller (FC) with nylon nuts.
Tighten only by hand to avoid over-compressing the silicone grommets (or rubber gummies) as it could reduce vibration damping and defeat the purpose of soft mounting. Inspect the gummies, there should’t be any visible gap between them, and ideally your flight controller should have a slight amount of play when pressed. This flexibility allows the gummies to properly absorb frame vibrations.

Next, install the top plate.

Here are the weights of the completed drone:
- Drone including propellers and battery strap: 453g
- Drone + 6S 1100mAh LiPo: 645g
- Drone + 6S 1100mAh LiPo + GoPro 13: 802g

When installing the propellers, pay attention to the different rotations—CW (clockwise) and CCW (counter-clockwise). Ensure they are installed on the correct motors; otherwise, your quad may not take off or could flip over when trying to.

Use M5 nylon lock nuts to hold the propellers securely on the motor. Tightening might be challenging at first but will become easier over time. Avoid overtightening to prevent prop hub shattering. Tighten just enough so the prop can’t move when you try to rotate it with your hand while holding the motor bell.
A dedicated prop nut tool can speed up prop changes.

When mounting the battery (and GoPro), ensure the COG (center of gravity) is as close to the drone’s center as possible. To check if the battery is placed correctly, grab the middle of the top plate with two fingers and see if the quad stays level. It’s essential to maintain the COG at the center of the four motors. For instance, if the quad is front-heavy, the front motors will work harder than the rear motors when trying to maintain its position, negatively impacting flight performance.

And we are ready for a test flight!


9. Setting Up Betaflight

We’ve already covered much of the Betaflight setup during this build. However, to double-check everything and ensure nothing is missed, follow my complete beginner’s tutorial here: https://oscarliang.com/betaflight-firmware-setup/
10. Tuning
Tuning your quadcopter involves adjusting it to fly and behave the way you want. Betaflight has come a long way; you don’t have to tune your quad, and it will likely fly just fine with stock settings. However, if you’re serious about performance, there’s more to learn!
For most people, tuning an FPV drone involves adjusting these settings:
Tuning is quite technical and sometimes involves the use of Blackbox logs. If you don’t know how to use Blackbox, this is how to tune your FPV drone in 10 simple steps. If you’re familiar with Blackbox, check out this in-depth guide on tuning filters and PID.
Before tuning, though, I’d recommend flashing Bluejay firmware to the ESC if they come with BLHeli_S firmware, it will give you better performance. When doing so, you’ll need to choose between the 24kHz or 48kHz versions. The 24kHz version provides better responsiveness and torque, while the 48kHz version offers smoother flight with slightly less torque. I recommend 48KHz. You can also enable bi-directional Dshot, and turn on RPM filter once you’ve flashed Bluejay. It’s one of the best filters available in Betaflight and makes your quad flies better.
I will share my PID and Filter tune for this build in my Patreon shortly, if you want to try my tune, consider subscribing: https://oscarliang.com/patreon-support-announcement/
11. Learning How to Fly
If you have little to no experience flying a mini quad, consider checking out these tutorials to get started:
- Practice with FPV simulators
- Tips and Exercises to learn FPV flying
- Finding FPV flying difficult? Here are some advice from different pilots
If you have any questions, feel free to ask in the comments.
You can check my past build guides (some info is outdated):
- 2023 (DJI Vista): https://drive.google.com/file/d/1-pClBJSi2yo4warQ_BkAtSCr6jgu6VqB/view?usp=drive_link
- 2020 (DJI Vista): https://drive.google.com/file/d/11-QBBVgNaPU-qeGUABUy_Np6zEWEFSn1/view?usp=share_link
- 2020 (4in1 ESC + analog): https://drive.google.com/file/d/1dWlCwGVU8NZAL00of8RBshyjXov2LDDW/view?usp=share_link
- 2018 (single ESC + analog): https://drive.google.com/file/d/1CvMcbZd7Wo2KRcxXvyaJ8WZrsAD9q0Li/view?usp=share_link
94 comments
I hope I have on order most of what I need for this build. Will see as time passes and then I can start building. Looking forward to it.
Hi Oscar. OK, just found this and I am considering possibly maybe doing this build. Currently flying a DJI Mini 4 Pro and Avata 1. I believe that my DJI Goggles Integra and my DJI Remote Controller 2 are compatible with this build.
Do you have any updated parts lists? It seems some parts may not be readily available from US sources. I ask because of the current shipping issues.
Any other advice?
Feel free to contact me directly.
Wally
Hey, im planning to build a micro FPV drone, did you have any guides or tips to help me ?
Hi Oscar
I wonder if the DJI goggles N3 and the DJI RC 2 controller work with this build ?
The N3 only works with RC3, not the RC2.
And No, the N3 doesn’t work with this air unit, only the O4.
Are there any good video tutorials building the DJI drone above?
Hi Oscar, i don’t understand why i won’t need sbus on my dji camera setup? Would you mind to explain it to me? And what’s the different between using sbus and not?
If you want to control the drone using DJI’s remote controller, then you’d need SBUS wire. If you are using other radios, like ExpressLRS radio link, then you won’t need it.
With the 6s 1000 mah battery, how long will my flight time be around? Is it capable of doing stunts? Not that I’m any good yet lol.
Around 4 to 6 minutes? It really depends on your setup, and how fast you are flying.
Can I connect the drone to a DJI controller with a phone holder? I don’t have goggles and don’t want the extra expense to buy some.
If you want to fly FPV drones, goggles are strongly recommended.
If you don’t plan to fly with goggles, just your phone, DJI camera drones are better options: https://oscarliang.com/dji-drones/
Hi,
Question, will the RadioMaster Boxer EdgeTX RC Transmitter – ELRS 2.4GHz – Transparent – ELRS be compatible with the DJI build in this page? I am building it currently and just ordered it.
ELRS and DJI FPV system can be used in the same build, no problem. Just make sure your flight controller has enough UART for all these devices.
Is this build more powerful than Avata 2?
There’s no comparion. A 5″ freestyle drone is WAY more powerful and much faster.
Hey Oscar, great guide thank you! I’ve mostly used the same parts as you have suggested and it looks like everything is working correctly although I haven’t flown the drone yet. My question was regarding temperatures. What sort of temps SHOULD the TX800 and a camera such as the CADDX Ant get up to? My TX800 is too hot to touch when powered up. My camera is fairly warm too, although not too hot to handle.
It’s normal that VTX gets very hot. Make sure the VTX antenna is attached when you plug in the battery. It’s important that you don’t leave the drone powered on the ground/bench for too long without proper cooling / airflow. Always try to take off as soon as you plug in the battery to avoid VTX overheat.
Hello,
Thank you for this guide. I am new in the FPV world. I already bought a DJI FPV with Dji controller 2 and Dji googles V2. Is the controller and googles compatible with this build? I dont want to buy all new equipment :)
Yes.
Hi Oscar, thanks a lot for your amazing work. I’ve built this exact setup in digital. I’ve run into a problem, I can’t mange to enable OSD. I’ve double checked the solderings, and flashed the firmware on my Integra googles and on the video transmitter. I’ve been trying to solve this problem for a couple of days but I can’t find what’s wrong.. Any idea ?
Are you using the Vista? It might be this: https://oscarliang.com/caddx-vista-vtx/#OSD-Disappear-Fix
Hi,
How do you get the TX800 to transmit audio?
You can’t, it doesn’t have a built-in mic, nor does it have an audio input for external mic. You will need a different VTX if you want audio.
Hi Oscar,
I can’t seem to get the osd up im using dji goggles integra andy help would be gratly appreciated.
Hey man. How do you record your session while flying? Following your build exactely as is and I have a TX16s radio with dji goggles v2
You can record video inside the goggles, it’s called DVR.
damn, its something wrong with me bc i no more can’t focus. i can’t read all that i am giving up. i don’t have money eighter and i am stupid.
Oscar, excellent guide. I build one (the first one) using your guide entirely.
The issue that I’m facing is that out of nowhere it goes crazy (like a runaway), if you see the black box log… it is stable until it is not and for no apparent reason.
Motors go from 0 to 100% and then 0% back again… I lost already a 6S pack on the first flight. Now, I’m testing in the bench with no propellers on. I tried everything flashed to early versions, check and recheck orientation and flight controller mount, frames cracks, etc. I’m inclined to disable the PID setup in the flight controller and starts from scratch on its configuration.
Any clue what could be the reason for suck behavior and what should I look out first?
how can I show you the log?
maybe you can put your log in google drive or dropbox, then send me the “share link”?
A bit more info would be helpful – like pictures of your build.
Thanks Oscar.
drive.google.com/file/d/1D-aM6fpYLmCKemfkgUjDI-KNjnxDd52q/view?usp=sharing
drive.google.com/file/d/1Bt6_7wG4rK2gRYB7QJ-GGGtAz0q8iiDM/view?usp=sharing
I’ll take some photos of the build, but it has the same parts that you used in this article :)
SpeedyBee F405 V3
MAX ECO 2306-1900KV
TBS SOURCE ONE V5 5INCH
First thing first, your mid points need calibrated properly (both sticks), they are not centered when resting, causing the drone to drift. Follow this guide: https://oscarliang.com/adjust-tx-channel-mid-end-point/
And after you take off, the 2nd motor and 4th motor (front two motors) just goes to zero output which is weird, could be related to the mid point issue – do you have a video of the issue? I’d like to see what actually happens.
Hi Oscar, Thanks for the reply.
Done, I run the setup of mid, low and high points. I have a Jumper -T little running 2.9.4
Correction note: Motors are EMAX ECO II Series 2207 Motor – 1900Kv
I have collected photos and logs of this afternoon test.Also I add a backup on the configuration.
drive.google.com/drive/folders/1IXL8Pf_f5kZJVrTdUDlNTy1FF9YuABQD?usp=sharing
Could it be a faulty capacitor?
Thank you for your support. I really appreciate it, so I can move forward with this interesting hobby.
Are you testing this on the bench without props? If that’s the case I’d suggest putting some propellers on, and test it outside where it’s safe.
The motors ramp up because of “air mode” when it’s on the bench, and that’s normal.
By the way, your center points of the right stick is still not centered properly, but that’s just a minor issue, shouldn’t prevent you from taking off.
Hi Oscar,Thanks for the reply.Yes, I’m testing it without the props because it was a mess when it failed the first time. As the log shows, it goes “nuts” for no reason and (as far as I can understand) randomly. Because of this, I have removed the props and I’ll connect them once the unit behaves on the bench. :)Also, I have disabled airmode from betaflight, also, I have set it up Master Multiplier at 0.5 (same behavior that at 1)
My expectation is that the drone should arm, motors should spin “forever” until a command is given. This (sometimes) is not happening as the log shows.
Could this behavior be related to a bad capacitor or soldering issue? Do you mind checking the logs, I see no parameter going off prior to the morotos oscillating between 0-100.
I’m on my way to change the flight controller.
Right okay. Looking at the logs again, I think it could be a faulty Gyro on the flight controller – the Roll and Yaw axis are super noisy compared to the pitch and I think that could be why it went nuts. Glad you have a new FC coming to confirm this.
Thanks Oscar,
I’ll keep you posted.
FYI, in the meantime I’ll try to re-soldeir the capacitor to see of this had an effect based on this article from SpeedyBee speedybee.zendesk.com/hc/en-us/articles/22722846255131-The-Impact-of-Capacitor-Wire-Length-on-Gyroscopes
Regards
GS
It’s true that longer wires reduces low ESR capacitors effectiveness, but what they don’t tell you in the article is how long the “long wire” is and what gauge wires they used in the example. It also depends on how noisy the quad was in this demonstration without capacitors. You will be surprised how well the capacitor still works well within a reasonable wire length and using the my recommended wire gauge. If the wires were 28 gauge thin and 1 meter long, it would be like not having a capacitor at all. I’m not saying they’re doing that just to make a point and shift the blame to the user, but we are missing some key information in the testing they’ve done.
Hi Oscar,
FYI – You were right. No change with he re-soldering, shorter capacitor. I’m waiting for a new FC to swap the top section and see if the problem disappear. In the previously shared google link I have updated a folder with photos and copy of the last log showing the persistent random issue. keep you posted and talks for the support :)
Hi Oscar,
I replaced the FC (top part) and the issue seems resolved. (I’m still wearing the helmet during testing jejejeje). I have updated some picts/logs in the same shared folder for everybody reference.
Thank you for your help and ideas….for sure I’ll bother you again.:)
I had this issue and found that switching from DSHOT600 (default on my FC) to DSHOT300 fixed it perfectly.
Used all the recommended parts in this build tutorial
Hi, I used your guides to build a killer drone. They are all so good.
Ware I am stuck at, Oscar is what would I enter in the CLI in Betaflight for the VTX TX800 Ultra I want to be able to use the 1.6W in the OSD?
Absolutely amazing guide! I’m going to copy the majority of this build! My only question is do you think there’s a way to keep the capacitor mounted in the back of the quad? It looks like there is some room around the vtx area. Just curious!
Hey Oscar, just wanted to say thanks for putting all this information out there, your website was my go to when I recently found out about the hobby.
I copied about 90% of the analog build and I’m having a blast, I’m finally starting to be confident to move like I do in simulators, I hit my first powerloop yesterday!
Hey Oscar, just wanted to thank you so much for this tutorial. Was my first 5″ drone and I’ve had an absolute blast with it as a beginner pilot. I made a YT video going over the parts/build process to first flight and linked all your info.
https://youtu.be/_-fTIqS6Oiw?si=UR-4pEPigkM8Ejnw
Thanks again! Tim.
Hey Oscar – I’m about to try this exact build (digital version) for my first build! Thanks so much for the tutorial. One question – I only have the DJI controller 2, will I be able to use that controller with the vista and just not bother about soldering the ELRS receiver? It does say that you can do that on the runcam website but just wanted to be sure.
I would like to swap over to ELRS eventually but for now I’d rather save the extra money and use my DJI controller.
Thanks again,
Tim.
I am not entirely sure as I don’t have the DJI Controller 2, but according to this compatibility chart it looks like it’s not compatible with the Vista: https://oscarliang.com/dji-o3-air-unit-fpv-goggles-2/#Compatibility
Hi,
This is a great guide. I was wondering if you had any suggestions to maximize the flight time for this build (like, 20 min per charge). I just like to enjoy the sights and don’t really need a super agile racing drone. I’m thinking of using the Digital DJI build but with the new O3 unit like others here have suggested. For this case, would it be better to:
Swap out the 6S LiPo battery with a 6S Li-ion? And if so, is there a good mAh range to consider?
Reduce the kV of the motors to something like 500 kV to 900 kV? Would that make it underpowered? Not sure what the sweet spot would be.
Maybe slightly different propellers? Larger ones might get more lift but there’s only so much you can fit on a 5″ frame.
And could I keep all of the other components the same? I.e. same FC & ESC Stack? The SpeedyBee F405 V4 looks pretty good as an upgrade from the V3.
I have a guide on extending flight time here: https://oscarliang.com/improve-fpv-drone-flight-time-efficiency/
Do I need to use Receiver rp1elrs if I want to use same build but with dji o3 ?
No you can just use the o3 alone :)
Hi Oscar! great tutorial, however when I plug my drone into my PC the VTX does not light up. Is it faulty or could it be my soldering job?
The VTX only gets power when you plug in the battery. The USB connection to the FC won’t power the VTX.
Is the instalation of dji o3 is similar like you did it here with wasp cam ? Considering everything else is the same
Not really it’s more complicated to installed in this frame. But You could probably just double sided tape it down and zip tie it to the frame. However for the camera, you will need some sort of 3D printed adapter because the lens is too big to fit inside the frame.
Wonderful stuff!
Have you considered hands -on training? Or are you already doing physical training or online? There could be some good business for you , if you are interested. Thanks a alot.
I am not doing hand on training currently, but if there’s an opportunity I would definitely consider it :)
Will this frame be compatable with dji o3 air unit ?
Yes but you need an 3D printed adapter to mount the camera as it sticks out in the front
Could you suggest something where I should look for ?
Hey Oscar, this is probably a noob question, but I’ll ask it anyway. I’m going to build my first drone, will be following your amazing tutorial, but I am going to use Walksnail Avatar for fpv. Can you recommend a camera will be a good choice for Walksnail? Don’t really care about image quality as far as it’s not analog :)
Thank you!
If you mostly fly during the day, I think the V2 camera is a great option. For low light, the Pro is the best option.
For budget option the new V3 nano kit is also worth considering though the image is not as good as the other two cams.
Hello, the tutorial and everything looks very special and great and everything. but how do i fly it? i mean with what controller? how do i connect the controller? and gow to i get the video that the camera is recording, and mainly how do i connect the fpv it self indp a vr goggles or a phone???
Hey Oscar, Thank you so much for this guide. This is my first fpv drone and just flying around has been a blast. I was sent the dji goggles 2 by mistake when I ordered the v2 goggles. With the goggles 2 I can’t seem to get the osd to work which makes flying a little worrisome as I can’t see the battery voltage. Is there a fix or workaround for the goggles 2 or do I just need to wait until there is more aftermarket support available for them?
Betaflight OSD is fully supported with the Goggles 2, including drone battery voltage. Take a look at the setup guide if you haven’t already: https://oscarliang.com/dji-o3-air-unit-fpv-goggles-2/#OSD
It says on their website that it works with the OG DJI controller – praying it works with the DJI C2. Otherwise happy to switch over to ELRS anyway. Thanks Oscar, looking forward to doing this for my first build and appreciate the tutorial.
Hi Oscar! Love your guides, helped me a ton getting into FPV and setting up my first quad.
So I built pretty much the same quad as you except for the frame and I use an DJI O3. But when I try to tune my quad like you did in the guide and enable RPM filtering with my Speedybee F405 V3 stack, I can’t figure out how to get my GYRO/FILTER/PID rates/hz down to 3200. I’ts pretty much always at 3250 to 3255 even with it’s stock config. So I can’t get it to less then 1% that you mention in your RPM filtering guide. Been trying to search the internet and get some answers but atm I’m just lost.
Would love to hear your response!
Keep up the awesome work!
Best regards Robin
In your case, I personally wouldn’t worry about it, the “1% difference” is just to give people a rough idea what they should be looking for. What we don’t want to see is the Gyro/PID drops below its target, which could be an indication that the FC processor is not keeping up. Take a look at your CPU load also, ensure it’s no higher than 75% (per Betaflight Developers’ recommendations), then you should be good to go. Do some test flight and make sure it’s working fine before further changes.
Thanks alot for your respone! My quad is flying great and I’m loving it! Thanks for what you do and keep doing it!
You’ve helped me alot with getting into FPV your guides and I’m learing so much!
Have a great day and keep up the awesome work!
Best regards Robin!
Hi there thank you for your detailed instructions on how to build a drone it’s very clear and awesome. However I would like to build a larger drone from say 7inch upto around 12inch. Maybe larger if possible. I would like it to be a long range drone aswell. Really I would like to create a monster of a drone high speed altitude and 3d capabilitys and I was wondering if you could help me a bit regarding your knowledge many thanks
tankk you for great toturial ….good job
Hey, after I plug in cable connecting ESC with FC and testing it with multimeter I have a beep. After disconnecting cable beep is gone. Can it be that connector cable is broken, or should I look somewhere else?
Hey, I found the issue – pin in the plug were touching
What’s cost of this kit?
Around 350-400$
Love all the detail! Thanks a ton! I got this put together a few weeks back and have been having a ball getting used to everything since it’s my very first FPV built. I did notice that the video quality coming to my DJI FPV goggles v2 is quite a bit pixelated. From 5m to 100m in a clear field the feed is no where near a clear picture. I’m honestly afraid to fly further since it’s so difficult to make out the image. Interestingly to me, it’s worse when I’m low to the ground and closer than when I am higher and just a bit further away.
Any suggestions, tips, tricks I should try would be greatly appreciated. I’m think that it might be interference and was thinking about resoldering the vtx with more twists in the line (I feel like I read somewhere that it’ll help shield from electrical interference).
your video link doesn’t sound normal and you should troubleshoot it.
– check all the antennas (on your VTX and Goggle) if they are attached properly.
– change to anther channel (avoid flying in channel 8 / channel P, that’s public channel)
– increase your output power if possible
– try flying somewhere else and see if that improves? maybe interference nearby.
Very helpfull
This artikell is detil and help me to learning about drone FPV.
Hlw,
Your work has been really helpful to me.
I am still waiting for the Speedybee f7v3 build.
Pls make it
Thanks in advance,
From india
I really like the presentation! Trouble is, I want to build something more like the Air 2s : lots of flight time, great pix ! Is it too hard ? Cliff
Oscar, thanks for the great tutorial! I have started the project following your tutorial but i want to use 4S batteries since I already have them from another hobby – could you please suggest what should be changed in the project? Which motors and propellers should be used according to your experience? Thanks in advance.
Simply get the 2755 KV version of the motor I suggested (you can pick on the product page I linked to), or any other 2207 motors with around 2400KV-2700KV should also work fine for 4S.
What is the range of this drone with the circular polarised antenna and the speedy bee vtx and something like the machine ev800d???
Very, very Good.
I am looking at building the DJI build what controller and fpv headset is needed thanks for the step by step and all the links
Thank you so much for creating this wonderful resource. I’m helping my son work through this to build his first FPV drone. Your instructions have been invaluable.
I would be grateful if you could explain this note from section 8:
We won’t connect the SBUS and GND pads in the Vista, so we can cut those two wires off in the cable.
How do you know not to connect these two wires? What would happen if we went ahead and connected them?
Thanks so much!
So the Vista has built-in receiver capability if you have a DJI FPV Remote to use with it, it outputs SBUS signal you can connect that to the flight controller.
But because we are using an external radio receiver, in this case an ExpressLRS receiver, we won’t need to connect the SBUS pad. You can connect them but they won’t do anything.
I recommend using an external radio receiver, the receiver in the Vista normally loses signal (giving you failsafe) before you lose video so it’s not really ideal.
Hey Oscar, great tutorial here. I just had one question. I want to install the caddx vista and presumably I would need to install the receiver as I am using the DJI remote v1?
if you are using the DJI remote v1, then no, you can use the Vista as your radio receiver, just connect the SBUS pad on the Vista to your FC, and configure it in Betaflight. See instructions here: https://oscarliang.com/dji-fpv-system-setup/#Using-DJI-Remote-Controller
Hi Oscar your information is very good, and very informative, we already modified from analog to Digital, we used Runcam Link, but we ran into some problems after that, the battery dropped to 10 volts (Lipo 4s) after flying for less than 1 minute, can you advise for this trouble ?
I am new to the whole scene and looking into building my first fpv drone and have a question regarding the battery used and the total weight. How much would using a 4S battery impact the total weight of the drone? Would you be able to build a similar 4S quad which is less than 500g, considering sub 500g quads can be flown basically everywhere where as there are some restrictions on drones heavier than 500g where I live. Or could this also be achieved by using a smaller capacity 6S battery than used in the guide?
It’s totally possible to build a 5″ drone that weighs below 500g (including battery), for example the Emax Hawk Apex. Ultimately it just depends on the components you want to use and what kind of performance you want to get out of it.
The weight of a battery does not depend on cell count, but the total watt hour (energy stored in the battery). For example, a 4S 1500mAh battery would weigh similar to a 6S 1000mAh, because they have the same watt hour (= voltage * capacity).
You can totally use a smaller 6S battery with the drone we build in this tutorial, the only downside is shorter flight time. By reducing the weight of the drone, you can get some of the lost flight time back, for example, by using lighter components.
Hi Oscar,
I had recently built a quad using this guide, it was really helpful. For motors I had used Emax Eco 2 2207 1900KV.
It flies pretty well on a 4s, but on 6s it seems to be freaking out sometimes. How could I proceed as, on 4s it feels underpowered..